
How to Create Customer Account Group in SAP
 Editorial Team
⚡ Smart Summary
Customer Account Group in SAP FI controls master-data field status, number ranges, and one-time customer behavior. This walkthrough explains how to configure account groups through transaction OBD2 so finance teams can standardize customer master records and enforce consistent data quality.
What Is a Customer Account Group in SAP FI?
A Customer Account Group in SAP FI is a classification key that groups customer master records sharing the same business characteristics, number range, and field status. The account group is assigned to every customer during creation through transaction XD01 or FD01, and it determines which fields are visible, required, optional, or suppressed in the master-data screens. It also controls the number range for customer IDs and indicates whether the group is reserved for one-time customers.
Common standard SAP account groups include 0001 (sold-to party), 0002 (goods recipient), 0003 (payer), 0004 (bill-to party), and CPDA (one-time customer). Custom account groups are typically created for specific business scenarios such as inter-company customers, employees treated as customers, or affiliate sales channels. The account group is a master-data governance lever that keeps the customer database clean and consistent across the organization.
Why Configure a Customer Account Group?
Configuring a Customer Account Group lets the FI Accounts Receivable team enforce a consistent data-entry standard for every customer master record. By defining field status at the account-group level, the implementation team can hide irrelevant fields, force critical fields such as tax number or payment terms to be mandatory, and present only the master-data sections that apply to that customer type. The result is fewer data-quality issues downstream in invoicing, dunning, and reporting.
Account groups also separate number ranges, which makes it easy to identify customer types at a glance. For example, domestic customers can use one range while foreign customers use another. The one-time customer flag is another reason to maintain dedicated groups so that walk-in or single-transaction customers do not pollute the regular customer database. Together, these controls support a clean order-to-cash process and a reliable AR sub-ledger.
Steps to Create a Customer Account Group in SAP
Follow the sequence below to define a new customer account group through the SPRO Customizing path (transaction OBD2). Each step builds on the previous one, so make sure you have authorization for FI Customizing and a valid Customizing Request before starting.
Step 1) Open Transaction SPRO
Enter the transaction code SPRO in the SAP Command Field and press Enter to launch the Customizing screen.

Step 2) Select SAP Reference IMG
In the next screen, select the SAP Reference IMG button to open the Implementation Guide tree.

Step 3) Navigate to the Account Group Node
In the Display IMG screen, follow the menu path: Financial Accounting -> Accounts Receivable and Accounts Payable -> Customer Accounts -> Master Data -> Preparations for Creating Master Data -> Define Account Groups with Screen Layout (Customers).

Step 4) Press New Entries
In the next screen, select the New Entries button from the Application Menu Bar to start creating a new account group.

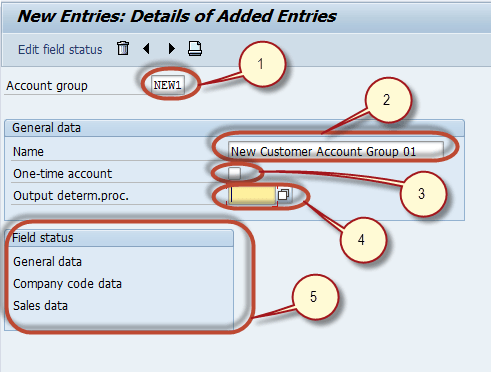
Step 5) Enter the Account Group Details
In the next screen, enter the following details for the new account group:
- Enter a unique key as the Account Group key
- Enter a short description for the Account Group
- Check this flag for creating an Account Group for One-Time Customers
- Enter the Output Determination Procedure
- Select the Master Data Section for which you want to maintain the field status
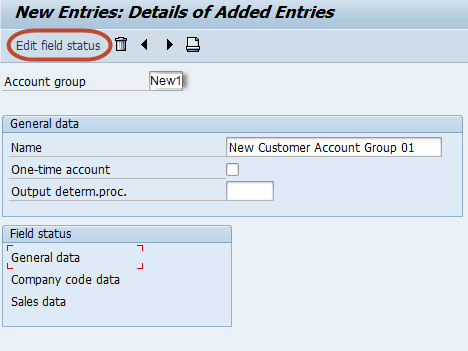
Step 6) Edit Field Status
Press the Edit Field Status button to maintain the field status of the selected Master Data section.
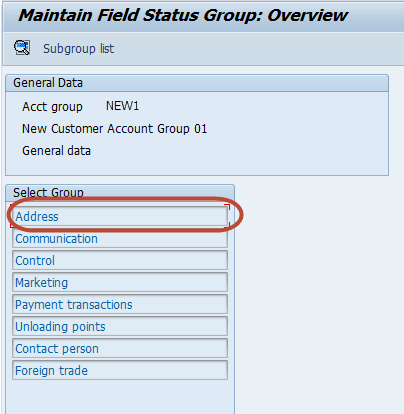
Step 7) Select the Field Group
In the next screen, select the Group of fields for which you want to maintain the field status.
Step 8) Maintain the Field Status
In the next screen, maintain the field status of fields in the selected Group (Suppress, Required, Optional, or Display).
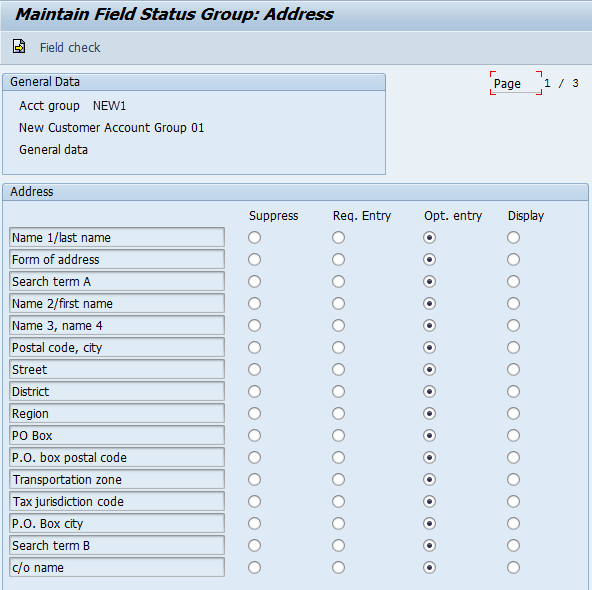
Similarly, you can maintain the field status of other Master Data sections and their Groups. After maintaining the field status, press Save in the SAP Standard Menu to create the Account Group.

Step 9) Assign a Customizing Request
In the next screen, enter the Customizing Request Number to capture the new Customer Account Group in a transport for promotion to QA and PROD.
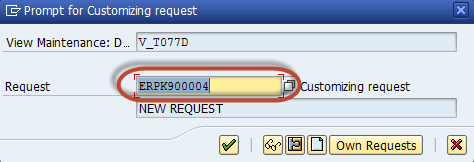
You have successfully created the Customer Account Group in SAP.
How to Verify the New Customer Account Group
After saving, you should always verify the new account group so that it behaves as expected before users start creating customer master records. Open transaction XD01 and create a test customer using the new account group. Confirm that the number range, field status (Suppress, Required, Optional, Display), and one-time customer flag follow the configuration done in OBD2.
Cross-check the entry through OBD2 again to confirm the account group is saved against the assigned transport. For the number range link, use transaction XDN1 to verify the range assignment, and check the customizing request through transaction SE10 to confirm the request is ready to be released.
Common Errors and Troubleshooting Tips
Several validation messages can appear when configuring a Customer Account Group. The most frequent are listed below along with the typical resolution:
- “Account group XXXX already exists”: The key is already used; choose a unique 4-character code or update the existing group instead.
- “No authorization for transaction OBD2”: Customizing authorization is missing; request role SAP_FI_CUSTOMIZING or equivalent from the Basis team.
- “Field status group not maintained”: Maintain the field status for each Master Data section before saving the account group.
- “Number range interval not assigned”: Use transaction XDN1 to assign a valid number range to the new account group.
- “Customizing Request is locked”: Either select a different open request or unlock the current request through SE10.
Best Practices for Customer Account Group Setup
Apply the following practices to keep customer master data clean and audit-ready. They reduce manual rework, simplify data governance, and improve reporting consistency.
- Reserve a separate account group (e.g., CPDA) for one-time customers so that the regular customer database stays clean.
- Use the field status to make tax fields, reconciliation account, and payment terms mandatory for every standard customer.
- Align number ranges to account groups so customer IDs visually indicate the customer type (domestic, foreign, inter-company, employee).
- Always capture the account group in a Customizing Request and follow the standard DEV to QA to PROD transport path.
- Document each custom account group, including its purpose, field status, and number range, in the FI configuration guide.
