How to Download & Install NLTK
⚡ Smart Summary
Download and Install NLTK on Windows, Mac, or Linux by installing Python first, then adding the Natural Language Toolkit through pip or Anaconda and downloading the corpus datasets.

Installing NLTK in Windows
Learn how to set up NLTK on Windows from the command prompt. The instructions below assume Python is not installed yet, so the first step is to install Python.
Installing Python in Windows
Step 1) Open the link https://www.python.org/downloads/, and select the latest Windows release.

Note: For an older version, visit the Downloads tab to see all releases.

Step 2) Click the downloaded installer file.

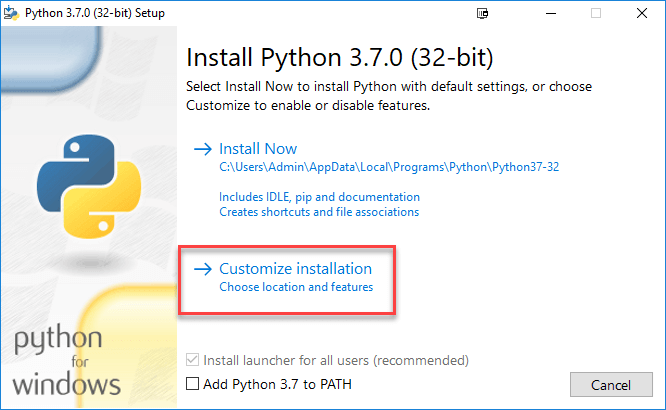
Step 3) Select Customize Installation.
Step 4) Click NEXT.

Step 5) On the next screen:
- Select the advanced options.
- Provide a custom install location. In this example, a folder on the C drive is chosen for easier access.
- Click Install.

Step 6) Click the Close button once the install finishes.

Step 7) Copy the path of your Scripts folder.

Step 8) In the Windows command prompt:
- Navigate to the location of the pip folder.
- Enter the command to install NLTK:
pip3 install nltk
- The installation should complete successfully.

NOTE: For Python 2, use the command pip2 install nltk.
Step 9) From the Windows Start menu, search for and open the Python Shell.

Step 10) Verify that the installation works by running the command below:
import nltk

If no error appears, the installation is complete.
Installing NLTK in Mac/Linux
Installing NLTK on Mac or Linux requires the Python package manager pip. If pip is not installed, follow the instructions below to complete the process.
Step 1) Update the package index by typing the command below:
sudo apt update
Step 2) Install pip for Python 3:
sudo apt install python3-pip
You can also install pip through easy_install:
sudo apt-get install python-setuptools python-dev build-essential
Once easy_install is installed, run the command below to install pip:
sudo easy_install pip
Step 3) Use the following command to install NLTK:
sudo pip install -U nltk
sudo pip3 install -U nltk
Installing NLTK through Anaconda
Step 1) Install Anaconda by visiting https://www.anaconda.com/products/individual and selecting the Python version you need.

Note: Refer to this tutorial for detailed steps to install Anaconda.
Step 2) In the Anaconda prompt:
- Enter the command:
conda install -c anaconda nltk
- Review the package upgrade, downgrade, and install information, then enter yes.
- NLTK is downloaded and installed.

NLTK Dataset
The NLTK module ships with many datasets that you need to download before use. Technically, each dataset is called a corpus. Common examples include stopwords, gutenberg, framenet_v15, large_grammars, brown, and wordnet.
How to Download all packages of NLTK
Step 1) Run the Python interpreter in Windows or Linux.
Step 2)
- Enter the commands:
import nltk
nltk.download ()
- The NLTK Downloader window opens. Click the Download button to fetch the dataset. This process takes time depending on your internet connection.

NOTE: You can change the download location by clicking File > Change Download Directory.

Step 3) To test the installed data, use the following code:
>>> from nltk.corpus import brown
>>>brown.words()
[‘The’, ‘Fulton’, ‘County’, ‘Grand’, ‘Jury’, ‘said’, …]

Running the NLP Script
This section explains how an NLP script runs on a local PC. The right library choice depends on your requirements. See the official list of NLP libraries for alternatives such as spaCy, gensim, and TextBlob.
How to Run NLTK Script
Step 1) In your favorite code editor, copy the code and save the file as NLTKsample.py:
from nltk.tokenize import RegexpTokenizer
tokenizer = RegexpTokenizer(r'\w+')
filterdText=tokenizer.tokenize('Hello Guru99, You have build a very good site and I love visiting your site.')
print(filterdText)

Code Explanation:
- The objective of this program is to remove every kind of punctuation from a given text. We imported “RegexpTokenizer”, a module of NLTK that removes any expression, symbol, character, or numeric value you choose.
- A regular expression is passed to the “RegexpTokenizer” module.
- The text is tokenized using the “tokenize” method, and the output is stored in the “filterdText” variable.
- The result is printed using “print()”.
Step 2) In the command prompt:
- Navigate to the location where you saved the file.
- Run the command
python NLTKsample.py.

The output is:
[‘Hello’, ‘Guru99’, ‘You’, ‘have’, ‘build’, ‘a’, ‘very’, ‘good’, ‘site’, ‘and’, ‘I’, ‘love’, ‘visiting’, ‘your’, ‘site’]