
How to Host a Website on IIS: Setup & Deploy Web Application
 Editorial Team
⚡ Smart Summary
Hosting a Website on IIS involves installing Internet Information Services on Windows Server and deploying an ASP.NET application to it. This resource explains what IIS is, how to install it, and how to deploy a web application using both the File Copy and Web Publish methods.

What is IIS?
IIS, or Internet Information Server, is the server used to host .NET web applications. IIS hosting is normally installed on a Windows Server.
For users to access a website, it is required that the website is hosted on some sort of web server. There are different web servers available for different technologies. In .NET, the web server available is called Internet Information Services, or IIS.
Once the web application is developed, it is then deployed on an IIS Server. This web application can then be accessed by the end users. There are two ways to deploy an application to the server, and you will see both here.
- Using the File Copy method.
- Using the Web Publish method.
How to Download and Install IIS
The below diagram shows the process flow for an IIS Server.

- The first part is the request sent by the user. The request will normally be a web page. An example could be http://example.com/Default.aspx.
- Here ‘example.com’ is a website hosted on the IIS Server.
- ‘Default.aspx’ is a web page on the example.com website.
- So the user will enter the URL http://example.com/Default.aspx in the web browser. The request will then go to the IIS Server, which has the example.com application.
- Once the request comes to the IIS server, it is processed. The IIS Server will perform all the required operations as per the request.
- Finally, the IIS Server sends the output back to the user. The output will generally be HTML content sent back to the user. This HTML content will be displayed in the web browser.
Let us look at how we can install IIS on a Windows Server.
- First, download Windows Server from the URL – https://learn.microsoft.com/en-us/previous-versions/dn934703(v=msdn.10) and try it for 120 days.

Once installed, the following steps need to be carried out for installing IIS.
Step 1) Go to Windows Server and Add roles
On Windows Server 2012, the default dashboard is shown as below.
- The first step is to click on ‘Add roles and features’ on the dashboard.
- This allows one to install additional features on a server.

Step 2) Proceed to the next step
On the next screen, you need to click the Next button to proceed.

Step 3) Choose the installation method
In the next step, we need to perform two sub-steps:
- The first is to choose Role-based or feature installation. This will allow us to perform the IIS installation.
- Click the ‘Next’ button to proceed.

Step 4) Select the server
In the next screen, you will see the name of the server on which the installation is taking place. Click the Next button to proceed.

Step 5) Choose the web server option
In the next step, we need to perform two sub-steps:
- Choose the Web Server option. This will ensure that IIS gets installed.
- Click the ‘Next’ button to proceed.

Step 6) Proceed further
In the subsequent screen, click the Next button to proceed.

Step 7) Start the installation
In the final screen, click the Install button to begin the installation.

Once IIS has been installed, you can launch it by going to Search in Windows 2012.
- Enter the string ‘inetmgr’, which is the command for IIS.
- Then Internet Information Services Manager will come up. Click on this.

After you click on the above link, IIS will open, and you will be presented with the below screen.

In IIS, you will have an initial site set up called Default Web Site.
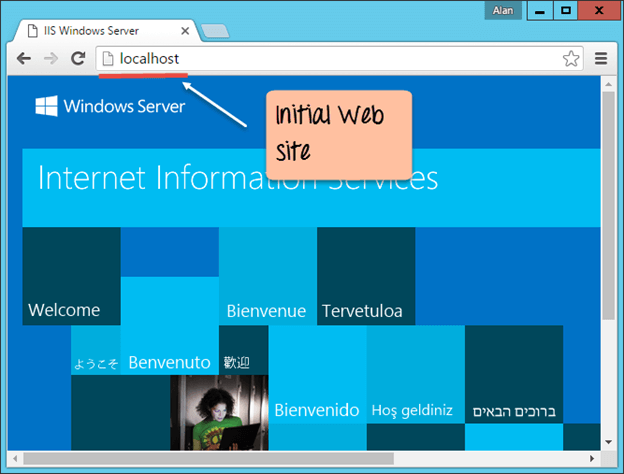
If you open your browser and go to the URL http://localhost, you will see the below output. This URL mainly goes to the Default Web Site shown in the previous screen. This is the default page, which indicates that the IIS Server is up and running.
How to Deploy Website in IIS via File copy
After developing a web application, the next important step is to deploy the web application. The web application needs to be deployed so that it can be accessed by other users. The deployment is done to an IIS Web server.
There are various ways to deploy a web application. Let us look at the first method, which is the File Copy method.
We use the web application created in the earlier sections. Let us follow the below-mentioned steps to host the application in IIS.
Step 1) Let us first ensure we have our web application ‘DemoApplication’ open in Visual Studio.

Step 2) Open the ‘Demo.aspx’ file and enter the string “Guru 99 ASP.Net”.

<!DOCTYPE html>
<html xmlns="http://www.w3.org/1999/xhtml">
<head runat="server">
    <title></title>
</head>
    <body>
      <form id="form1" runat="server">
         <div>
          Guru 99 ASP.Net
         </div>
      </form>
    </body>
</html>
Now just run the application in Visual Studio to make sure it works.
Output:

The text ‘Guru 99 ASP.Net’ is displayed. You should get the above output in the browser.
Step 3) Now it is time to publish the solution.
- Right-click ‘DemoApplication’ in the Solution Explorer.
- Choose the ‘Publish’ option from the context menu.

It will open another screen (see step below).
Step 4) In the next step, choose ‘New Profile’ to create a new publish profile. The publish profile will have the settings for publishing the web application via File Copy.

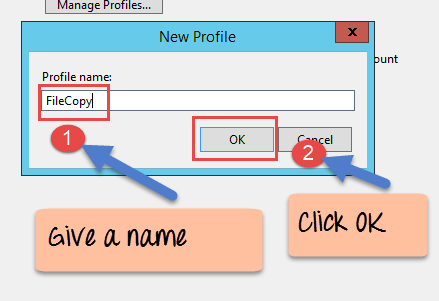
Step 5) In the next screen, we have to provide the details of the profile.
- Give a name for the profile, such as FileCopy.
- Click the OK button to create the profile.
Step 6) In this step, we specifically mention that we are going to publish the website via File Copy.
- Choose the Publish method as File System.
- Enter the target location as C:\inetpub\wwwroot – this is the standard file location for the Default Web Site in IIS.
- Click the ‘Next’ button to proceed.

Step 7) In the next screen, click the Next button to proceed.

Step 8) Click the ‘Publish’ button on the final screen.

When all of the above steps are executed, you will get the following output in Visual Studio.
Output:

From the output, you will see that the Publish succeeded.
Now just open the browser and go to the URL – http://localhost/Demo.aspx.

You can see from the output that now when you browse to http://localhost/Demo.aspx, the page appears. It also displays the text ‘Guru 99 ASP.Net’.
How to Publish ASP.NET Website
Another method to deploy the web application is via publishing a website. The key difference in this method on how to host a web application in IIS is that:
- You have more control over the deployment.
- You can specify which website you want to deploy your application to.
- For example, suppose you had two websites, WebSiteA and WebSiteB. If you use the Web Publish method, you can publish your application to any website. Also, you do not need to know the physical path of the website.
- In the File Copy method, you have to know the physical path of the website.
Let us use the same Demo Application and see how to deploy an ASP.Net application in IIS step by step using the “website publish method”.
Step 1) In this step:
- Right-click ‘DemoApplication’ in the Solution Explorer.
- Choose the Publish option from the context menu.

Step 2) On the next screen, select the ‘New Profile’ option to create a new publish profile. The publish profile will have the settings for publishing the web application via Web Deploy.

Step 3) In the next screen, we have to provide the details of the profile.
- Give a name for the profile, such as ‘WebPublish’.
- Click the ‘OK’ button to create the profile.

Step 4) In the next screen, you need to give all the details for the publish process.
- Choose the Publish method as Web Deploy.
- Select the server as Localhost.
- Enter the site name as Default Web Site – remember that this is the name of the IIS website.
- Enter the destination URL as http://localhost.
- Finally, click the Next button to proceed.

Step 5) Click the ‘Next’ button on the following screen to continue.

Step 6) Finally, click the Publish button to publish the website.

When all of the above IIS hosting steps are executed, you will get the following output in Visual Studio.
Output:

From the output, you will see that the Publish succeeded.
Now just open the browser and go to the URL – http://localhost/Demo.aspx.

You can see from the output that now when you browse to http://localhost/Demo.aspx, the page appears. It also displays the text Guru 99 ASP.Net.
