
UNIT TESTING in Asp.Net: Complete Tutorial
 Jacob Lee
⚡ Smart Summary
Unit testing an ASP.NET application in Visual Studio starts with a Unit Test Project, wires a reference to the target project, adds MSTest [TestClass] and [TestMethod] attributes, and calls Assert methods to prove that classes behave as designed.

Testing is an essential aspect of any programming language. Testing for ASP.NET applications is possible with the help of Visual Studio.
Visual Studio is used to create test code. It is also used to run the test code for an ASP.NET application. In this way, it becomes simple to check for any errors in an ASP.NET application. In Visual Studio, the testing module comes with an out of box functionality. One can straightaway perform a test for an ASP.NET project.
Introduction to testing for ASP.NET
The first level of testing an ASP.NET project is unit level testing. This test is the functionality of an application. The testing is conducted to ensure that the application behaves as expected. In ASP.NET, the first task is to create a test project in Visual Studio. The test project will contain the necessary code to test the application.
Let us consider the below web page. In the page, we have the message “Guru99 – ASP.NET” displayed. Now how can we confirm that the correct message is displayed when an ASP.NET project runs. This is done by adding a test project to the ASP.NET solution (used to develop web-based applications). This test project would ensure that the right message is displayed to the user.
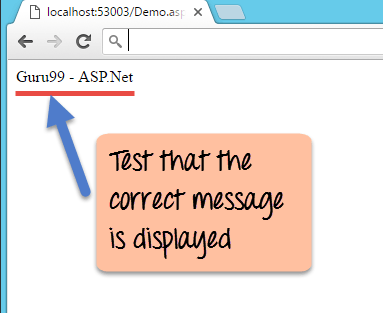
Let us look into more detail now and see how we can work on testing in ASP.NET.
Creating a .NET Unit Testing Project
Before we create a test project, we need to perform the below high-level steps.
- Use our ‘DemoApplication’ used in the earlier sections. This will be our application which needs to be tested.
- We will add a new class to the DemoApplication. This class will contain a string called ‘Guru99 – ASP.NET.’ This string will be tested in our testing project.
- Finally, we will create a testing project. This is used to test the ASP.NET application.
So let us follow the above high-level steps and see how to implement testing.
Step 1) Ensure the DemoApplication is open in Visual Studio.
Step 2) Let us now add a new class to the DemoApplication. This class will contain a string called ‘Guru99 – ASP.NET.’ This string will be tested in our testing project.
Follow below step to add a new class.
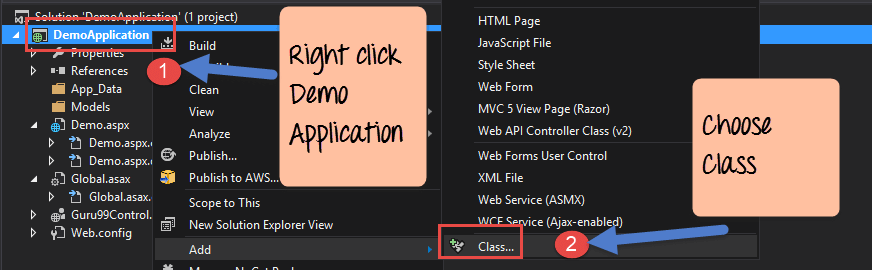
- In Visual Studio, right-click the ‘DemoApplication’ in the Solution Explorer.
- Choose the option Add->Class from the context menu.
Step 3) In this step,
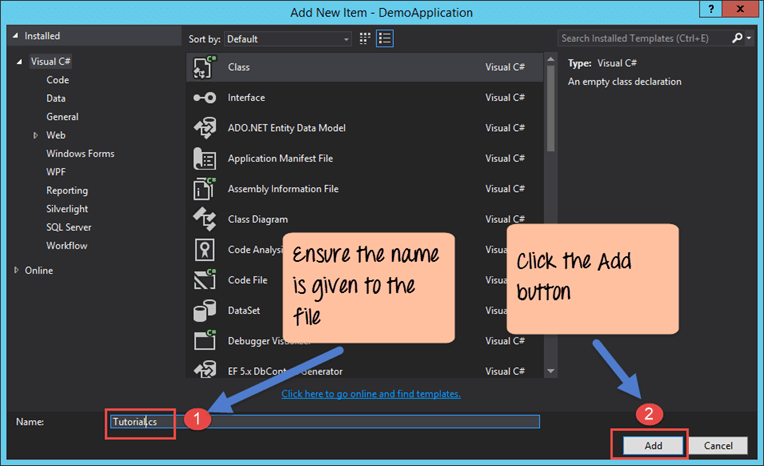
- Give a name ‘Tutorial.cs’ for the new class.
- Click the ‘Add’ button to add the file to the DemoApplication.
Now, a new class is added to file “DemoApplication.”
Step 4) Open the new Tutorial.cs file from “DemoApplication”. Add the string “Guru99 – ASP.NET.”
To open the file, double-click on the Tutorial.cs file in the Solution Explorer.
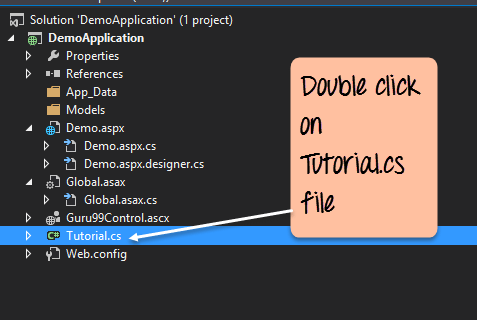
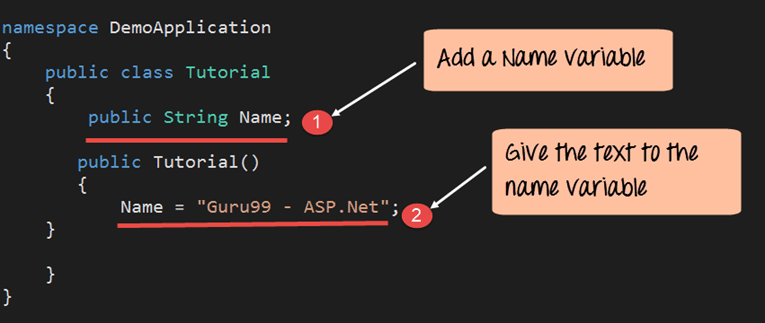
The file will have some default code already written. Do not bother about that code, just add the below line of code.
namespace DemoApplication
{
  public class Tutorial
  {
     public String Name;
     public Tutorial()
     {
        Name = "Guru99 - ASP.Net";
     }
  }
}
Code Explanation:-
- The Name variable is of type string.
- Finally in, the constructor of the Tutorial class, assign the value of the Name variable. The value is assigned to “Guru99 – ASP.NET”
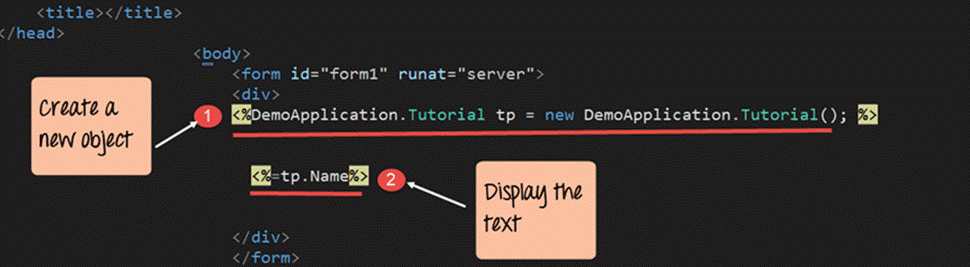
Step 5) Now go to the demo.aspx file and add the lines of code to display the text “Guru99 – ASP.NET.”
<!DOCTYPE html>
<html xmlns="http://www.w3.org/1999/xhtml">
<head runat="server">
    <title></title>
</head>
    <body>
    <form id="form1" runat="server">
    <div>
        <% DemoApplication.Tutorial tp=new DemoApplication.Tutorial();%>
        <%=tp.Name%>
    </div>
    </form>
    </body>
</html>
Code Explanation:-
- The first line creates an object of the class ‘Tutorial’. This is the first step when working with classes and objects. The name given to the object is ‘tp’.
- Finally we call ‘tutorial.cs’ from demo.aspx file. It displays the value of the Name variable.
When you run the above program in Visual Studio, you will get the following output.
Output:-
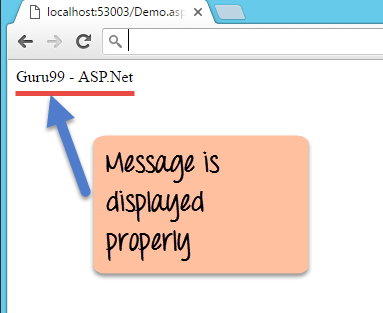
From the output, you see the message “Guru99 – ASP.NET” displayed.
Step 6) Now let us add our test project to the Demo Application. This is done with the help of Visual Studio.

- Right-click the Solution – DemoApplication.
- In the context menu, choose the option ‘New Project’.
Step 7) The step involves the addition of the Unit Test project to the demo application.
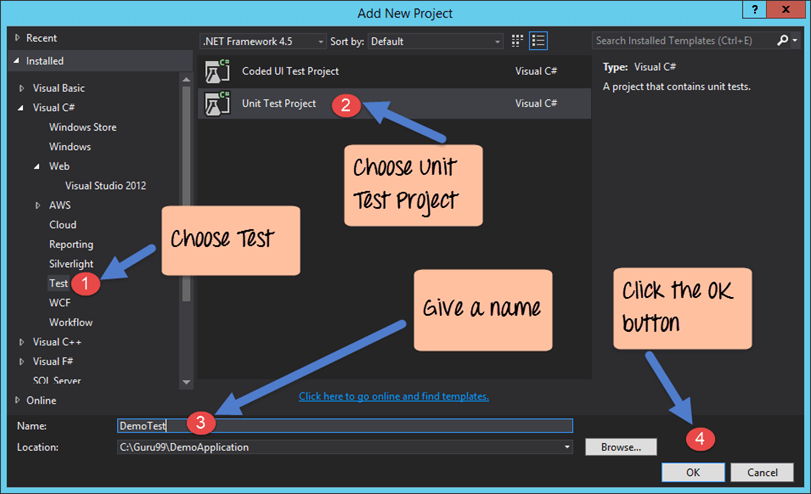
- Click on item type as ‘Test’ from the left-hand panel.
- Choose the item as ‘Unit Test Project’ from the list, which appears in the center part of the dialog box.
- Give a name for the test project. In our case, the name given is ‘DemoTest’.
- Finally, click the ‘OK’ button.
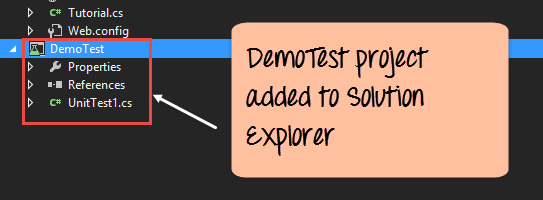
You will eventually see the DemoTest project added to the solution explorer. With this, you can also see other files like UnitTest1.cs, properties, etc. are generated by default.
Running the Test Project
The test project created in the earlier section is used to test our ASP.NET application. In the following steps, we are going to see how to run the Test project.
- The first step would be to add a reference to the ASP.NET project. This step is carried out so that the test project has access to the ASP.NET project.
- Then we will write our test code.
- Finally, we will run the test using Visual Studio.
Step 1) To test our Demo Application, first test project needs to reference the Demo Application. Add a reference to the Demo.aspx solution.
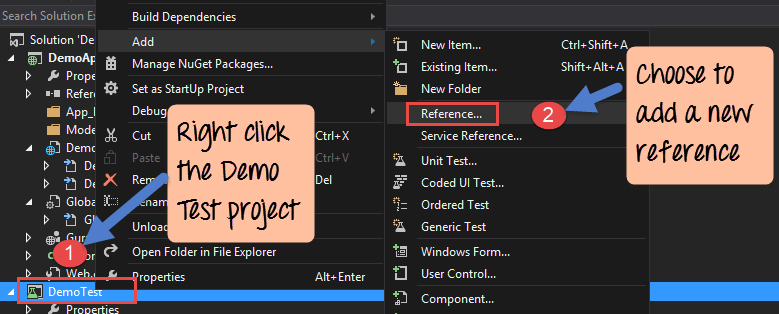
- Right-click the Demo Test project
- From the menu choose the option of Add->Reference.
Step 2) The next step is to add a reference to the DemoApplication.
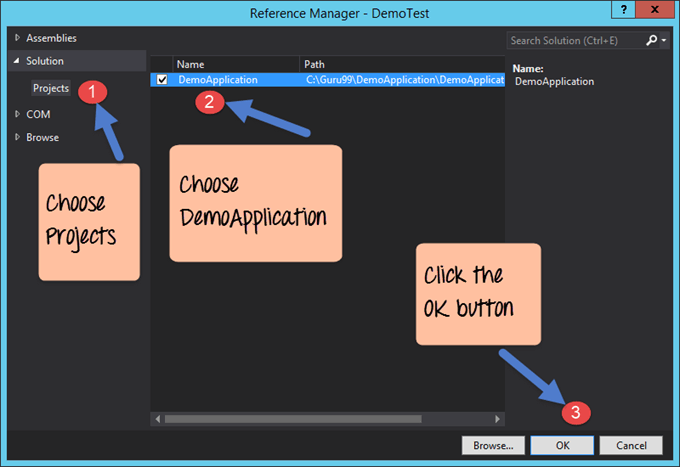
- Select the Projects option from the left-hand side of the dialog box
- Click on the check box next to DemoApplication
- Click on the ‘OK’ button.
This will allow a demotest project to test our DemoApplication.
Step 3) Now it is time to add the test code to our test project.
- For this first double-click on the UnitTest1 (UnitTest1 file is automatically added by Visual Studio when the Test project is created) file in the Solution Explorer.
- This is the file which will be run to test the ASP.NET project.
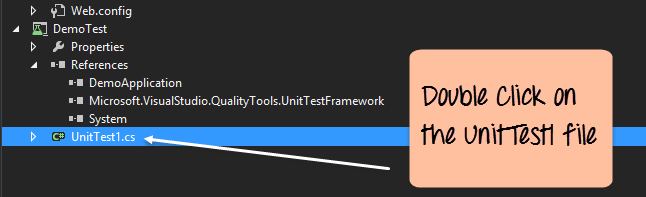
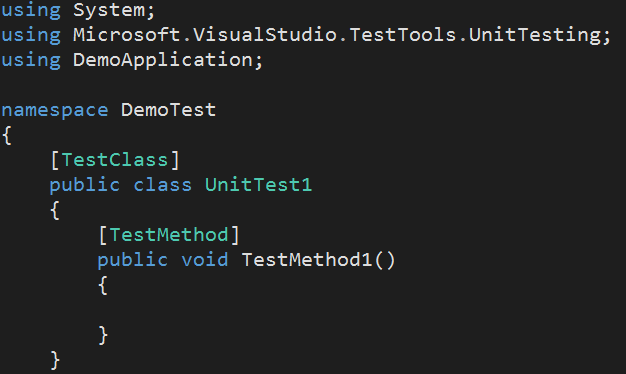
You will see the below code added by Visual Studio in the UnitTest1.cs file. This is the basic code needed for the test project to run.
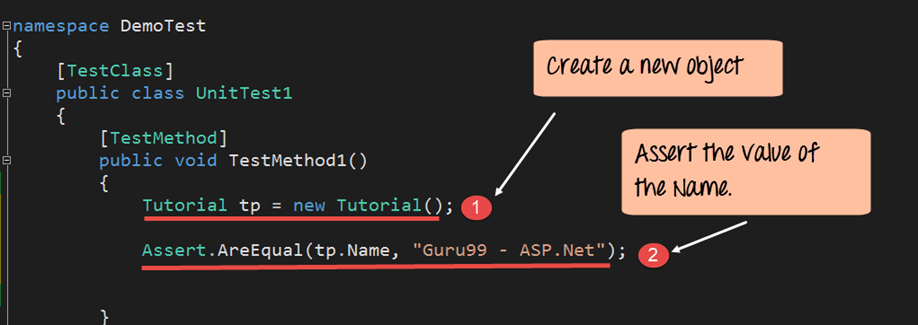
Step 4) The next step is to add the code which is used to test the string “Guru99 – ASP.NET.”
using System;
using Microsoft.VisualStudio.TestTools.UnitTesting;
using DemoApplication;

namespace DemoTest
{
 [TestClass]
 public class UnitTest1
 {
   [TestMethod]
   public void TestMethod1()
   {
      Tutorial tp = new Tutorial();
      Assert.AreEqual(tp.Name,"Guru99 - ASP.Net");
   }
 }
}
- Create a new object called ‘tp’ of the type Tutorial
- The Assert.AreEqual method is used in .NET to test if a value is equal to something. So in our case, we are comparing the values of tp.Name to Guru99 – ASP.NET.
Step 5) Now let us run our test project. For this, we need to go to the menu option Test->Run->All Tests

Output:-
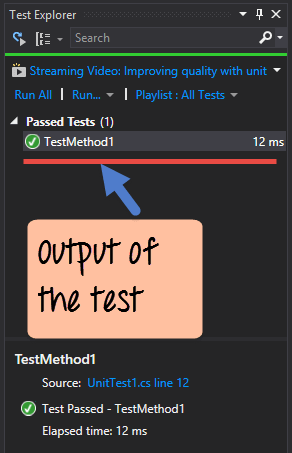
A test Explorer window will appear in Visual Studio. This will show the above result and display that a successful test was run in Visual Studio.
MSTest Attributes and Assertions You Will Use
The Microsoft.VisualStudio.TestTools.UnitTesting namespace ships a small set of attributes and assertions that cover most ASP.NET unit tests. Learning these first makes every later test easier to read and maintain.
- [TestClass] – marks the class as a container of tests. MSTest scans classes with this attribute at discovery time.
- [TestMethod] – marks a public, parameterless method as an individual test. The method returns void, Task, or ValueTask.
- [TestInitialize] / [TestCleanup] – run before and after each test method. Use them to create and dispose shared setup such as a mock repository or an in-memory context.
- [ClassInitialize] / [ClassCleanup] – run once for the whole class. They are useful when the setup is expensive, for example seeding a test database.
- [DataRow] and [DataTestMethod] – supply parameterised inputs so a single test method covers several cases.
Inside each test method, the Assert class checks the outcome. Common calls include Assert.AreEqual for value comparisons, Assert.IsTrue and Assert.IsFalse for booleans, Assert.IsNull and Assert.IsNotNull for references, and Assert.ThrowsException for expected exceptions. Structure every test using the Arrange, Act, Assert pattern so setup, invocation, and verification stay visually separated. This layout keeps failing tests easy to debug because the failing line is almost always the single Assert at the bottom.
MSTest, NUnit, and xUnit Compared for ASP.NET
Three testing frameworks dominate the .NET ecosystem. Each one runs inside Visual Studio and integrates with dotnet test, so the difference is mostly style, community support, and default behaviour.
- MSTest – shipped by Microsoft and comes preinstalled with the Visual Studio Unit Test Project template used earlier in this tutorial. It is the safest default when a team is new to unit testing on the Microsoft stack.
- NUnit – the oldest of the three, originally ported from JUnit. It offers a rich constraint model, parameterised tests through TestCase and TestCaseSource, and mature support across every .NET version.
- xUnit.net – used internally by the ASP.NET Core and Entity Framework Core teams. It replaces the SetUp method with constructor and IDisposable, encourages one test class per behaviour, and uses [Fact] and [Theory] instead of [TestMethod].
All three frameworks discover tests through attributes, run through the dotnet test command, and produce trx or xUnit XML reports that CI pipelines such as Azure DevOps, GitHub Actions, and Jenkins can consume directly. For a first ASP.NET project, staying with MSTest keeps the toolchain simple. Teams that want richer parameterisation or already use ASP.NET Core often pick xUnit for consistency with the framework it was built with.
Best Practices for Unit Testing ASP.NET Applications
Following a small set of habits keeps a suite fast, reliable, and useful over the life of an ASP.NET project.
- Test one behaviour per method. A test that asserts several unrelated things fails for many reasons and takes longer to fix.
- Name tests after intent. A pattern such as MethodUnderTest_Scenario_ExpectedResult makes the Test Explorer output a readable specification of the class.
- Isolate the unit from external systems. Wrap file, network, and database calls behind interfaces and swap in fakes or mocks so the test does not hit the real dependency.
- Keep tests fast. Aim for the full unit suite to finish in seconds. Slow tests get skipped, and skipped tests hide regressions.
- Follow the Arrange, Act, Assert layout. Three short blocks with blank lines between them signal intent and make failing lines easy to spot.
- Run tests on every commit. Wire dotnet test into a CI pipeline so a broken test blocks the merge instead of shipping to production.
- Track code coverage, but do not chase it. Coverage highlights untested paths but a high number alone does not guarantee quality. Review what the missing lines actually do.
Applied together, these practices turn the DemoTest project built above into the seed of a suite that catches regressions on every push, documents behaviour for future developers, and gives confidence when refactoring an ASP.NET application.
