
AngularJs Routing with parameters
 Editorial Team
⚡ Smart Summary
Routing in AngularJS turns a single HTML page into a multi-view application by mapping URL fragments to templates and controllers. The ngRoute module and the $routeProvider service define these mappings, while the ng-view directive injects the matching template.
Before we look at how routing works in AngularJS, it helps to understand the kind of application routing was built for. The section below sets that context, and every technique that follows builds on it.
What are Single Page Applications?
Single page applications, or SPAs, are web applications that load a single HTML page and then update that page dynamically as the user interacts with it. Instead of requesting a fresh document from the server for every click, an SPA swaps only the portion of the page that changed.
That design creates one problem. If the browser never navigates to a new document, the address bar never changes, so the user cannot bookmark a screen, share it, or use the back button. Routing solves exactly this problem.
What is Routing in AngularJS?
Routing in AngularJS is a method that allows you to create Single Page Applications. It enables you to create different URLs for different content in your web applications. AngularJS routing also helps to show multiple contents depending on which route is chosen. It is specified in the URL after the # sign.
Let’s take an example of a site which is hosted via the URL http://example.com/index.html.
This page hosts the main screen of your application. Suppose the application organizes an Event and the user wants to list the events, view one in detail, or delete one. In a Single Page application with routing enabled, all of this is available via the following links.
The # symbol would be used along with the different routes (ShowEvent, DisplayEvent, and DeleteEvent).
- To see all events, the user is directed to http://example.com/index.html#ShowEvent
- To see one particular event, they are directed to http://example.com/index.html#DisplayEvent
- To delete an event, they are directed to http://example.com/index.html#DeleteEvent
Note that the main URL stays the same. Only the fragment after the # changes, and that fragment is what AngularJS watches. With the concept established, the next section covers the pieces you must wire up before any of it works.
Adding AngularJS Route using $routeProvider
As discussed earlier, routes in AngularJS are used to route the user to a different view of your application. This routing is done on the same HTML page, so the user has the experience that they have not left the page.
In order to implement routing, the following main steps have to be implemented in your application in any specific order.
- Reference angular-route.js. This JavaScript file, developed by Google, contains all the routing functionality and must be included so the application can reference the modules routing needs.
- Add a dependency to the ngRoute module from within your application. Without this dependency, routing cannot be used in the AngularJS application at all.
Below is the general syntax of this statement. This is just a normal declaration of a module with the inclusion of the ngRoute keyword.
var module = angular.module("sampleApp", ['ngRoute']);
- Configure your $routeProvider. This provides the various routes in your application, and the syntax simply states that when the relevant path is chosen, use the route to display the given view.
when(path, route)
- Links to your route from within your HTML page. In your HTML page, you will add reference links to the various available routes in your application.
<a href="#!/route1">Route 1</a><br/>
- Finally would be the inclusion of the ng-view directive, which would normally be in a div tag. This would be used to inject the content of the view when the relevant route is chosen.
💡 Tip: All five steps are mandatory. A missing angular-route.js reference is the most common reason a route silently does nothing, because $routeProvider does not exist without it. The next section puts all five together in a working example.
AngularJS Routing Example
Now, let’s look at an example of routing using the above-mentioned steps.
In our AngularJS routing example with parameters,
- One link is to display the topics for an AngularJS course, and the other is for the Node.js course.
- When the user clicks either link, the topics for that course will be displayed.
Step 1) Include the angular-route file as a script reference.

This route file is necessary in order to make use of the functionalities of having multiple routes and views. This file can be downloaded from the AngularJS website.
Step 2) Add href tags which will represent links to “Angular JS Topics” and “Node JS Topics.”

Step 3) Add a div tag with the ng-view directive which will represent the view.
This will allow the corresponding view to be injected whenever the user clicks on either the “Angular JS Topics” or “Node JS Topics.”

Step 4) In your script tag for AngularJS, add the “ngRoute module” and the “$routeProvider” service.

Code Explanation:
- Include the “ngRoute module.” With this in place, Angular handles routing automatically and understands all of the routing commands.
- The $routeProvider is a service that listens in the background to the routes which are called. When the user clicks a link, it detects this and decides which route to take.
- Create one route for the Angular link: when it is clicked, inject Angular.html and use ‘AngularController’ for the business logic.
- Create one route for the Node link, which injects Node.html and uses ‘NodeController’ in the same way.
Step 5) Next is to add controllers to process the business logic for both the AngularController and NodeController.
In each controller, we are creating an array of key-value pairs to store the Topic names and descriptions for each course. The array variable ‘tutorial’ is added to the scope object for each controller.

<!DOCTYPE html>
<html>
<head>
<meta charset="UTF-8">
<title>Event Registration</title>
</head>
<body ng-app="sampleApp">

<script src="https://code.angularjs.org/1.8.3/angular.min.js"></script>
<script src="https://code.angularjs.org/1.8.3/angular-route.js"></script>

<h1> Guru99 Global Event</h1>

<div class="container">
<ul>
<li><a href="#!/Angular">Angular JS Topics</a></li>
<li><a href="#!/Node">Node JS Topics</a></li>
</ul>
<div ng-view></div>
</div>

<script>
var sampleApp = angular.module('sampleApp', ['ngRoute']);

sampleApp.config(['$routeProvider',
function($routeProvider) {
  $routeProvider.
  when('/Angular', {
    templateUrl: 'Angular.html',
    controller: 'AngularController'
  }).
  when('/Node', {
    templateUrl: 'Node.html',
    controller: 'NodeController'
  });
}]);

sampleApp.controller('AngularController', function($scope) {
  $scope.tutorial = [
    {Name: "Controllers", Description: "Controllers in action"},
    {Name: "Models", Description: "Models and binding data"},
    {Name: "Directives", Description: "Flexibility of Directives"}
  ];
});

// NodeController follows the same shape with Node.js topics
sampleApp.controller('NodeController', function($scope) {
  $scope.tutorial = [{Name: "Promises", Description: "Power of Promises"}];
});
</script>
</body>
</html>
⚠️ Corrections applied. The <title> tag sat inside <body>, chrset="UTF 8" was misspelled, the second link pointed at #Node.html instead of the registered route /Node, and template paths carried a leading slash that resolves from the domain root.

Step 6) Create pages called Angular.html and Node.html. For each page we are carrying out the below steps.
These steps will ensure that all of the key-value pairs of the array are displayed on each page.
- Using the ng-repeat directive to go through each key-value pair defined in the tutorial variable.
- Displaying the name and description of each key-value pair.
- Angular.html
<h2>Angular</h2>
<ul ng-repeat="ptutor in tutorial">
<li>Course : {{ptutor.Name}} - {{ptutor.Description}}</li>
</ul>
- Node.html — identical to the listing above, with the heading changed to “Node”. Both templates read the same
tutorialvariable, which each controller supplies from its own scope.

⚠️ Correction: the heading in the original Angular.html read “Anguler”. The spelling is corrected above.
If the code is executed successfully, the following output will be shown when you run your code in the browser.
Output:

If you click on the AngularJS Topics link, the below output will be displayed.

The output clearly shows that,
- When the “Angular JS Topics” link is clicked, the routeProvider that we declared in our code decides that the Angular.html code should be injected.
- This code will be injected into the “div” tag, which contains the ng-view directive. Also, the content for the course description comes from the “tutorial variable” which was part of the scope object defined in the AngularController.
- When one clicks on the Node.js Topics, the same result will take place, and the view for Node.js topics will be manifested.
- Also, notice that the page URL stays the same. It is only the route after the # tag which changes, and this is the concept of single page applications. The #hash tag in the URL is a separator between the route (which in our case is ‘Angular’) and the main HTML page (Sample.html).

The example works only while the user clicks a link that matches a registered route. The next section handles what should happen when nothing matches.
Creating a Default Route in AngularJS
Routing in AngularJS also provides the facility to have a default route. This is the route which is chosen if there is no match for the existing route.
The default route is created by adding the following condition when defining the $routeProvider service.
The below syntax simply means to redirect to a different page if any of the existing routes do not match.
otherwise({
  redirectTo: 'page'
});
Let’s use the same example above and add a default route to our $routeProvider service.

sampleApp.config(['$routeProvider',
function($routeProvider) {
  $routeProvider.
  when('/Angular', {
    templateUrl: 'Angular.html',
    controller: 'AngularController'
  }).
  when('/Node', {
    templateUrl: 'Node.html',
    controller: 'NodeController'
  }).
  otherwise({
    redirectTo: '/Angular'
  });
}]);
Code Explanation:
- Here we are using the same code as above, with the only difference being that we are using the otherwise statement and the “redirectTo” option to specify which view should be loaded if no route is specified. In our case we want the ‘/Angular’ view to be shown.
If the code is executed successfully, the following output will be shown when you run your code in the browser.
Output:

From the output,
- You can clearly see that the default view shown is the AngularJS view.
- This is because when the page loads it goes to the ‘otherwise’ option in the $routeProvider function and loads the ‘/Angular’ view.
A default route decides which view loads. The next section covers how a single route can serve many records by carrying a value in the URL.
How to Access Parameters from the AngularJS Route
Angular also provides the functionality to pass parameters during routing. The parameters are added to the end of the route in the URL, for example, http://guru99/index.html#/Angular/1. In this Angular routing example,
- http://guru99/index.html is our main application URL
- The # symbol is the separator between the main application URL and the route
- Angular is our route
- And finally ‘1’ is the parameter which is added to our route
The general syntax is HTMLPage#/route/parameter, so the earlier topics become Sample.html#/Angular/1, #/Angular/2 and #/Angular/3, where the digit is the topicid.
Let’s look in detail at how we can implement an Angular route with a parameter.
Step 1) Add the following code to your view
- Add a table to show all the topics for the Angular JS course to the user.
- Add a table row for showing the topic “Controllers.” For this row, set the href to “#!/Angular/1”, so clicking the topic passes parameter 1 in the URL along with the route.
- Add a row for the topic “Models,” with the href set to “#!/Angular/2” so that parameter 2 travels in the URL.
- Add a row for the topic “Directives,” with the href set to “#!/Angular/3” so that parameter 3 travels in the URL.

Step 2) Add topic id in the routeProvider service function
In the routeProvider service function, add the :topicId placeholder to denote that any parameter passed in the URL after the route should be assigned to the variable topicId.

Step 3) Add the necessary code to the controller
- Make sure to first add “$routeParams” as a parameter when defining the controller function. This parameter will have access to all of the route parameters passed in the URL.
- “$routeParams” holds the topicId passed in the route. Attaching
$routeParams.topicIdto the scope as$scope.tutorialidmakes it available to the view as tutorialid.

<!DOCTYPE html>
<html>
<head>
<meta charset="UTF-8">
<title>Event Registration</title>
</head>
<body ng-app="sampleApp">

<script src="https://code.angularjs.org/1.8.3/angular.min.js"></script>
<script src="https://code.angularjs.org/1.8.3/angular-route.js"></script>

<h1> Guru99 Global Event</h1>
<table class="table table-striped">
<tbody>
<tr><td>1</td><td>Controllers</td>
<td><a href="#!/Angular/1">Topic details</a></td></tr>
<!-- rows 2 and 3 repeat with /Angular/2 and /Angular/3 -->
</tbody>
</table>
<div ng-view></div>

<script>
var sampleApp = angular.module('sampleApp', ['ngRoute']);

sampleApp.config(['$routeProvider',
function($routeProvider) {
  $routeProvider.
  when('/Angular/:topicId', {
    templateUrl: 'Angular.html',
    controller: 'AngularController'
  });
}]);

sampleApp.controller('AngularController', ['$scope', '$routeParams',
function($scope, $routeParams) {
  $scope.tutorialid = $routeParams.topicId;
}]);
</script>
</body>
</html>
⚠️ Corrections applied. The original used the letter l instead of the digit 1 in href="#Angular/l", omitted the ng-view container so the template had nowhere to render, and loaded angular-route.js before angular.min.js, which throws a module error.
Step 4) Add the expression to display the variable
Add the expression to display the tutorialid variable in the Angular.html page.

<h2>Angular</h2>

<br><br>{{tutorialid}}
If the code is executed successfully, the following output will be shown when you run your code in the browser.
Output:

In the output screen,
- If you click on the Topic Details link for the first topic, the number 1 gets appended to the URL.
- That number is taken as a “routeParams” argument and becomes accessible in the controller.
Reading a parameter is straightforward. Fetching the record that the parameter identifies, before the view appears, is the job of the property covered next.
How to Preload Data with the resolve Property
The controller in the previous section reads a topic id and displays it immediately. Real applications must first fetch the record from a server, and if the view renders before that request returns, the user sees an empty template that fills in a moment later. The resolve property removes that flash of empty content.
Each key inside a resolve object is a dependency that AngularJS prepares before the route activates. If the value is a promise, the router waits for it to settle. Only once every promise has resolved does AngularJS instantiate the controller and render the template, and the resolved values are injected into the controller by name, exactly like any other service.
sampleApp.config(['$routeProvider',
function($routeProvider) {
  $routeProvider.
  when('/Angular/:topicId', {
    templateUrl: 'Angular.html',
    controller: 'AngularController',
    resolve: {
      // The router waits for this promise before rendering
      topic: ['$http', '$route', function($http, $route) {
        var id = $route.current.params.topicId;
        return $http.get('/api/topics/' + id).then(function(response) {
          return response.data;
        });
      }]
    }
  });
}]);

// 'topic' is injected already resolved, so no loading state is needed
sampleApp.controller('AngularController', ['$scope', 'topic',
function($scope, topic) {
  $scope.topic = topic;
}]);
Two behaviours matter here. A rejected promise cancels the route change and leaves the browser on the current view, so a failed request never produces a broken page. However, because the router blocks while the promise is pending, a slow endpoint makes the application appear frozen. Pair resolve with a progress indicator driven by the $routeChangeStart and $routeChangeSuccess events.
⚠️ Warning: Never place authentication checks only inside resolve. Rejecting a route hides a view but does not protect the data behind it, and the API endpoint must still enforce access on the server.
Beyond preloading data, a route can also carry static configuration values. The service described next is how a controller reads them.
How To Use Angular $route Service
The $route service allows you to access the properties of the route. The $route service is available as a parameter when the function is defined in the controller. The general syntax of how the $route parameter is made available from the controller is shown below.
myApp.controller('MyController', function($scope, $route) { ... });
- myApp is the AngularJS module defined for your application.
- MyController is the name of the controller defined for your application.
- Just as $scope passes information from the controller to the view, $route exposes the properties of the current route.
Let’s have a look at how we can use the $route service.
In this example,
- We are going to create a simple custom variable called “mytext,” which will contain the string “This is angular.”
- We are going to attach this variable to our route. Later we are going to access this string from our controller using the $route service and then use the scope object to display it in our view.
So, let’s see the steps which we need to carry out to achieve this.
Step 1) Add a custom key-value pair to the route. Here, we are adding a key called ‘mytext’ and assigning it a value of “This is angular.”

Step 2) Add the relevant code to the controller.
- Add the $route parameter to the controller function. The $route parameter is a key parameter defined in Angular, which allows one to access the properties of the route.
- The “mytext” variable which was defined in the route can be accessed via the $route.current reference. This is then assigned to the ‘text’ variable of the scope object. The text variable can then be accessed from the view accordingly.

// Only the config and controller change; the page markup is unchanged
sampleApp.config(['$routeProvider',
function($routeProvider) {
  $routeProvider.
  when('/Angular/:topicId', {
    mytext: "This is angular",   // custom key attached to the route
    templateUrl: 'Angular.html',
    controller: 'AngularController'
  });
}]);

sampleApp.controller('AngularController', ['$scope', '$routeParams', '$route',
function($scope, $routeParams, $route) {
  $scope.tutorialid = $routeParams.topicId;
  $scope.text = $route.current.mytext;
}]);
Step 3) Add a reference to the text variable from the scope object as an expression. This will be added to our Angular.html page as shown below.
This will cause the text “This is angular” to be injected into the view. The {{tutorialid}} expression is the same as that seen in the previous topic and this will display the number ‘1’.
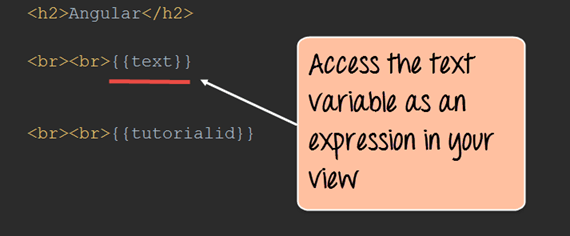
<h2>Angular</h2>

<br><br>{{text}}
<br><br>{{tutorialid}}
If the code is executed successfully, the following output will be shown when you run your code in the browser.
Output:

From the output,
- We can see that the text “This is angular” also gets displayed when we click on any of the links in the table. The topic id also gets displayed at the same time as the text.
Every URL shown so far still carries a # symbol. The final configuration step removes it.
Enabling HTML5 Routing
HTML5 routing is used to create clean URLs. It means the removal of the hashtag from the URL. So the routing URLs, when HTML5 routing is used, would appear as shown below.
Sample.html/Angular/1
Sample.html/Angular/2
Sample.html/Angular/3
This concept is normally known as presenting a pretty URL to the user.
There are 2 main steps which need to be carried out for HTML5 routing.
- Configuring $locationProvider
- Setting our base for relative links
Let’s look in detail at how to carry out the above-mentioned steps in our example.
Step 1) Add the relevant code to the Angular module.
- Add a
<base>tag to the document head. This is required for HTML5 routing so that the application knows what the base location of the application is. - Add the $locationProvider service. This service allows you to define the html5Mode.
- Set the html5Mode of the $locationProvider service to true.

Step 2) Remove all the # tags for the links (‘Angular/1’, ‘Angular/2’, ‘Angular/3’) to create easy-to-read URLs.

<!-- In the head: required by html5Mode so relative templates resolve -->
<base href="/">

<!-- In the body: the # is dropped from every link -->
<a href="Angular/1">Topic details</a>

<script>
sampleApp.config(['$routeProvider', '$locationProvider',
function($routeProvider, $locationProvider) {
  $locationProvider.html5Mode(true);
  $routeProvider.
  when('/Angular/:topicId', {
    templateUrl: 'Angular.html',
    controller: 'AngularController'
  });
}]);
</script>
⚠️ Correction: the original declared a baseUrl constant pointing at a local IDE path, which has no effect on html5Mode. AngularJS reads the base location from the <base href> tag. The original also injected $locationProvider without ever calling html5Mode(true), so the hash was never removed.
If the code is executed successfully, the following output will be shown when you run your code in the browser.
Output:

From the output,
- You can see that the # tag is not there when accessing the application.
Everything above uses ngRoute, the router shipped by the AngularJS team. It is not the only option, and the comparison below explains when the alternative is the better fit.
ngRoute vs ui-router: Which Router to Choose
ngRoute is maintained by the AngularJS team and matches a URL directly to a single template and controller. ui-router is a community project built to remove ngRoute’s main limitation: it matches on application state rather than on the URL alone, which allows one screen to contain several independently routed regions.
| Aspect | ngRoute | ui-router |
|---|---|---|
| Configuration service | $routeProvider | $stateProvider |
| Matches on | URL only | Named state, URL optional |
| Nested views | Not supported | Supported |
| Multiple views per screen | One ng-view | Many named ui-view outlets |
| Nested resolve | Not supported | Child states inherit parent resolves |
| Best suited to | Flat, small applications | Dashboards and layered layouts |
Choose ngRoute when each URL maps to one full-page view, since it needs no extra dependency and the whole API fits on a single page. Choose ui-router when a screen has panes that navigate independently, or when child views must reuse data loaded by a parent. Migrating later is possible but not trivial, because state names replace URL patterns throughout the templates.
Common AngularJS Routing Errors and How to Fix Them
Most routing failures produce a blank ng-view rather than a console error, which makes them harder to diagnose than they should be. Each symptom below names its cause and its fix.
- Unknown provider: $routeProvider: angular-route.js was never loaded, or loaded before angular.min.js. Reference the core library first.
- The view stays blank with no error: no element carries the ng-view directive, so the template has nowhere to render.
- Nothing loads on first visit: no route matches the empty path. Add an otherwise block with a redirectTo value.
- $routeParams is empty: the pattern is missing its colon placeholder. It must read ‘/Angular/:topicId’.
- Templates 404 after html5Mode: configure the server to rewrite unmatched paths to the base page, and confirm the base href tag is present.
- The controller never re-runs: only the parameter changed, so AngularJS reused the controller instance rather than rebuilding it. Listen for the $routeUpdate event instead of relying on the controller function to fire again.
