
Protractor Testing Tutorial: Automation Tool Framework
 Editorial Team
⚡ Smart Summary
Protractor is an end-to-end behavior-driven test framework built for AngularJS applications, combining Selenium WebDriver with Jasmine so that testers can drive real browsers and verify Angular-specific elements that standard Selenium locators cannot reach.

What is Protractor Testing?
Protractor is an automation and end-to-end behavior-driven testing tool that plays an important role in the Testing of AngularJS applications and works as a Solution integrator combining powerful technologies like Selenium, Jasmine, WebDriver, etc. The purpose of Protractor Testing is not only to test AngularJS applications but also for writing automated regression tests for normal Web Applications as well.
⚠️ Deprecation notice: Protractor is deprecated and archived. Support ended in August 2023 and the Angular CLI dropped its Protractor builder after Angular 15. Pick Playwright, Cypress, WebdriverIO or TestCafe for new end-to-end testing. The walkthrough below stays for legacy suites.
Why Do We Need Protractor Framework?
JavaScript is used in almost all web applications. As the applications grow, JavaScript also increases in size and complexity. In such case, it becomes a difficult task for Testers to test the web application for various scenarios.
Sometimes it is difficult to capture the web elements in AngularJS applications using JUnit or Selenium WebDriver.
Protractor is a Node.js program which is written in JavaScript and runs with Node to identify the web elements in AngularJS applications, and it also uses WebDriver to control the browser with user actions.
So what exactly is an AngularJS application?
AngularJS applications are Web Applications which use extended HTML’s syntax to express web application components. It is mainly used for dynamic web applications. These applications use less and flexible code compared with normal Web Applications. Note that AngularJS 1.x left Long Term Support on 31 December 2021, so such applications are legacy today.
Why can’t we find AngularJS web elements using Normal Selenium WebDriver?
AngularJS applications have some extra HTML attributes like ng-repeater, ng-controller, ng-model.., etc. which are not included in Selenium locators. Selenium is not able to identify those web elements using Selenium code. So, Protractor on the top of Selenium can handle and controls those attributes in Web Applications.
Protractor is an end to end testing framework for AngularJS based applications. While most frameworks focus on conducting unit tests for AngularJS applications, Protractor focuses on testing the actual functionality of an application.
Before we start Protractor, we need to install the following:
- Selenium: you can find the Selenium installation steps in the Selenium WebDriver installation guide.
- NPM (Node.js): we need to install Node.js to install Protractor. You can find these installation steps in the Node.js download and install guide.
Protractor Installation
Step 1) Open command prompt and type “npm install -g protractor” and hit Enter.
The above command will download the necessary files and install Protractor on the client system, as shown below.

Step 2) Check the installation and version using “protractor –version.” If successful it will show the version as like in below screenshot. If not, perform the step 1 again.

(Steps 3 and 4 are Optional but recommended for better practice)
Step 3) Update the WebDriver manager. The WebDriver manager is used for running the tests against the angular web application in a specific browser. After Protractor is installed, the WebDriver manager needs to be updated to the latest version. This can be done by running the following command in the command prompt.
webdriver-manager update
The driver binaries download as shown below.

Step 4) Start the WebDriver manager. This step will run the WebDriver manager in the background and will listen to any tests which run via protractor.
Once a test runs, the WebDriver automatically loads it in the relevant browser. Start the manager with the command below.
webdriver-manager start
The console reports the listening address.
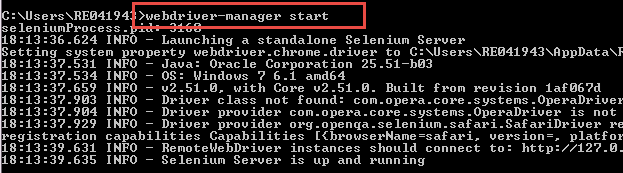
Now, if you go to the following URL (http://localhost:4444/wd/hub/static/resource/hub.html) in your browser, you will actually see the WebDriver manager running in the background.

Sample AngularJS application testing using Protractor
With the driver manager running, Protractor needs two files to run, a spec file and configuration file.
- Configuration file: This File helps protractor to where the test files are placed (specs.js) and to talk with Selenium server (Selenium Address). Chrome is the default browser for Protractor.
- Spec file: This File contains the logic and locators to interact with the application.
Step 1) We have to open https://angularjs.org and enter the text as “GURU99” in “Enter a name here” textbox.

Step 2) In this step,
- Entered the name “Guru99”
- In output text ” Hello Guru99″ is seen.

Step 3) Now we have to capture the text from the webpage after entering the name and need to verify with the expected text.
Code:
We have to prepare configuration file (conf.js) and spec file (spec.js) as mentioned above.
Logic of spec.js :
describe('Enter GURU99 Name', function() {
 it('should add a Name as GURU99', function() {
 browser.get('https://angularjs.org');
 element(by.model('yourName')).sendKeys('GURU99');
  var guru= element(by.xpath('html/body/div[2]/div[1]/div[2]/div[2]/div/h1'));
expect(guru.getText()).toEqual('Hello GURU99!');
  });
});
Code Explanation of spec.js:
- describe(‘Enter GURU99 Name’, function()The describe syntax is from the Jasmine framework. Here “describe” (‘Enter GURU99 Name’) typically defines components of an application, which can be a class or function etc. In the code suite called as “Enter GURU99,” it’s just a string and not a code.
- it(‘should add a Name as GURU99’, function()
- browser.get(‘https://angularjs.org’)As like in Selenium WebDriver browser.get will open a new browser instance with mentioned URL.
- element(by.model(‘yourName’)).sendKeys(‘GURU99’) Here we are finding the web element using the Model name as “yourName,” which is the value of “ng-model” on the web page. Check the screen shot below-

- var guru= element(by.xpath(‘html/body/div[2]/div[1]/div[2]/div[2]/div/h1’)) Here we are finding the web element using XPath and store its value in a variable “guru”.
- expect(guru.getText()).toEqual(‘Hello GURU99!’) Finally we are verifying the text which we have got from the webpage (using gettext() ) with expected text .
Logic of conf.js:
exports.config = {
  seleniumAddress: 'http://localhost:4444/wd/hub',
  specs: ['spec.js']
};
Code Explanation of conf.js
- seleniumAddress: ‘http://localhost:4444/wd/hub’The Configuration file tells Protractor the location of Selenium Address to talk with Selenium WebDriver.
- specs: [‘spec.js’]This line tells Protractor the location of test files spec.js
Execution of the Code
First, navigate to the folder where conf.js and spec.js are placed, then follow the steps below.
Step 1) Open the command prompt.
Step 2) Make sure Selenium WebDriver manager is up and running. For that give the command as “webdriver-manager start” and hit Enter.

(If Selenium WebDriver is not up and running we cannot proceed with a test as Protractor cannot find the WebDriver to handle the web application)
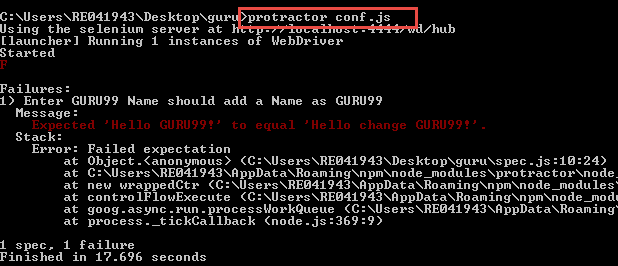
Step 3) Open a new command prompt and give the command as “protractor conf.js” to run the configuration file. The run finishes as shown below.

Explanation:
- Here Protractor will execute the configuration file with given spec file in it.
- We can see the Selenium server running at “http://localhost:4444/wd/hub” which we have given in the conf.js file.
- Also, here can see the result how many are passed and failures like in above screenshot.
A passing result has now been verified. Next, look at a failing result.
Step 1) Open and change expected to result in spec.js to “‘Hello change GURU99” like below.
After change in spec.js :
describe('Enter GURU99 Name', function() {
 it('should add a Name as GURU99', function() {
 browser.get('https://angularjs.org');
 element(by.model('yourName')).sendKeys('GURU99');
  var guru= element(by.xpath('html/body/div[2]/div[1]/div[2]/div[2]/div/h1'));
expect(guru.getText()).toEqual('Hello change GURU99!');
  });
});
Step 2) Save the spec.js file and repeat above steps of “Execution of the Code” section
Now, execute the above steps.
Result:

We can see the result as failed indicated with ‘F’ in the screenshot with the reason as “Expected ‘Hello GURU99!’ to equal ‘Hello change GURU99!’. Also, it shows how many failures are encountered when executing code.
Can we achieve the same with Selenium WebDriver?
Sometimes AngularJS elements can be located with XPath or CSS selectors from Selenium WebDriver. However, those elements are generated and rebound dynamically, so Protractor was the safer option for AngularJS suites.
Generate Reports using Jasmine Reporters
Protractor supports Jasmine reporters. This section uses JUnitXmlReporter to generate test execution reports automatically in XML format, following the steps below.
Installation of Jasmine Reporter
There are two options, local or global
- Open command prompt execute the following command to install locally
npm install --save-dev jasmine-reporters@^2.0.0
The command above installs jasmine-reporters locally, inside the directory where it is run.
- Open command prompt execute the following command for global installation
npm install –g jasmine-reporters@^2.0.0
Here, the reporters are installed locally.
Step 1) Execute the command.
npm install --save-dev jasmine-reporters@^2.0.0
from the command prompt like below.

Step 2) Check the installation folders in the directory. ” Node_modules” should be available if it is successfully installed like in below snapshot.

Step 3) Add the following colored code to an existed conf.js file
exports.config = {
      seleniumAddress: 'http://localhost:4444/wd/hub',
      capabilities: {
          'browserName': 'firefox'
      },
      specs: ['spec.js'],
     framework: 'jasmine2' ,
      onPrepare: function() {
          var jasmineReporters = require('C:/Users/RE041943/Desktop/guru/node_modules/jasmine-reporters');
          jasmine.getEnv().addReporter(new jasmineReporters.JUnitXmlReporter(null, true, true)
          );
     }
   };
Explanation of code:
In code, we are generating the report “JUnitXmlReporter” and giving the Path where to store the report.
Step 4) Open the command prompt and execute command protractor conf.js.
Step 5) When you execute the above code, junitresults.xml will be generated in mentioned path.

Step 6) Open the XML and verify the result. The failure message is shown in the result file as our Test Case is failed. The test case failed because the Expected Result from “spec.js” is not matched with the Actual result from a Web page.

Step 7) Use the junitresult.xml file for evidences or result files.
Protractor vs Modern Test Automation Alternatives
Since Protractor no longer receives updates, teams planning new suites need to know how it stacks up against the frameworks that Angular projects now migrate to. The table below compares Protractor with the three alternatives that come up most often in the FAQs below.
| Framework | Status | Language support | Browser engines | Angular-specific locators |
|---|---|---|---|---|
| Protractor | Deprecated, end of life August 2023 | JavaScript, TypeScript | Chrome, Firefox, IE via Selenium WebDriver | by.model, by.binding, by.repeater |
| Cypress | Actively maintained | JavaScript, TypeScript | Chrome, Firefox, Edge | None; relies on CSS or data attributes |
| Playwright | Actively maintained | JavaScript, TypeScript, Python, Java, .NET | Chromium, Firefox, WebKit | None; relies on CSS, text or role selectors |
| WebdriverIO | Actively maintained | JavaScript, TypeScript | Chromium, Firefox, WebKit via WebDriver or DevTools | None; relies on CSS or data attributes |
Teams with an existing Protractor suite generally move fastest to WebdriverIO, since its command style and Selenium-based driver management stay close to what Protractor testers already know. Teams starting fresh, or needing the quickest test runs, more often pick Cypress or Playwright instead.
