How to Download & Install Node.js and NPM on Windows
⚡ Smart Summary
Node.js installation on Windows uses the official MSI installer or the Chocolatey package manager, both of which bundle NPM. After setup, a simple HTTP server script confirms the runtime serves a Hello World response in the browser.
To start building your Node.js applications, the first step is the installation of the Node.js framework. The Node.js framework is available for a variety of operating systems right from Windows to Ubuntu and OS X. Once the Node.js framework is installed, you can start building your first Node.js applications.
Node.js also has the ability to embed external or extended functionality by making use of custom modules. These modules have to be installed separately. An example of a module is the MongoDB module, which allows you to work with MongoDB databases from your Node.js application.
How to Install Node.js on Windows
The first step in using Node.js is the installation of the Node.js libraries on the client system. Below are the steps to download and install Node.js in Windows:
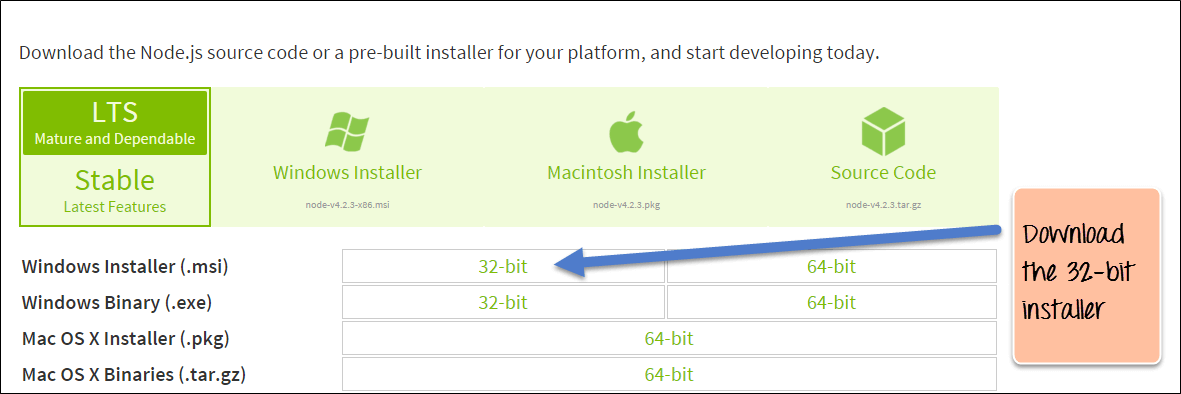
Step 1) Download Node.js Installer for Windows.
Go to the site https://nodejs.org/en/download/ and download the necessary binary files. In our example, we are going to download Node.js on Windows with the 32-bit setup files.
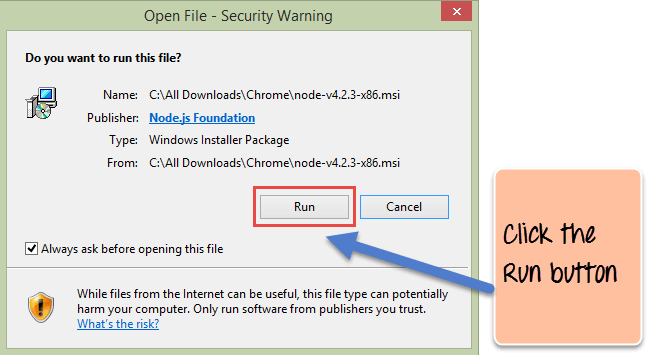
Step 2) Run the installation. Double click on the downloaded .msi file to start the installation. Click the Run button on the first screen to begin the installation.
Step 3) In the next screen, click the “Next” button to continue with the Node.js download and installation.

Step 4) Accept the terms and conditions. In the next screen, accept the license agreement and click on the Next button.

Step 5) Set up the path. In the next screen, choose the location where Node.js needs to be installed and then click on the Next button.
- First, enter the file location for the installation of Node.js. This is where the files for Node.js will be stored after the installation.
- Click on the Next button to proceed ahead with the installation.

Step 6) Select the default components to be installed. Accept the default components and click on the Next button.

Step 7) Start the installation. In the next screen, click the Node.js install button to start installing on Windows.

Step 8) Complete the installation. Click the Finish button to complete the installation.

Note: Windows now recommends that developers use Node.js with WSL2 (the Windows Subsystem for Linux) for Linux-style development workflows.
How to Install NPM on Windows 10/8/7
The other way to install Node.js on any client machine is to use a “package manager.” On Windows, the NPM (Node Package Manager) download is known as Chocolatey. It was designed to be a decentralized framework for quickly installing applications and tools that you need.
For installing NPM on Windows via Chocolatey, the following steps need to be performed.
Step 1) Installing Chocolatey – The Chocolatey website has very clear instructions on how this framework needs to be installed.
- The first step is to run the below command in the command prompt window. This command is taken from the Chocolatey website and is the standard command for installing Node.js via Chocolatey.
- The below command is a PowerShell command which calls the remote PowerShell script on the Chocolatey website. This command needs to be run in a PowerShell command window.
- This PowerShell script does all the necessary work of downloading the required components and installing them accordingly.
@powershell -NoProfile -ExecutionPolicy Bypass -Command "iex ((new-object net.webclient).DownloadString('https://chocolatey.org/install.ps1'))" && SET PATH=%PATH%;%ALLUSERSPROFILE%\chocolatey\bin

Step 2) The next step is to install Node.js to your local machine using the Chocolatey package manager. This can be done by running the below command in the command prompt.

If the installation is successful, you will get the message of the successful installation of Node.js.
Note: If you get an error like “C:\ProgramData\chocolatey\lib\libreoffice\tools\chocolateyInstall.ps1”, then manually create the folder in the path.
Running your first Hello World application in Node.js
Once you have Node.js downloaded and installed on your computer, let us try to display “Hello World” in a web browser. Create a Node.js file with the file name firstprogram.js.
var http = require('http');

http.createServer(function (req, res) {
    res.writeHead(200, {'Content-Type': 'text/html'});
    res.end('Hello World!');
}).listen(8080);
Code Explanation:
- The basic functionality of the “require” function is that it reads a JavaScript file, executes the file, and then proceeds to return an object. Using this object, one can then use the various functionalities available in the module called by the require function. So in our case, since we want to use the functionality of HTTP, we are using the require(http) command.
- In this 2nd line of code, we are creating a server application which is based on a simple function. This function is called whenever a request is made to our server application.
- When a request is received, we are asking our function to return a “Hello World” response to the client. The writeHead function is used to send header data to the client, while the end function closes the connection to the client.
- We are then using the server.listen function to make our server application listen to client requests on port no 8080. You can specify any available port here.
Executing the code
- Save the file on your computer: C:\Users\Your Name\firstprogram.js
- In the command prompt, navigate to the folder where the file is stored. Enter the command Node firstprogram.js.

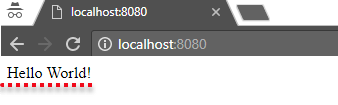
- Now, your computer works as a server! If anyone tries to access your computer on port 8080, they will get a “Hello World!” message in return.
- Start your internet browser, and type in the address: http://localhost:8080
Output: