
Node.js Streams: FileStream, Pipes & Events
 James Hartman
⚡ Smart Summary
Node.js streams read and write data in small chunks instead of loading entire files into memory, and this page explains filestream creation, pipe chaining, backpressure handling, and the event model that keeps large-scale data transfer efficient.
Types of Streams in Node.js
Every stream that Node.js exposes falls into one of four base types, and knowing which type a given API returns explains how that stream behaves before any code is written. The stream module that ships with Node.js defines these categories, and the file, network, and compression APIs used throughout this article are all built on top of them.
| Stream Type | Data Direction | Example API | Common Use Case |
|---|---|---|---|
| Readable | Source only (data flows out) | fs.createReadStream() | Reading a file, receiving an HTTP request body |
| Writable | Destination only (data flows in) | fs.createWriteStream() | Writing a file, sending an HTTP response |
| Duplex | Both directions, independently | net.Socket (TCP socket) | Two-way network communication |
| Transform | Both directions, data is modified in transit | zlib.createGzip() | Compressing or encoding data mid-pipeline |
A readable stream and a writable stream are the two building blocks used throughout this article; both also power an HTTP web server in Node.js. A duplex stream combines both roles in one object, while a transform stream is a duplex stream whose output modifies its input, such as gzip compression applied mid-stream.
Filestream in Node.js
With the four stream categories defined, the rest of this article builds a file transfer using the readable and writable stream APIs.
Node makes extensive use of streams as a data transfer mechanism.
For example, when you output anything to the console using the console.log function, you are actually using a stream to send the data to the console.
Node.js also has the ability to stream data from files so that they can be read and written appropriately. We will now look at an example of how we can use streams to read and write from files. We need to follow the below-mentioned steps for this example
Step 1) Create a file called data.txt which has the below data. Let assume this file is stored on the D drive of our local machine.
Tutorial on Node.js
Introduction
Events
Data Connectivity
Using Jasmine
Step 2) Write the relevant code which will make use of streams to read data from the file.

var fs = require("fs");
var stream;
stream = fs.createReadStream("D://data.txt");

stream.on("data", function(data) {
    var chunk = data.toString();
    console.log(chunk);
});
Code Explanation:-
- We first need to include the ‘fs’ modules which contain all the functionality required to create streams.
- Next we create a readable stream by using the method – createReadStream. As an input, we give the location of our data.txt file.
- The steam.on function is an event handler and in it, we are specifying the first parameter as ‘data.’ This means that whenever data comes in the stream from the file, then execute a callback function. In our case, we are defining a callback function which will carry out 2 basic steps. The first is to convert the data read from the file as a string. The second would be to send the converted string as an output to the console.
- We are taking each chunk of data which is read from the data stream and converting it to a string.
- Finally, we are sending the output of each string converted chunk to the console.
Output:

- If the code is executed properly, you will see the above output in the console. This output will be the same as that in the data.txt file.
Writing to a file
In the same way, that we create a read stream, we can also create a write stream to write data to a file. Let’s first create an empty file with no contents called data.txt. Let’s assume this file is placed in the D drive of our computer.
The below code shows how we can write data to the file.

var fs = require("fs");
var stream;
stream = fs.createWriteStream("D://data.txt");

stream.write("Tutorial on Node.js")
stream.write("Introduction")
stream.write("Events")
stream.write("Generators")
stream.write("Data Connectivity")
stream.write("Using Jasmine")
Code Explanation:-
- We are creating a writable stream by using the method – createWriteStream. As an input, we give the location of our data.txt file.
- Next we used the stream.write a method to write the different lines of text to our text file. The stream will take care of writing this data to the data.txt file.
If you open the data.txt file, you will now see the following data in the file
Tutorial on Node.js
Introduction
Events
Generators
Data Connectivity
Using Jasmine
Pipes in Node.js
Reading and writing streams independently is useful, but Node.js also lets a readable stream connect directly to a writable stream, moving data without manual buffering code.
Within Node applications, streams can be piped together using the pipe() method, which takes two arguments:
- A Required writable stream that acts as the destination for the data and
- An optional object used to pass in options.
A typical example of using pipes, if you want to transfer data from one file to the other.
So let’s see an example of how we can transfer data from one file to the other using pipes.
Step 1) Create a file called datainput.txt which has the below data. Let assume this file is stored on the D drive of our local machine.
Tutorial on Node.js
Introduction
Events
Generators
Data Connectivity
Using Jasmine
Step 2) Create a blank empty file called dataOutput.txt and placed it on the D drive of your local machine.
Step 3) Write the below code to carry out the transfer of data from the datainput.txt file to the dataOutput.txt file.

var fs = require("fs");
var readStream = fs.createReadStream("D://datainput.txt");
var writeStream = fs.createWriteStream("D://dataOutput.txt");
readStream.pipe(writeStream);
Code Explanation:-
- We are first creating a “readstream” to our datainput.txt file which contains all our data which needs to be transferred to the new file.
- We then need to create a “writestream” to our dataOutput.txt file, which is our empty file and is the destination for the transfer of data from the datainput.txt file.
- We then use the pipe command to transfer the data from the readstream to the write stream. The pipe command will take all the data which comes into the readstream, and push it to the writestream.
If you now open the dataOutput.txt file, you will see all the data which was present in the datainput.txt file.
Stream Events and Backpressure in Node.js
Calling pipe(), as shown above, hides two mechanics that matter at scale: the events every stream emits, and the backpressure system that stops a fast source from overwhelming a slow destination.
- data: emitted by a readable stream each time a new chunk is available.
- end: emitted once a readable stream has delivered its last chunk.
- finish: emitted by a writable stream once all queued data is flushed.
- error: emitted by either stream type on failure; always handle it or the process crashes.
The example below listens for all four events while manually managing backpressure, the same behavior that pipe() provides automatically.
var fs = require("fs");
var readStream = fs.createReadStream("D://data.txt");
var writeStream = fs.createWriteStream("D://dataOutput.txt");

readStream.on("data", function(chunk) {
    var ok = writeStream.write(chunk);
    if (!ok) {
        readStream.pause();
    }
});

writeStream.on("drain", function() {
    readStream.resume();
});

readStream.on("end", function() {
    writeStream.end();
});

writeStream.on("finish", function() {
    console.log("Write completed.");
});

readStream.on("error", function(err) {
    console.log(err);
});
Backpressure occurs when a readable stream produces data faster than a writable stream can consume it. The write() method returns false once its buffer fills up, so the code above pauses the source until the destination emits a drain event, signalling it is safe to resume. pipe() performs this cycle automatically.
⚠ Tip: In production, prefer the pipeline() function from the stream module over a manual pipe() chain, since it forwards errors from every stream and closes file handles automatically.
Events in Node.js
Streams are one example of Node.js’s broader event-driven design. The rest of this article looks at how events work in general, using the same EventEmitter class streams rely on internally.
Events are one of the key concepts in Node.js and sometimes Node.js is referred to as an Event-driven framework.
Basically, an event is something that happens. For example, if a connection is established to a database, then the database connection event is triggered. Event driven programming is to create functions that will be triggered when specific events are triggered.
Let’s look at a basic example of defining an event in Node.js.
We are going to create an event called ‘data_received’. When this event is triggered, the text “data received” will be sent to the console.

var events = require('events');
var eventEmitter = new events.EventEmitter();
eventEmitter.on('data_received', function() {
    console.log('data received succesfully.');
});

eventEmitter.emit('data_received');
Code Explanation:-
- Use the require function to include the ‘events’ module. With this module, you will be able to create events in Node.js.
- Create a new events emitter. This is used to bind the event, which in our case is “data_received” to a callback function which is defined in step3.
- We define an event-driven function which says that if in case the “data_received” event is triggered then we should output the text “data_received” to the console.
- Finally, we do have a manual trigger of our event using the eventEmiter.emit function. This will trigger the data_received event.
When the program is run, the text “data received” will be sent to the console as shown below.

Emitting Events
Beyond emitting and listening for events, Node.js exposes extra methods for controlling how listeners are registered and inspected.
When defining events, there are different methods for events which can be invoked. This topic focuses on looking at each one of them in detail.
- One time event handlers
Sometimes you may be interested in reacting to an event only the first time it occurs. In these situations, you can use the once() method.
Let’s see how we can make use of the once method for event handlers.

Code Explanation:-
- Here we are using the ‘once’ method to say that for the event ‘data_received,’ the callback function should only be executed once.
- Here we are manually triggering the ‘data_received’ event.
- When the ‘data_received’ event is triggered again, this time, nothing will happen. This is because of the first step where we said that the event could only be triggered once.
If the code is executed properly, the output in the log will be ‘data_received successfully’. This message will only appear once in the console.
- Inspecting Event Listeners
At any point in its lifetime, an event emitter can have zero or more listeners attached to it. The listeners for each event type can be inspected in several ways.
If you are interested in only determining the number of attached listeners, then look no further than the EventEmitter.listenerCount() method.
(Note: Listeners are important because the main program should know if listeners are being added on the fly to an event, else the program will malfunction because additional listeners will get called.)

Code Explanation:-
- We are defining an eventEmitter type which is required for using the event-related methods.
- We are then defining an object called emitter which will be used to define our event handlers.
- We are creating 2 events handlers which basically do nothing. This is kept simple for our example just to show how the listenerCount method works.
- Now when you invoke the listenerCount method on our data_received event, it will send the number of event listeners attached to this event in the console log.
If the code is executed properly, the value of 2 will be shown in the console log.
- The newListener Event
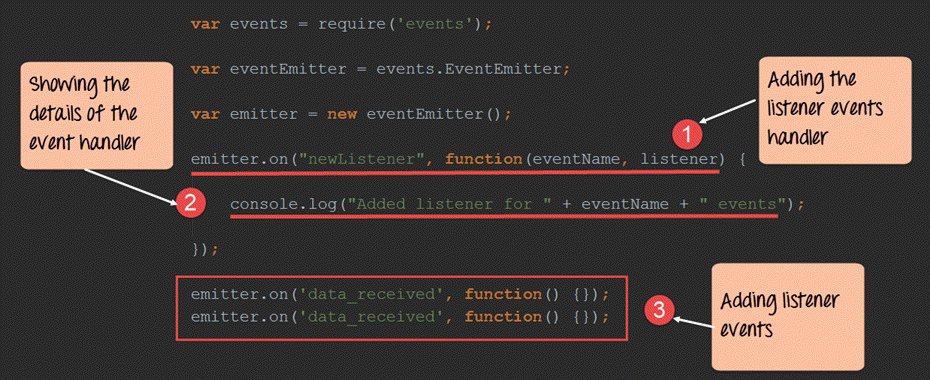
Each time a new event handler is registered, the event emitter emits a newListener event. This event is used to detect new event handlers. You typically use newListener event when you need to allocate resources or perform some action for each new event handler.
var events = require('events');
var eventEmitter = events.EventEmitter;
var emitter = new eventEmitter();
emitter.on("newListener", function(eventName, listener) {
    console.log("Added listener for " + eventName + " events");
});
emitter.on('data_received', function() {});
emitter.on('data_received', function() {});
Code Explanation:-
- We are creating a new event handler for the ‘newListener’ event. So whenever a new event handler is registered, the text “Added listener for” + the event name will be displayed in the console.
- Here we are writing to the console the text “Added listener for” + the event name for each event registered.
- We are defining 2 event handlers for our event ‘data_received’.
If the above code is executed properly, the below text will be shown in the console. It just shows that the ‘newListener’ event handler was triggered twice.
Added listener for data_received events
Added listener for data_received events
