
Node.js Express.js FrameWork Tutorial
 Editorial Team
⚡ Smart Summary
Express.js is a minimal Node.js web application framework that adds routing, middleware and template rendering to the core HTTP module, so single-page, multi-page and hybrid applications reach a working server in very few lines.
In this tutorial, we will study the Express framework. This framework is built in such a way that it acts as a minimal and flexible Node.js web application framework, providing a robust set of features for building single-page, multi-page, and hybrid web applications.
What is Express.js?
Express.js is a Node.js web application server framework, which is specifically designed for building single-page, multi-page, and hybrid web applications.
It has become the standard server framework for Node.js. Express is the backend part of something known as the MEAN stack.
Express layers routing and middleware over the core Node.js HTTP, streams and events APIs.
The MEAN is a free and open-source JavaScript software stack for building dynamic web sites and web applications which has the following components;
1) MongoDB — The standard NoSQL database
2) Express.js — The default web applications framework
3) AngularJS — The JavaScript MVC framework used for web applications
4) Node.js — Framework used for scalable server-side and networking applications.
The Express.js framework makes it very easy to develop an application which can be used to handle multiple types of requests like the GET, PUT, and POST and DELETE requests.
Installing and using Express
Express gets installed via the Node Package Manager. This can be done by executing the following line in the command line
npm install express
The above command requests the Node Package Manager to download the required express modules and install them accordingly.
Version note: npm now installs Express 5.2; many projects still pin Express 4. Both run the examples below on a supported Node.js release.
Let’s use our newly installed Express framework and create a simple “Hello World” application.
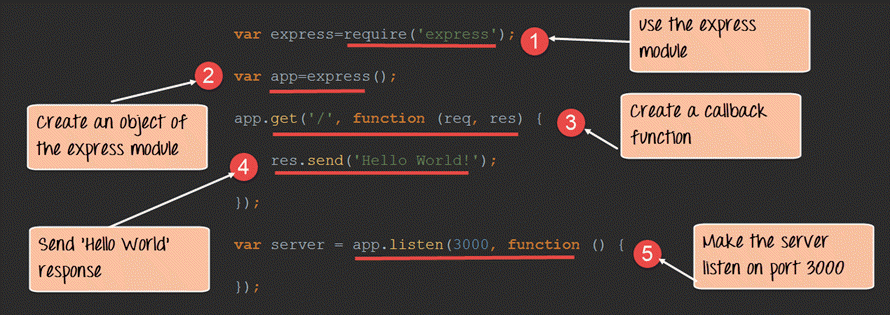
Our application is going to create a simple server module which will listen on port number 3000. In our example, if a request is made through the browser on this port number, then server application will send a ‘Hello World’ response to the client.
var express=require('express');
var app=express();
app.get('/',function(req,res)
{
res.send('Hello World!');
});
var server=app.listen(3000,function() {});
Code Explanation:
- In our first line of code, we are using the require function to include the “express module.”
- Before we can start using the express module, we need to make an object of it.
- Here we are creating a callback function. This function will be called whenever anybody browses to the root of our web application which is http://localhost:3000 . The callback function will be used to send the string ‘Hello World’ to the web page.
- In the callback function, we are sending the string “Hello World” back to the client. The ‘res’ parameter is used to send content back to the web page. This ‘res’ parameter is something that is provided by the ‘request’ module to enable one to send content back to the web page.
- We are then using the listen function to make our server application listen to client requests on port no 3000. You can specify any available port over here.
If the command is executed successfully, the following Output will be shown when you run your code in the browser.
Output:

From the output,
- You can clearly see that if you browse to the URL of localhost on port 3000, you will see the string ‘Hello World’ displayed on the page.
- Because in our code we have mentioned specifically for the server to listen on port no 3000, we are able to view the output when browsing to this URL.
What are Routes?
A single root route is only the starting point.
Routing determines the way in which an application responds to a client request to a particular endpoint.
For example, a client can make a GET, POST, PUT or DELETE http request for various URL such as the ones shown below;
http://localhost:3000/Books
http://localhost:3000/Students
In the above example,
- If a GET request is made for the first URL, then the response should ideally be a list of books.
- If the GET request is made for the second URL, then the response should ideally be a list of Students.
- So based on the URL which is accessed, a different functionality on the web server will be invoked, and accordingly, the response will be sent to the client. This is the concept of routing.
Each route can have one or more handler functions, which are executed when the route is matched.
The general syntax for a route is shown below
app.METHOD(PATH, HANDLER)
Wherein,
1) app is an instance of the express module
2) METHOD is an HTTP request method (GET, POST, PUT or DELETE)
3) PATH is a path on the server.
4) HANDLER is the function executed when the route is matched.
| Call | Request | Purpose |
|---|---|---|
| app.get(PATH, HANDLER) | GET | Read |
| app.post(PATH, HANDLER) | POST | Create |
| app.put(PATH, HANDLER) | PUT | Replace |
| app.delete(PATH, HANDLER) | DELETE | Remove |
| app.route(PATH) | Chained | Group handlers |
| app.use(HANDLER) | Any | Mount middleware |
⚠️ Express 5 note: these signatures are unchanged, but app.del() became app.delete(), res.sendfile() became res.sendFile(), and wildcards now need names such as /*splat.
Let’s look at an example of how we can implement routes in Express. Our example will create 3 routes as
- A /Node route which will display the string “Tutorial on Node” if this route is accessed
- A /Angular route which will display the string “Tutorial on Angular” if this route is accessed
- A default route / which will display the string “Welcome to Guru99 Tutorials.”
Our basic code will remain the same as previous examples. The below snippet is an add-on to showcase how routing is implemented.

var express = require('express');
var app = express();
app.route('/Node').get(function(req,res)
{
    res.send("Tutorial on Node");
});
app.route('/Angular').get(function(req,res)
{
    res.send("Tutorial on Angular");
});
app.get('/',function(req,res){
    res.send('Welcome to Guru99 Tutorials');
});
Code Explanation:
- Here we are defining a route if the URL http://localhost:3000/Node is selected in the browser. To the route, we are attaching a callback function which will be called when we browse to the Node URL. The function has 2 parameters.
- The main parameter we will be using is the ‘res’ parameter, which can be used to send information back to the client.
- The ‘req’ parameter has information about the request being made. Sometimes additional parameters could be sent as part of the request being made, and hence the ‘req’ parameter can be used to find the additional parameters being sent.
- We are using the send function to send the string “Tutorial on Node” back to the client if the Node route is chosen.
- Here we are defining a route if the URL http://localhost:3000/Angular is selected in the browser. To the route, we are attaching a callback function which will be called when we browse to the Angular URL.
- We are using the send function to send the string “Tutorial on Angular” back to the client if the Angular route is chosen.
- This is the default route which is chosen when one browses to the root of the application — http://localhost:3000. When the default route is chosen, the message “Welcome to Guru99 Tutorials” will be sent to the client.
If the command is executed successfully, the following Output will be shown when you run your code in the browser.
Output:
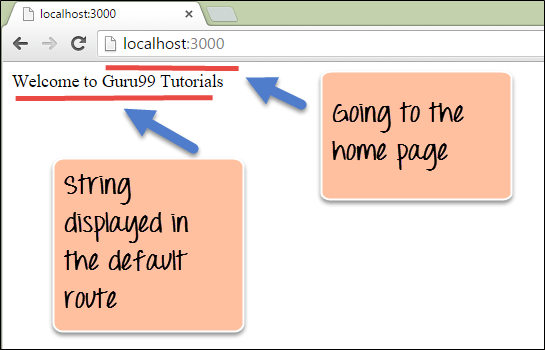
From the output,
- You can clearly see that if you browse to the URL of localhost on port 3000, you will see the string ‘Welcome to Guru99 Tutorials’ displayed on the page.
- Because in our code, we have mentioned that our default URL would display this message.
Next, browse to /Node.

From the output,
- You can see that if the URL has been changed to /Node, the respective Node route would be chosen and the string “Tutorial on Node” is displayed.
Then browse to /Angular.

From the output,
- You can see that if the URL has been changed to /Angular, the respective Node route would be chosen and the string “Tutorial on Angular” is displayed.
Sample Web server using express.js
From our above example, we have seen how we can decide on what output to show based on routing. This sort of routing is what is used in most modern-day web applications. The other part of a web server is about using templates in Node.js.
When creating quick on-the-fly Node.js applications, an easy and fast way is to use templates for the application. There are many frameworks available in the market for making templates. In our case, we will take the example of the Jade framework for templating.
Jade gets installed via the Node Package Manager. This can be done by executing the following line in the command line
npm install jade
The above command requests the Node Package Manager to download the required Jade modules and install them accordingly.
NOTE: In the latest version of Node jade has been deprecated. Instead, use pug.
⚠️ Modern equivalent: install Pug, rename index.jade to index.pug and set app.set(‘view engine’,’pug’). The jade package receives no updates; the steps below still run.
Let’s use our newly installed Jade framework and create some basic templates.
Step 1) The first step is to create a Jade template. Create a file called index.jade and insert the below code. Ensure to create the file in “views” folder
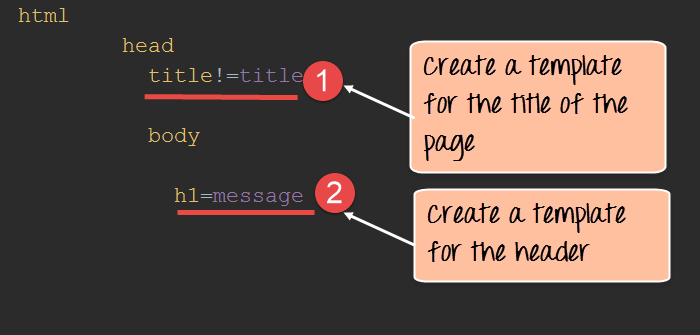
- Here we are specifying that the title of the page will be changed to whatever value is passed when this template gets invoked.
- We are also specifying that the text in the header tag will get replaced to whatever gets passed in the Jade template.
The application code that renders it follows.

var express=require('express');
var app=express();
app.set('view engine','jade');
app.get('/',function(req,res)
{
res.render('index',
{title:'Guru99',message:'Welcome'})
});
var server=app.listen(3000,function() {});
Code Explanation:
- The first thing to specify in the application is “view engine” that will be used to render the templates. Since we are going to use Jade to render our templates, we specify this accordingly.
- The render function is used to render a web page. In our example, we are rendering the template (index.jade) which was created earlier.
- We are passing the values of “Guru99” and “Welcome” to the parameters “title” and “message” respectively. These values will be replaced by the ‘title’, and ‘message’ parameters declared in the index.jade template.
If the command is executed successfully, the following Output will be shown when you run your code in the browser.
Output:

From the output,
- We can see that the title of the page gets set to “Guru99” and the header of the page gets set to “Welcome.”
- This is because of the Jade template which gets invoked in our Node.js application.
