Node.js Generators & Compare with Callbacks
In this tutorial, we are going to learn about Generators and their differences with Callbacks
What are generators?
Generators have become quite famous in Node.js in recent times and that is probably because of what they are capable of doing.
- Generators are function executions that can be suspended and resumed at a later point.
- Generators are useful when carrying out concepts such as ‘lazy execution’. This basically means that by suspending execution and resuming at will, we are able to pull values only when we need to.
Generators have the below 2 key methods.
- Yield method – The yield method is called in a function to halt the execution of the function at the specific line where the yield method is called.
- Next method – This method is called from the main application to resume the execution of a function which has a yield method. The execution of the function will continue till the next yield method or till the end of the method.
Let’s look at an example of how generators can be used.
In our example, we are going to have a simple Add function which will add 2 numbers, but we will keep on halting the method execution at different points to showcase how generators can be used.
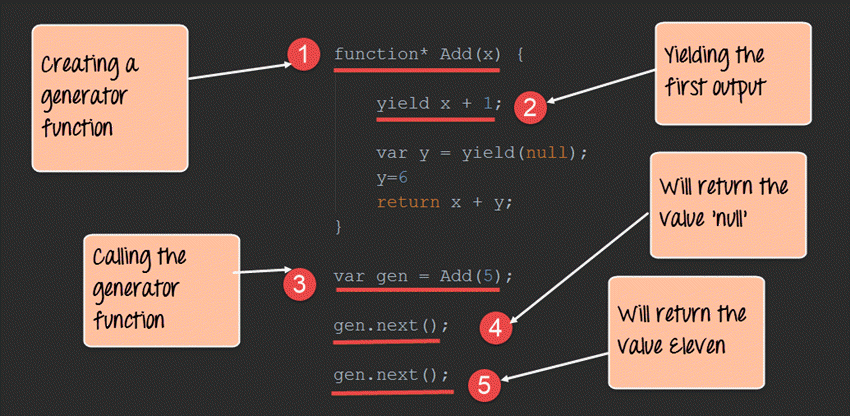
function* Add(x) {
   yield x + 1;
   var y = yield(null);
   y = 6
   return x + y;
}

var gen = Add(5);

gen.next();

gen.next();
Code Explanation
- The first step is to define our generator “function”. Note that this is done by adding a “*” to the function keyword. We are then defining a function called Add which takes a parameter of x.
- The yield keyword is a specific to generators. This makes it a powerful construct for pausing a function in the middle of anything. So here, the function execution will be halted till we invoke the next() function, which will be done in Step4. At this point, the value of x will become 6 and the execution of the function will be stopped.
- This is where we first call the generator function and send the value of 5 to our Add function. This value will be substituted in the x parameter of our Add function.
- Once we call the next() function, the Add() function will resume the execution. When the next statement var y= yield(null) will be executed, the Add() function will again stop executing.
- Now after calling the next() function again, the next statements will run, and the combined value of x=5 and y=6 will be added and returned.
Callbacks vs. generators
Generators are used to solve the problem of what is known as callback hell. Sometimes callback functions become so nested during the development of a Node.js application that it just becomes too complicated to use callback functions.
This is where generators are useful. One of the most common examples of this is when creating timer functions.
Let’s see the below example of how generators can prove to be useful over callbacks.
Our example will just create a simple time delay function. We would then want to call this function incorporating a delay of 1000, 2000 and 3000 ms.
Step 1) Define our callback function with the necessary time delay code.
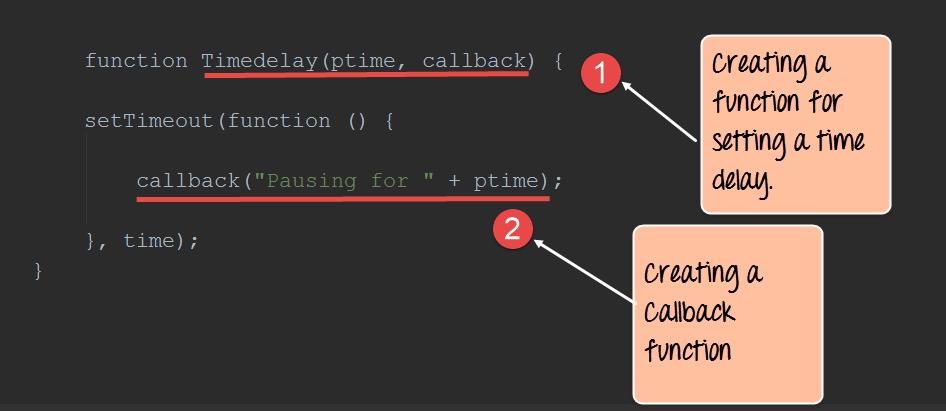
function Timedelay(ptime, callback) {

setTimeout(function() {

    callback("Pausing for " + ptime);

  }, time);
}
Code Explanation
- Here we are creating a function called Timedelay with a parameter called ptime. This will take in the necessary time delay we want to introduce in our application.
- The next step is to just create a message, which will be displayed to the user saying that the application is going to be pause for these many numbers of milliseconds.
Step 2) Now let’s look at the code if we were incorporating callbacks. Suppose we wanted to incorporate callbacks based on the value of 1000, 2000 and 3000 milliseconds, the below code shows how we would need to implement these using callbacks.
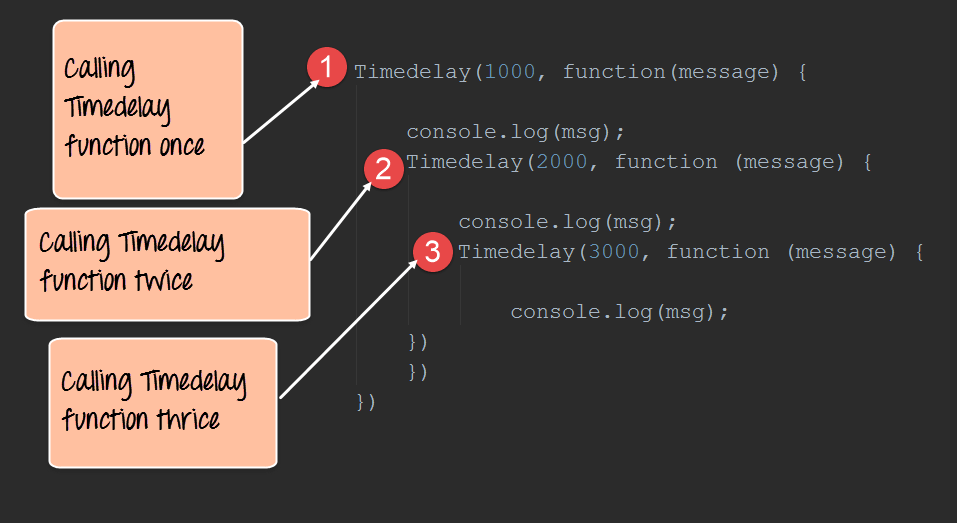
Timedelay(1000, function(message) {

  console.log(msg);
  Timedelay(2000, function(message) {

    console.log(msg);
    Timedelay(3000, function(message) {

      console.log(msg);
  })
  })
})
Code Explanation
- We are calling the Timedelay as a callback with 1000 as the value.
- Next we want to call the Timedelay function again with 2000 as the value.
- Finally, we want to call the Timedelay function again with 3000 as the value.
From the above code, you can see that it becomes messier as we want to start calling the function multiple times.
Step 3) Now let’s see how to implement the same code using generators. From the below code you can now see how simple it has become to implement the Timedelay function using generators.

function* Messages() {
  console,log(yield(Timedelay(1000, function(){})));
  console,log(yield(Timedelay(2000, function(){})));
  console,log(yield(Timedelay(3000, function(){})));
}
Code Explanation
- We are first defining a generator function which will be used to call our Timedelay function.
- We are calling the Yield function along with the Timedelay function with 1000 as the parameter value.
- We are then calling the Yield function along with the Timedelay function with 2000 as the parameter value.
- Finally, we are calling the Yield function along with the Timedelay function with 3000 as the parameter value.
Summary
Generators can also be used to alleviate the problems with nested callbacks and assist in removing what is known as the callback hell. Generators are used to halt the processing of a function. This is accomplished by usage of the ‘yield’ method in the asynchronous function.