
AngularJS Custom Directive: Templates, Scope & Transclude
 Editorial Team
⚡ Smart Summary
Custom Directives in AngularJS extend HTML with reusable behaviour that you define yourself. A directive factory returns a definition object, and AngularJS attaches that behaviour wherever the matching element, attribute, class, or comment appears in the markup.

What is a Custom Directive in AngularJS?
A Custom Directive in AngularJS is a user-defined directive that extends HTML with behaviour you write yourself. It is registered on a module using the “directive” function, and AngularJS attaches it wherever the matching element or attribute appears in the page. Even though AngularJS has a lot of powerful built-in directives out of the box, such as ng-repeat, sometimes custom directives are required.
⚠️ Correction: The original said a custom directive “replaces the element for which it is used”. By default it does not: template is inserted inside the matched element. Replacement needs replace: true, deprecated since AngularJS 1.3.
⚠️ Support notice: AngularJS reached end of life on 31 December 2021 and receives no further patches or security fixes. Everything below stays accurate for maintaining existing AngularJS 1.x code; in modern Angular the equivalents are components and attribute directives.
The reason to reach for a custom directive is repetition. When the same markup or DOM wiring appears on several screens, a directive turns it into one named tag.
How to Create a Custom Directive?
Let us take a look at an example of how we can create an AngularJS custom directive.
The custom directive in our case is simply going to inject a div tag which has the text “Angular JS Tutorial” in our page when the directive is called.
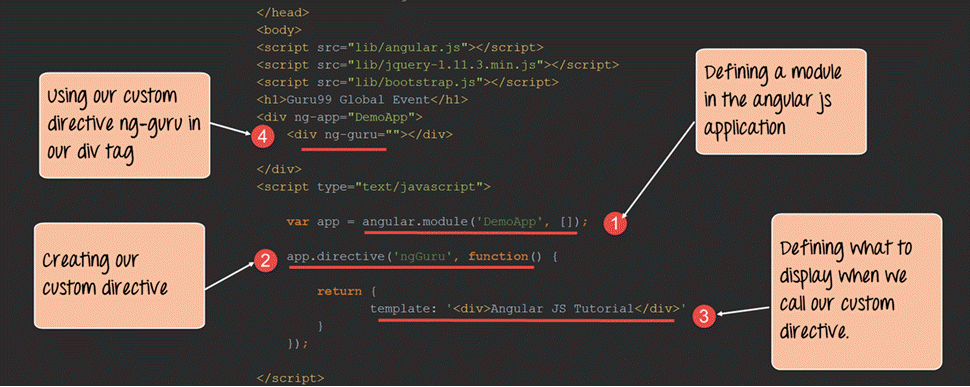
The annotated screenshot below numbers the four parts of the listing explained after it.
<!DOCTYPE html>
<html>
<head>
    <meta chrset="UTF 8">
    <title>Event Registration</title>
</head>
<body>

<script src="https://code.angularjs.org/1.6.9/angular-route.js"></script>
<script src="https://code.angularjs.org/1.6.9/angular.js"></script>
<script src="https://code.angularjs.org/1.6.9/angular.min.js"></script>
<script src="https://code.jquery.com/jquery-3.3.1.min.js"></script>

<h1> Guru99 Global Event</h1>

<div ng-app="DemoApp">
    <div ng-guru=""></div>

</div>

<script type="text/javascript">
    var app = angular.module('DemoApp',[]);
    app.directive('ngGuru',function(){

    return {
        template: '<div>Angular JS Tutorial</div>'
    }
    });

</script>

</body>
</html>
⚠️ Warning — defects preserved in this listing: The code is reproduced exactly as published. Three flaws recur in every listing here: chrset="UTF 8" should be charset="UTF-8"; angular.js and angular.min.js both load, so AngularJS loads twice; and angular-route.js loads before the file it depends on.
Code Explanation
- We are first creating a module for our AngularJS application. This is required to create a custom directive because the directive will be created using this module.
- We are now creating a custom directive called “ngGuru” and defining a factory function which will hold the custom code for our directive.
- We are using the template parameter, which is a parameter defined by AngularJS for custom directives. In this, we are defining that whenever this directive is used, then just use the value of the template and inject it in the calling code.
- Here we are now making use of our custom created “ng-guru” directive. When we do this, the value we defined for our template,
<div>Angular JS Tutorial</div>, will now be injected here.
Directive Naming and Normalisation
The name mismatch between the JavaScript and the HTML confuses most beginners. AngularJS normalises every element and attribute name before matching it: it strips any x- or data- prefix, then converts a name delimited by -, : or _ into camelCase. That is why ngGuru matches ng-guru, and why data-ng-guru works too. The camelCase form is the real name; kebab-case is simply how it is written in HTML.
⚠️ Correction: The original text said a custom directive name “should start with the letters ‘ng'”. The official AngularJS documentation advises the opposite: never prefix your own directives with ng, or they may collide with a future built-in. Use your own prefix, such as g99Guru written as g99-guru.
If the code executes successfully, this output appears.
Output:
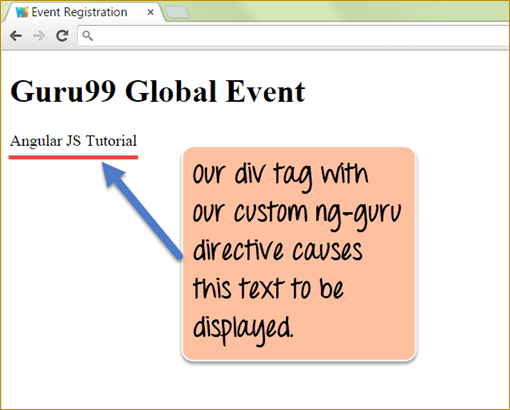
The output clearly shows that our custom ng-guru directive, which has the template defined for showing a custom text, gets displayed in the browser. The next step is to put something worth reusing inside that template.
How to Create Reusable Directives
We already saw the power of custom directives, but we can take that to the next level by building our own re-usable directives.
Let us say, for example, that we wanted to inject code that would always show the below HTML tags across multiple screens, which is basically just an input for the “Name” and “age” of the user.

To reuse this fragment on multiple screens without coding it each time, we create a master control, or directive, in AngularJS to hold these two controls.
So now, instead of repeating that markup on every screen, we embed it in a directive and call the directive instead. The screenshot below marks the only line that changes.

<!DOCTYPE html> <html> <head> <meta chrset="UTF 8"> <title>Event Registration</title> </head> <body> <script src="https://code.angularjs.org/1.6.9/angular-route.js"></script> <script src="https://code.angularjs.org/1.6.9/angular.js"></script> <script src="https://code.angularjs.org/1.6.9/angular.min.js"></script> <script src="https://code.jquery.com/jquery-3.3.1.min.js"></script> <h1> Guru99 Global Event</h1> <div ng-app="DemoApp"> <div ng-guru=""></div> </div> <script type="text/javascript"> var app = angular.module('DemoApp',[]); app.directive('ngGuru',function(){ return { template: ' Name <input type="text"><br><br> Age<input type="text">' }; }); </script> </body> </html>
Code Explanation
- In our code snippet for a custom directive, what changes is just the value which is given to the template parameter. Instead of a plain tag or a line of text, we are entering the entire fragment of two input controls for the “Name” and “age” which needs to be shown on our page.
💡 Tip: A template this long belongs in its own file. Swap template for templateUrl: 'name-age.html'.
If the code executes successfully, this output appears.
Output:

From the above output, we can see that the code snippet from the template of the custom directive gets added to the page. The template is still static, so the next step is to feed it data.
AngularJS Directives and Scopes
The scope is defined as the glue which binds the controller to the view by managing the data between the view and the controller.
When creating custom AngularJS directives, they by default will have access to the scope object in the parent controller. It is the same scope object, not a copy.
In this way, it becomes easy for the custom directive to make use of the data being passed to the main controller.
Let us look at an example of how we can use the scope of a parent controller in our custom directive. The screenshot below numbers the four steps.

<!DOCTYPE html>
<html>
<head>
    <meta chrset="UTF 8">
    <title>Event Registration</title>
</head>
<body>

<script src="https://code.angularjs.org/1.6.9/angular-route.js"></script>
<script src="https://code.angularjs.org/1.6.9/angular.js"></script>
<script src="https://code.angularjs.org/1.6.9/angular.min.js"></script>
<script src="https://code.jquery.com/jquery-3.3.1.min.js"></script>

<h1> Guru99 Global Event</h1>

<div ng-app="DemoApp" ng-controller="DemoController">
    <div ng-guru=""></div>

</div>

<script type="text/javascript">

    var app = angular.module('DemoApp',[]);

    app.controller('DemoController',function($scope) {
        $scope.tutorialName = "Angular JS";

    });

        app.directive('ngGuru',function(){
        return {
         template: '<div>{{tutorialName}}</div>'
     }
    });

</script>

</body>
</html>
Code Explanation
- We first create a controller called “DemoController”. In this, we define a variable called tutorialName and attach it to the scope object in one statement:
$scope.tutorialName = "Angular JS". - In our custom directive, we can call the variable “tutorialName” by using an expression. This variable would be accessible because it is defined in the controller “DemoController”, which would become the parent for this directive.
- We reference the controller in a div tag, which will act as our parent div tag. Note that this needs to be done first in order for our custom directive to access the tutorialName variable.
- We finally just attach our custom directive “ng-guru” to our div tag.
If the code executes successfully, this output appears.
Output:

The above output clearly shows that our custom directive “ng-guru” makes use of the scope variable tutorialName in the parent controller. Sharing the parent scope is convenient, but not always what you want.
Using Controllers with Directives
AngularJS gives the facility to access the controller’s member variable directly from custom directives without the need of the scope object.
This becomes necessary at times because an application may have multiple scope objects belonging to multiple controllers, so there is a high chance of accessing the scope object of the wrong controller by mistake.
In such a scenario there is a way to say specifically “I want to access this controller” from my directive.
Let us take a look at an example of how we can achieve this. The screenshot numbers the four steps.

<!DOCTYPE html>
<html>
<head>
    <meta chrset="UTF 8">
    <title>Event Registration</title>
</head>
<body>

<script src="https://code.angularjs.org/1.6.9/angular-route.js"></script>
<script src="https://code.angularjs.org/1.6.9/angular.js"></script>
<script src="https://code.angularjs.org/1.6.9/angular.min.js"></script>
<script src="https://code.jquery.com/jquery-3.3.1.min.js"></script>

<h1> Guru99 Global Event</h1>

<div ng-app="DemoApp" ng-controller="DemoController">
    <div ng-guru99=""></div>

</div>

<script type="text/javascript">

    var app = angular.module('DemoApp',[]);

    app.controller('DemoController',function() {
        this.tutorialName = "Angular";

    });

     app.directive('ngGuru99',function(){
        return {
         controller: 'DemoController',

          controllerAs: 'ctrl',

          template: '{{ctrl.tutorialName}}'
     };
    });

</script>

</body>
</html>
Code Explanation
- We first create a controller called “DemoController”. In this we will define a variable called “tutorialName” and this time, instead of attaching it to the scope object, we will attach it directly to the controller.
- In our custom directive, we are specifically mentioning that we want to use the controller “DemoController” by using the controller parameter keyword.
- We create a reference to the controller using the “controllerAs” parameter. This is defined by AngularJS and is the way to reference the controller by an alias.
- Finally, in our template, we are using the reference created in step 3 and using the member variable that was attached directly to the controller in step 1.
Note: It is possible to access multiple controllers in a directive by specifying respective blocks of the controller, controllerAs and template statements. To reach a parent directive’s controller instead, use require.
If the code executes successfully, this output appears.
Output:

The output clearly shows that the custom directive is accessing the DemoController and the member variable tutorialName attached to it, and displays the text “Angular”. Both approaches still read from a shared scope, which an isolate scope prevents.
How @, =, & and < Bindings Differ in an Isolate Scope
A directive that shares its parent scope can only be used once per controller, because two copies would fight over the same variables. A scope object creates an isolate scope: the directive sees nothing outside except the properties you list. Each entry uses a prefix symbol declaring how its value travels.
| Symbol | Direction | Value received | Use it for |
|---|---|---|---|
| @ | One-way in | The attribute as an interpolated string | Labels, titles, any plain text |
| = | Two-way | The live object or value itself | Models the directive writes back to |
| & | Outward call | A function evaluating an expression in the outer scope | Callbacks such as on-close or on-save |
| < | One-way in | The evaluated value, never written upward | Read-only data, added in AngularJS 1.5 |
💡 Tip: Reach for < before =. One-way binding is cheaper to watch and stops a component from silently mutating its caller’s data. The next section uses @.
AngularJS Directives and Components: ng-transclude
As we mentioned earlier, AngularJS is meant to extend the functionality of HTML. And we have already seen how we can have code injection by using custom re-usable directives.
But in modern web application development, there is also a concept of developing web components, which basically means creating our own HTML tags that can be used as components in our code.
Hence AngularJS provides another level of power for extending HTML tags by giving the ability to wrap whatever markup the caller puts inside the tag.
This is done by the “ng-transclude” directive, which tells AngularJS to capture everything that is put inside the custom tag in the markup and drop it into the template at that point.
Let us take an example of how we can achieve this. The screenshot numbers the five points that follow.

<!DOCTYPE html>
<html>
<head>
    <meta chrset="UTF 8">
    <title>Event Registration</title>
</head>
<body>

<script src="https://code.angularjs.org/1.6.9/angular-route.js"></script>
<script src="https://code.angularjs.org/1.6.9/angular.js"></script>
<script src="https://code.angularjs.org/1.6.9/angular.min.js"></script>
<script src="https://code.jquery.com/jquery-3.3.1.min.js"></script>

<h1> Guru99 Global Event</h1>

<div ng-app="DemoApp">
    <pane title="{{title}}">Angular JS</pane>

</div>

<script type="text/javascript">

    var app = angular.module('DemoApp',[]);

    app.directive('pane',function(){
        return {

            transclude:true,
            scope :{title:'@'},
            template: '<div style="border: 1px solid black;"> '+
                        '<ng-transclude></ng-transclude>'+
                            '</div>'
        };
    });

</script>

</body>
</html>
Code Explanation
- We are using the directive to define a custom HTML tag called “pane”, with a factory function supplying its code. In the output, the pane tag displays the text “Angular JS” in a rectangle with a solid black border.
- The “transclude” property has to be set to true, which is what tells AngularJS to keep the original inner markup and make it available to
ng-transclude. - In the scope object we are declaring a title binding. Attributes are normally written as name/value pairs like
name="value". In our case the attribute on the pane tag is “title”, and the “@” symbol asks AngularJS to copy that attribute across as an interpolated string. - The template draws the solid black border for our control and marks the spot where the transcluded markup is inserted.
- Finally, we are calling our custom HTML tag along with the title attribute that was defined.
⚠️ Correction: The original text described “@” as “the requirement from angular”. It is not a formality: @ is one of the four isolate-scope binding symbols in the table above and always yields a string. This template also never renders {{title}}, and no controller defines title, so only the transcluded text is visible.
If the code executes successfully, this output appears.
Output:

- The output shows the custom pane element rendered as a bordered box containing the transcluded text “Angular JS”.
A directive can also contain other directives, which is how larger components are assembled.
Nested Directives
Directives in AngularJS can be nested. Like inner modules or functions in any programming language, you may need to embed directives within each other.
You can get a better understanding of this by seeing the below example.
In this example, we are creating 2 directives called “outer” and “inner”.
- The inner directive displays a text called “Inner”.
- While the outer directive actually makes a call to the inner directive to display the text called “Inner”.
The screenshot below marks both directive definitions and the point where one calls the other.

</head>
<body>

<script src="https://code.angularjs.org/1.6.9/angular-route.js"></script>
<script src="https://code.angularjs.org/1.6.9/angular.js"></script>
<script src="https://code.angularjs.org/1.6.9/angular.min.js"></script>
<script src="https://code.jquery.com/jquery-3.3.1.min.js"></script>

<h1> Guru99 Global Event</h1>

<div ng-app="DemoApp">
    <outer></outer>
</div>

<script type="text/javascript">

    var app = angular.module('DemoApp',[]);

    app.directive('outer',function(){
        return {

            restrict:'E',
            template: '<div><h1>Outer</h1><inner></inner></div>',
        }});

    app.directive('inner',function(){
        return {

            restrict:'E',
            template: '<div><h1>Inner</h1></div>',
        }
    });
</script>

</body>
</html>
⚠️ Warning — defect preserved in this listing: The published listing begins at </head>, missing its opening <!DOCTYPE html>, <html> and <head> lines. Add them before running it.
Code Explanation
- We are creating a directive called “outer” which will behave as our parent directive. This directive will then make a call to the “inner” directive.
- The
restrict:'E'option tells AngularJS to match each directive by element name, which is why they can be written as the tags<outer>and<inner>. The letter ‘E’ is the short form of the word ‘Element’. - Here we are creating the inner directive which displays the text “Inner” in a div tag.
- In the template for the outer directive, we are calling the inner directive. So over here we are injecting the template from the inner directive into the outer directive.
- Finally, we are directly calling out the outer directive.
⚠️ Correction: The original text claimed restrict:'E' is required “to ensure that the data from the inner directive is available to the outer directive”. It does no such thing; it only controls how a directive may be written. Nesting works because the compiler keeps walking into the template it just inserted. To share data, use require and controller.
If the code executes successfully, this output appears.
Output:

From the output,
- It can be seen that both the outer and inner directives have been called, and the text in both div tags is displayed.
Rendering markup is only half of what a directive does; the other half is reacting to the user.
Handling Events in a Directive
Events such as mouse clicks or button clicks can be handled from within directives themselves. This is done using the link function. The link function is what allows the directive to attach itself to the DOM elements in an HTML page.
Syntax:
The syntax of the link function is as shown below.
link: function ($scope, element, attrs)
The link function normally accepts 3 parameters: the scope, the element the directive is associated with, and the attributes of the target element. Two more, a required controller and a transclude function, arrive when they apply.
Compile Phase versus Link Phase
AngularJS processes a directive in two passes, and knowing which is which tells you where your code belongs.
- Compile runs once on the template element, before any scope exists. It suits structural edits shared by every clone.
- Link runs once per instance, after the template is cloned and a scope attached. DOM listeners and scope reads belong here.
Because compile has no scope, anything needing data belongs in link, which is why the example below defines link alone.
Let us look at an example of how we can accomplish this. The screenshot numbers the four points below.

<!DOCTYPE html>
<html>
<head>
    <meta chrset="UTF 8">
    <title>Event Registration</title>
</head>
<body>

<script src="https://code.angularjs.org/1.6.9/angular-route.js"></script>
<script src="https://code.angularjs.org/1.6.9/angular.js"></script>
<script src="https://code.angularjs.org/1.6.9/angular.min.js"></script>
<script src="https://code.jquery.com/jquery-3.3.1.min.js"></script>

<h1> Guru99 Global Event</h1>

<div ng-app="DemoApp">
    <div ng-guru="">Click Me</div>
</div>

<script type="text/javascript">

    var app = angular.module('DemoApp',[]);

    app.directive('ngGuru',function(){
        return {

            link:function($scope,element,attrs) {
                element.bind('click',function () {
                    element.html('You clicked me');
                });}
        }});
</script>

</body>
</html>
Code Explanation
- We are using the link function as defined in AngularJS to give the directive the ability to access events in the HTML DOM.
- We are using the ‘element’ keyword because we want to respond to an event for an HTML DOM element, which in our case is the “div” element. We then use the “bind” function to add custom functionality to the click event of the element. The ‘click’ word is the keyword used to denote the click event of any HTML control.
- Here we are saying that we want to substitute the inner HTML of the element, in our case the div element, with the text ‘You clicked me’.
- Here we are defining our div tag to use the ng-guru custom directive.
💡 Tip: A directive should clean up after itself. Remove any listener that outlives the element inside element.on('$destroy', ...), or the page leaks memory.
If the code executes successfully, this output appears.
Output:
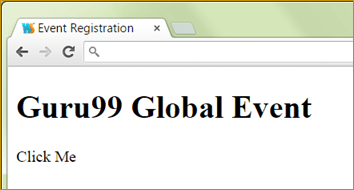
- Initially the text ‘Click Me’ is shown to the user, because that is what was defined inside the div tag. When you click on the div tag, the output below is shown instead.

Every example above used one or two properties of the same definition object. The full set is worth keeping to hand.
Directive Definition Object Properties Reference
The object returned by a directive factory is the Directive Definition Object. Each property answers one question about how the directive behaves.
| Property | Default | What it does |
|---|---|---|
| restrict | ‘EA’ | Which forms match: E element, A attribute, C class, M comment |
| template | none | Inline markup inserted into the matched element |
| templateUrl | none | Template file path, fetched once then cached |
| scope | false | false shares the parent scope, true creates a child, an object isolates |
| controller | none | Constructor exposing an API other directives can require |
| controllerAs | none | Alias for the controller inside the template |
| require | none | Another directive’s controller to inject; ^ searches parents, ^^ skips self, ? optional |
| link | none | Per-instance function: scope, element, attrs, controller, transcludeFn |
| compile | none | Runs once on the template before any scope exists |
| transclude | false | Preserves the original inner markup for ng-transclude |
| priority | 0 | Compile order on a shared element; higher runs first |
| terminal | false | Stops lower-priority directives on that element |
| replace | false | Swaps the element for the template. Deprecated since 1.3 |
💡 Tip: Start with restrict, template and link. Add scope for reuse, controller and require for directive-to-directive calls, and leave priority and terminal alone.
