
AngularJS Directives: ng-init, ng-app, ng-model & ng-repeat
 Editorial Team
⚡ Smart Summary
AngularJS Directives extend plain HTML with new behaviour. The ng-app, ng-init, ng-model and ng-repeat markers bootstrap an application, seed local data, bind form controls to the model, and clone elements once per collection item.
What is Directive in AngularJS?
A Directive in AngularJS is a command that gives HTML new functionality. When AngularJS goes through the HTML code, it will first find the directives in the page and then parse the HTML page accordingly. A simple example of an AngularJS directive, which we have seen in earlier chapters, is the “ng-model directive”. This directive is used to bind our data model to our view.
Note: You can have basic AngularJS code in an HTML page with the ng-init, ng-repeat and ng-model directives without the need to have Controllers. The logic for these directives is in the AngularJS file which is provided by Google. Controllers are the next level AngularJS programming constructs that allow business logic, but as mentioned, for an application to be an AngularJS application it is not mandatory to have a controller.
But how does a browser end up running one?
How AngularJS Directives Work in HTML
As we defined in the introduction, an AngularJS directive is a way to extend the functionality of HTML. When the page loads, the AngularJS compiler walks the DOM, matches each element against the registered directives, and attaches the behaviour it finds.
AngularJS ships with dozens of built-in directives, plus any you register yourself. The four explained below with worked examples, ng-app, ng-init, ng-model and ng-repeat, are the ones beginners meet first. Before those examples, note the four ways a directive can be written.
What are the Four Types of AngularJS Directives?
A directive is not always an attribute. The AngularJS compiler can match one by element name, attribute, class name or comment, and each directive declares which forms it accepts through its restrict property. The default is EA, so element and attribute syntax both work unless you say otherwise. The value matters most when you write your own directive, because the compiler ignores any form the restrict value excludes.
| restrict value | Matched by | Example markup | Typical use |
|---|---|---|---|
| E | Element name | <my-widget></my-widget> | Self-contained blocks that own a template |
| A | Attribute | <div my-widget></div> | Adding behaviour to an existing element |
| C | Class name | <div class=”my-widget”></div> | Legacy markup that cannot take new attributes |
| M | Comment | <!– directive: my-widget –> | Rare, kept for backward compatibility |
💡 Tip: Prefer element and attribute syntax. The official AngularJS directive reference treats class and comment forms as legacy options. The examples below all use attribute syntax.
ng-app in AngularJS
This is used to initialize an AngularJS application. When this directive is in place in an HTML page, it basically tells AngularJS that this HTML page is an AngularJS application.
Example of ng-app
The example below shows how to make a normal HTML application an AngularJS application.

<!DOCTYPE html>
<html>
<head>
    <meta chrset="UTF 8">
    <title>Event Registration</title>
</head>
<body>

<script src="https://code.angularjs.org/1.6.9/angular-route.js"></script>
<script src="https://code.angularjs.org/1.6.9/angular.js"></script>
<script src="https://code.angularjs.org/1.6.9/angular.min.js"></script>
<script src="https://code.jquery.com/jquery-3.3.1.min.js"></script>

<h1> Guru99 Global Event</h1>

<div ng-app="">

    Tutorial Name : {{ "Angular" + "JS"}}

</div>

</body>
</html>
⚠️ Warning: The listing keeps the original chrset="UTF 8", exactly as published. The correct attribute is charset="UTF-8".
Code Explanation:
- The “ng-app” directive is added to our div tag to indicate that this application is an AngularJS application. Note that the ng-app directive can be applied to any tag, so it can also be put in the body tag as well.
- Because we have defined this application as an AngularJS application, we can now make use of the AngularJS functionality. In our case, we are using expressions to simply concatenate 2 strings.
If the code executes successfully, the output below appears.
Output:

The output clearly shows the output of the expression, which was only made possible because we defined the application as an AngularJS application. The next directive supplies its data.
ng-init in AngularJS
This is used to initialize application data. Sometimes you may require some local data for your application, and this can be done with the ng-init directive.
Example of ng-init
In this example, we are going to create a variable called “TutorialName” using the ng-init directive and display the value of that variable on the page.

<!DOCTYPE html>
<html>
<head>
    <meta chrset="UTF 8">
    <title>Event Registration</title>
</head>
<body>

<script src="https://code.angularjs.org/1.6.9/angular-route.js"></script>
<script src="https://code.angularjs.org/1.6.9/angular.js"></script>
<script src="https://code.angularjs.org/1.6.9/angular.min.js"></script>
<script src="https://code.jquery.com/jquery-3.3.1.min.js"></script>

<h1> Guru99 Global Event</h1>

<div ng-app="" ng-init="TutorialName='Angular JS'">

    Tutorial Name : {{ TutorialName}}

</div>

</body>
</html>
Code Explanation:
- The ng-init directive is added to our div tag to define a local variable called “TutorialName” and the value given to this is “AngularJS”.
- We are using expressions in AngularJS to display the output of the variable name “TutorialName” which was defined in our ng-init directive.
If the code executes successfully, the output below appears.
Output:

In the output,
- The result clearly shows the output of the expression which contains the string “AngularJS”. This is as a result of the string “AngularJS” being assigned to the variable ‘TutorialName’ in the ng-init section.
The next directive sends data back from the screen into the model.
ng-model in AngularJS
And finally, we have the ng-model directive, which is used to bind the value of an HTML control to application data.
Example of ng-model
In this example,
- We are going to create 2 variables called “quantity” and “price”. These variables are going to be bound to 2 text input controls.
- We are then going to display the total amount based on the multiplication of both price and quantity values.

<!DOCTYPE html>
<html>
<head>
    <meta chrset="UTF 8">
    <title>Event Registration</title>
</head>
<body>

<script src="https://code.angularjs.org/1.6.9/angular-route.js"></script>
<script src="https://code.angularjs.org/1.6.9/angular.js"></script>
<script src="https://code.angularjs.org/1.6.9/angular.min.js"></script>
<script src="https://code.jquery.com/jquery-3.3.1.min.js"></script>

<h1> Guru99 Global Event</h1>

<div ng-app="" ng-init="quantity=1;price=5">

    People : <input type="number" ng-model="quantity">

    Registration Price : <input type="number" ng-model="price">

    Total : {{quantity * price}}

</div>

</body>
</html>
Code Explanation:
- The ng-init directive is added to our div tag to define 2 local variables; one is called “quantity” and the other is “price”.
- Now we are using the ng-model directive to bind the text boxes of “People” and “Registration price” to our local variables “quantity” and “price” respectively.
- Finally, we are showing the Total via an expression, which is the multiplication of the quantity and price variables.
If the code executes successfully, the output below appears.
Output:

- The output clearly shows the multiplication of the values for People and Registration price.
Now, if you change the value of People and Registration price in the text boxes, the Total changes automatically.

- The above output just shows the power of data binding in AngularJS, which is achieved with the use of the ng-model directive.
The last of the four handles many values at once.
ng-repeat in AngularJS
This is used to repeat an HTML element. The example below shows how to use the ng-repeat directive.
Example of ng-repeat
In this example,
- We are going to have an array of chapter names in an array variable and
- then use the ng-repeat directive to display each element of the array as a list item

<!DOCTYPE html>
<html>
<head>
    <meta chrset="UTF 8">
    <title>Event Registration</title>
</head>
<body>

<script src="https://code.angularjs.org/1.6.9/angular-route.js"></script>
<script src="https://code.angularjs.org/1.6.9/angular.js"></script>
<script src="https://code.angularjs.org/1.6.9/angular.min.js"></script>
<script src="https://code.jquery.com/jquery-3.3.1.min.js"></script>

<h1> Guru99 Global Event</h1>

<div ng-app="" ng-init="chapters=['Controllers','Models','Filters']">
    <ul>
        <li ng-repeat="names in chapters">
            {{names}}
        </li>
    </ul>

</div>

</body>
</html>
Code Explanation:
- The ng-init directive is added to our div tag to define a variable called “chapters” which is an array variable containing 3 strings.
- The ng-repeat element is used by declaring an inline variable called “names” and going through each element in the chapters array.
- Finally, we are showing the value of the local inline variable ‘names.’
If the code executes successfully, the output below appears.
Output:
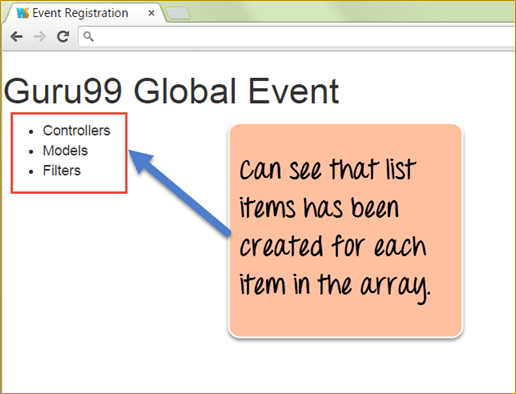
- The above output just shows that the ng-repeat directive took each value in the array called “chapters” and created HTML list items for each item in the array.
Those four cover startup, data, binding and repetition. The list below shows what comes next.
Other Commonly Used Built-in AngularJS Directives
The four directives above are the starting set, not the whole library. Each entry below is an attribute that you place directly on the element it controls.
- ng-bind: Writes a scope value into an element’s text without briefly showing raw braces on load.
- ng-if: Removes the element from the DOM when its expression is false, and rebuilds it when true.
- ng-show and ng-hide: Toggle visibility with CSS. The element stays in the DOM, so repeated toggles cost less.
- ng-class: Adds or removes CSS classes from an expression, letting styling follow the model.
- ng-click: Runs an expression or a scope function when the user clicks the element.
- ng-controller: Attaches a controller to a block of markup once the page outgrows ng-init.
- ng-disabled and ng-readonly: Set the matching form attribute whenever their expression is true.
The FAQs below answer the questions that most often follow this list.
