
Tableau Data Connections to Databases & Multiple Sources
 Editorial Team
⚡ Smart Summary
Tableau Data Connections cover every route data takes into a workbook, from flat files to live databases, web connectors, and published server sources. This page walks through each connection type, joins, unions, sorting, and source replacement.

In this Tableau Data Connections tutorial, you will learn about different data sources or data connections in Tableau.
Tableau Connecting to Various Data Sources
Tableau can connect to various types of data sources. It can connect to text files, excel files, PDF files, etc. It can also connect to various databases using its ODBC connector, as well as to servers and web connectors. The sections below cover the connection procedure for each of these Tableau data sources.
Following screenshot gives the exhaustive connection types Tableau supports

File-based sources sit on the left of that pane and servers in the middle. The sections below follow the same order.
Connecting to Text File in Tableau
Step 1) Click on the “Text File” option given in the data tab.

Step 2) In the next screen,
1. Select the SuperStore.csv
2. Click on “Open” Option. This will connect the text file into Tableau.

In the left pane you will see the CSV file.

Connecting to Excel File in Tableau
Step 1) Click on the “Microsoft Excel” option given in the data tab.

Step 2) In the next screen,
- Select the SuperStore.xlsx
- Click on “Open” Option.

Step 3) It connects the excel file into Tableau. The sheets present in the excel file is shown on the left side of the window.

Connection to Database
Step 1) Click on the required database connection given in the data tab. For example, if you want to connect to MySQL database, click on the “MySQL” Option.

Step 2) This will open MySQL connection window.
- You can enter the MySQL server name and edit the “Port” if needed.
- Enter the username and password used to connect the database.
- Click on the “Sign in” button to connect to the database.

This connects the database into Tableau. You can select tables from the database, import them, and join multiple tables by creating a relationship between them.
Connection to Websites
Tableau can connect to websites using Tableau data connectors. The connection procedure is given as follows.
Step 1) In this window,
- Click on “More” option in the data tab.
- Select “Web Data Connector” from the list.

Step 2) This will open a Tableau Web Data Connector window where you need to enter the web connector details.

How to Connect Tableau Desktop to Tableau Server
Tableau Server can store extracted data sources and data connections. At enterprise level it is important to keep the required connections in Tableau Server, so every user can reach the data source easily. Data sets on the server connect to Tableau Desktop as follows.
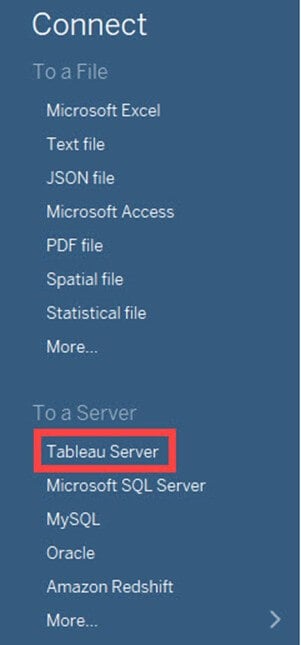
Step 1) Choose Tableau Server from options
Select the “Tableau Server” option given in the data tab.
Step 2) Open the Tableau server
This opens the Tableau Server Sign in window. Click on the “Tableau Cloud” option, labelled “Tableau Online” in builds before the 2022 rename.

Step 3) Sign in
It opens the Tableau Cloud Sign In Window.
- Enter the registered email id and password.
- Click on ‘Sign In’ button.

Step 4) Establish a connection
This will connect Tableau Server into Tableau Desktop.
- Select the data set as shown in the figure.
- This will import the dataset into Tableau.

The next task is usually combining more than one table.
Data Relationship
A relational Database/Excel file consists of multiple Tables/sheets. These multiple tables/sheets can be connected to each other in Tableau. This connection is established by ‘Join’ or ‘Union’ feature present in Tableau. The relationship between data in two or more tables needs to be specified while joining tables.
Joins
Tableau can “join” tables, up to 32 in a single data source. While joining, the relationship between two or more tables can be specified using an inner join, left join, right join or outer join. The functionalities of each join type are explained in the table below,
| Inner Join | Left Join | Right Join | Outer Join |
|---|---|---|---|
| It joins all the common records between two tables or sheets. The joining condition can be given based on the primary key. One or more joining conditions can be specified to join the tables. Many tables can be joined together in Tableau for visualization. | A left join is used to join all the records from a left table and common records from the right table. One or more join conditions can be specified to left join two different tables. | A right join is used to join all the records from a right table and common records from left table. Based on the requirements, one or more joining condition can be set. | An Outer join is used to join all the records from both left and right table. Joining conditions can be set to join common records. |
Let’s see an example of Join
Step 1) Once an Excel is connected, Drag the required sheet into data window as shown in the figure.

Step 2) You can connect multiple sheets by dragging the sheets into the data window. The relationship between the sheets can be given by connecting the data fields.

Step 3) In the data sheet
- Click on the “Join” option as shown in the figure. By default, Tableau joins two tables by connecting a relationship between common column present in it.
- You can edit the relationship by selecting the required joining Condition.
- You can add one or more data relationship between the sheets or tables.

Union
Union is used to append the data from two or more tables. In most cases, tables with the same headers are appended together using the union function, and no joining condition is required. The procedure is given as follows.
Step 1) Drag any of the sheet into data window as shown in the figure.

Step 2) Right click on the sheet and select “Convert to Union” option.

Step 3) In the data union window.
- Drag other sheets which need to be union.
- Click on ‘OK’ to append or union all the sheets present in the window.

A data relationship is not needed to union sheets present in the data source.
Relationships vs Joins in Tableau
Since version 2020.2 the canvas has an upper layer linking tables with a flexible line instead of a fixed join. That line is a relationship, and the choice changes the numbers a view returns.
A join runs immediately and produces one flattened table, so rows duplicate when one side has several matches. A relationship runs nothing until a worksheet requests fields, then queries at the right level of detail.
- Use a relationship when tables sit at different granularity, such as orders and returns, where duplicated measures would inflate totals.
- Use a join when a single flat table is genuinely wanted, such as a lookup adding descriptive columns.
- Use a union when tables share the same columns and only need stacking.
Joins remain available inside each logical table: double-clicking a table opens the physical layer containing the join dialog shown above.
Data Sorting
Data present in the data source can be sorted based on the user requirement. It can be sorted using data source order, ascending, descending, ascending per table and descending per table.
Once the data is connected to Tableau, data sorting can be done using the “Sort Fields” option in the “Data Source” tab. Worksheet-level sorting differs and is covered in sorting data in Tableau.

Replacing Data Source
Tableau can connect multiple data sources in a single workbook, and those sources can be used to build various sheets and dashboards. In some cases, a data source needs to be replaced with an updated file. Tableau has a replacing feature for this, and it does not affect visualizations already built on the old source. It is important to keep or replace all the used dimensions and measures while replacing the data source.
The procedure for replacing a data source is given as follows.
Step 1) Connect the new data source first, so both the current source and its replacement appear in the Data pane.

Step 2)
- Select the Data Source to be replaced.
- Right-click on the data source and select “Replace Data Source” option.

Step 3) It opens the data source replacement window.
1. Select the current data source.
2. Select replacement data source.
3. Click on “OK” to replace the data source.

Building views from this data is covered in the Tableau charts and graphs tutorial.
