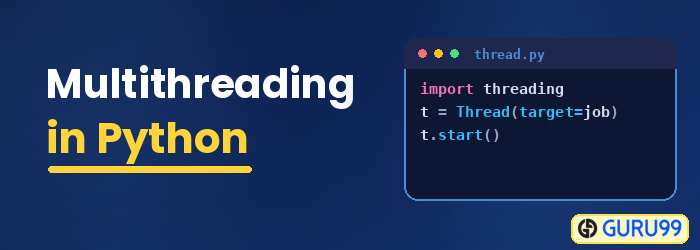
Multithreading in Python with Example: Learn GIL in Python
⚡ Smart Summary
Multithreading in Python runs several threads inside one process so they share memory and work concurrently. The threading module creates and manages these threads, while the Global Interpreter Lock limits true parallelism, making the technique best for input/output-bound tasks.
The Python programming language allows you to use multiprocessing or multithreading. In this tutorial, you will learn how to write multithreaded applications in Python.
What is a Thread?
A thread is a unit of execution in concurrent programming. Multithreading is a technique that allows a CPU to execute many tasks of one process at the same time. These threads can execute individually while sharing their process resources.
What is a Process?
A process is basically the program in execution. When you start an application on your computer (like a browser or text editor), the operating system creates a process.
What is Multithreading in Python?
Multithreading in Python programming is a well-known technique in which multiple threads in a process share their data space with the main thread, which makes information sharing and communication within threads easy and efficient. Threads are lighter than processes. Multiple threads may execute individually while sharing their process resources. The purpose of multithreading is to run multiple tasks and functions at the same time.
What is Multiprocessing?
Multiprocessing allows you to run multiple unrelated processes simultaneously. These processes do not share their resources and communicate through IPC.
Python Multithreading vs Multiprocessing
To understand processes and threads, consider this scenario: An .exe file on your computer is a program. When you open it, the OS loads it into memory, and the CPU executes it. The instance of the program that is now running is called the process.
Every process has two fundamental components:
- The Code
- The Data
Now, a process can contain one or more sub-parts called threads. This depends on the OS architecture. You can think of a thread as a section of the process that can be executed separately by the operating system.
In other words, it is a stream of instructions that can be run independently by the OS. Threads within a single process share the data of that process and are designed to work together to facilitate parallelism.
Why use Multithreading?
Multithreading allows you to break down an application into multiple sub-tasks and run these tasks simultaneously. If you use multithreading properly, your application speed, performance, and rendering can all be improved.
Python Multithreading
Python supports constructs for both multiprocessing and multithreading. In this tutorial, you will primarily focus on implementing multithreaded applications with Python. There are two main modules that can be used to handle threads in Python:
- The thread module, and
- The threading module
However, in Python, there is also something called a global interpreter lock (GIL). It does not allow for much performance gain and may even reduce the performance of some multithreaded applications. You will learn all about it in the upcoming sections of this tutorial.
The Thread and Threading modules
The two modules that you will learn about in this tutorial are the thread module and the threading module.
However, the thread module has long been deprecated. Starting with Python 3, it has been designated as obsolete and is only accessible as _thread for backward compatibility.
You should use the higher-level threading module for applications that you intend to deploy. The thread module has only been covered here for educational purposes.
The Thread Module
The syntax to create a new thread using this module is as follows:
thread.start_new_thread(function_name, arguments)
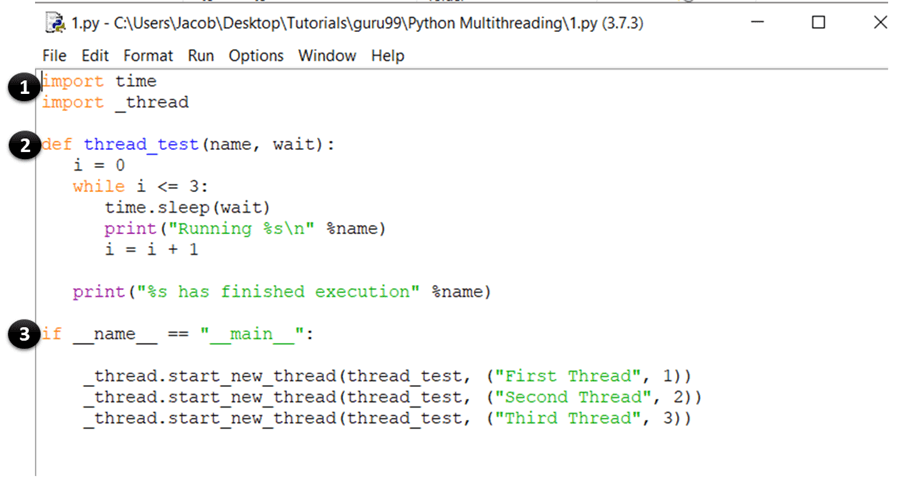
Alright, now you have covered the basic theory to start coding. So, open your IDLE or a notepad and type in the following:
import time
import _thread

def thread_test(name, wait):
   i = 0
   while i <= 3:
      time.sleep(wait)
      print("Running %s\n" %name)
      i = i + 1

   print("%s has finished execution" %name)

if __name__ == "__main__":

    _thread.start_new_thread(thread_test, ("First Thread", 1))
    _thread.start_new_thread(thread_test, ("Second Thread", 2))
    _thread.start_new_thread(thread_test, ("Third Thread", 3))
Save the file and hit F5 to run the program. If everything was done correctly, this is the output that you should see:
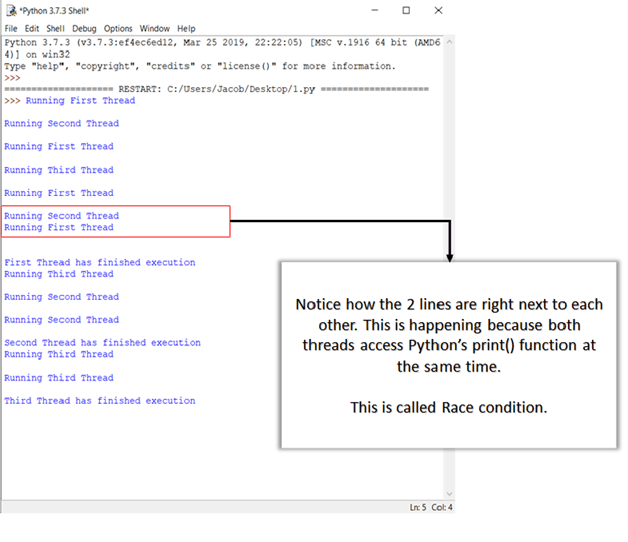
You will learn more about race conditions and how to handle them in the upcoming sections.
CODE EXPLANATION
- These statements import the time and thread module, which are used to handle the execution and delaying of the Python threads.
- Here, you have defined a function called thread_test, which will be called by the start_new_thread method. The function runs a while loop for four iterations and prints the name of the thread that called it. Once the iteration is complete, it prints a message saying that the thread has finished execution.
- This is the main section of your program. Here, you simply call the start_new_thread method with the thread_test function as an argument. This will create a new thread for the function you pass as an argument and start executing it. Note that you can replace this (thread_test) with any other function that you want to run as a thread.
The Threading Module
This module is the high-level implementation of threading in Python and the de facto standard for managing multithreaded applications. It provides a wide range of features when compared to the thread module.
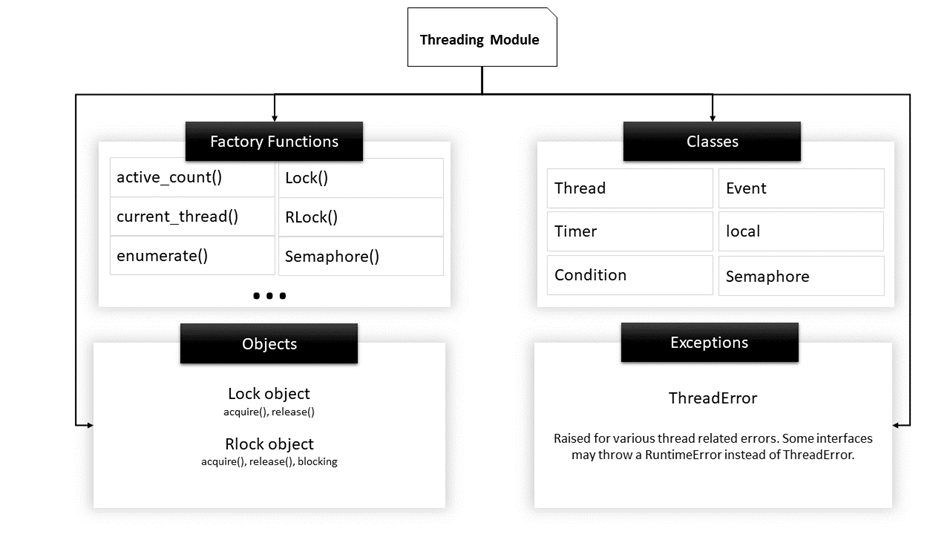
Structure of Threading module
Here is a list of some useful functions defined in this module:
| Function Name | Description |
|---|---|
| activeCount() | Returns the count of Thread objects that are still alive. |
| currentThread() | Returns the current object of the Thread class. |
| enumerate() | Lists all active Thread objects. |
| isDaemon() | Returns true if the thread is a daemon. |
| isAlive() | Returns true if the thread is still alive. |
| Thread Class methods | |
| start() | Starts the activity of a thread. It must be called only once for each thread because it will throw a runtime error if called multiple times. |
| run() | This method denotes the activity of a thread and can be overridden by a class that extends the Thread class. |
| join() | It blocks the execution of other code until the thread on which the join() method was called gets terminated. |
Backstory: The Thread Class
Before you start coding multithreaded programs using the threading module, it is crucial to understand the Thread class. The thread class is the primary class that defines the template and the operations of a thread in Python.
The most common way to create a multithreaded Python application is to declare a class that extends the Thread class and overrides its run() method.
The Thread class, in summary, signifies a code sequence that runs in a separate thread of control.
So, when writing a multithreaded app, you will do the following:
- define a class that extends the Thread class
- Override the __init__ constructor
- Override the run() method
Once a thread object has been made, the start() method can be used to begin the execution of this activity, and the join() method can be used to block all other code till the current activity finishes.
Now, let us try using the threading module to implement your previous example. Again, fire up your IDLE and type in the following:
import time
import threading

class threadtester (threading.Thread):
    def __init__(self, id, name, i):
       threading.Thread.__init__(self)
       self.id = id
       self.name = name
       self.i = i

    def run(self):
       thread_test(self.name, self.i, 5)
       print ("%s has finished execution " %self.name)

def thread_test(name, wait, i):

    while i:
       time.sleep(wait)
       print ("Running %s \n" %name)
       i = i - 1

if __name__=="__main__":
    thread1 = threadtester(1, "First Thread", 1)
    thread2 = threadtester(2, "Second Thread", 2)
    thread3 = threadtester(3, "Third Thread", 3)

    thread1.start()
    thread2.start()
    thread3.start()

    thread1.join()
    thread2.join()
    thread3.join()
This will be the output when you execute the above code:

CODE EXPLANATION
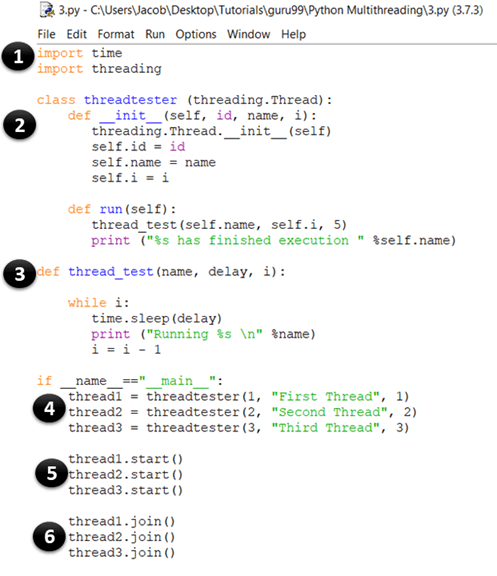
- This part is the same as our previous example. Here, you import the time and thread module, which are used to handle the execution and delays of the Python threads.
- In this bit, you are creating a class called threadtester, which inherits or extends the Thread class of the threading module. This is one of the most common ways of creating threads in Python. However, you should only override the constructor and the run() method in your app. As you can see in the above code sample, the __init__ method (constructor) has been overridden. Similarly, you have also overridden the run() method. It contains the code that you want to execute inside a thread. In this example, you have called the thread_test() function.
- This is the thread_test() method, which takes the value of i as an argument, decreases it by 1 at each iteration, and loops through the rest of the code until i becomes 0. In each iteration, it prints the name of the currently executing thread and sleeps for wait seconds (which is also taken as an argument).
- thread1 = threadtester(1, “First Thread”, 1) Here, we are creating a thread and passing the three parameters that we declared in __init__. The first parameter is the id of the thread, the second parameter is the thread’s name, and the third parameter is the counter, which determines how many times the while loop should run.
- thread2.start() The start method is used to start the execution of a thread. Internally, the start() function calls the run() method of your class.
- thread3.join() The join() method blocks the execution of other code and waits until the thread on which it was called finishes.
As you already know, the threads that are in the same process have access to the memory and data of that process. As a result, if more than one thread tries to change or access the data simultaneously, errors may creep in.
In the next section, you will see the different kinds of complications that can show up when threads access data and the critical section without checking for existing access transactions.
Deadlocks and Race conditions
Before learning about deadlocks and race conditions, it will be helpful to understand a few basic definitions related to concurrent programming:
- Critical Section: It is a fragment of code that accesses or modifies shared variables and must be performed as an atomic transaction.
- Context Switch: It is the process that a CPU follows to store the state of a thread before changing from one task to another so that it can be resumed from the same point later.
Deadlocks
Deadlocks are the most feared issue that developers face when writing concurrent/multithreaded applications in Python. The best way to understand deadlocks is by using the classic computer science example problem known as the Dining Philosophers Problem.
The problem statement for dining philosophers is as follows:
Five philosophers are seated at a round table with five plates of spaghetti (a type of pasta) and five forks, as shown in the diagram.

Dining Philosophers Problem
At any given time, a philosopher must either be eating or thinking.
Moreover, a philosopher must take the two forks adjacent to him (i.e., the left and right forks) before he can eat the spaghetti. The problem of deadlock occurs when all five philosophers pick up their right forks simultaneously.
Since each of the philosophers has one fork, they will all wait for the others to put their fork down. As a result, none of them will be able to eat spaghetti.
Similarly, in a concurrent system, a deadlock occurs when different threads or processes (philosophers) try to acquire the shared system resources (forks) at the same time. As a result, none of the processes get a chance to execute as they are waiting for another resource held by some other process.
Race Conditions
A race condition is an unwanted state of a program that occurs when a system performs two or more operations simultaneously. For example, consider this simple for loop:
i=0; # a global variable
for x in range(100):
    print(i)
    i+=1;
If you create n number of threads that run this code at once, you cannot determine the value of i (which is shared by the threads) when the program finishes execution. This is because in a real multithreading environment, the threads can overlap, and the value of i that was retrieved and modified by a thread can change in between when some other thread accesses it.
These are the two main classes of problems that can occur in a multithreaded or distributed Python application. In the next section, you will learn how to overcome this problem by synchronizing threads.
Synchronizing threads
To deal with race conditions, deadlocks, and other thread-based issues, the threading module provides the Lock object. The idea is that when a thread wants access to a specific resource, it acquires a lock for that resource. Once a thread locks a particular resource, no other thread can access it until the lock is released. As a result, the changes to the resource will be atomic, and race conditions will be averted.
A lock is a low-level synchronization primitive implemented by the _thread module. At any given time, a lock can be in one of two states: locked or unlocked. It supports two methods:
- acquire(): When the lock state is unlocked, calling the acquire() method will change the state to locked and return. However, if the state is locked, the call to acquire() is blocked until the release() method is called by some other thread.
- release(): The release() method is used to set the state to unlocked, i.e., to release a lock. It can be called by any thread, not necessarily the one that acquired the lock.
Here is an example of using locks in your apps. Fire up your IDLE and type the following:
import threading
lock = threading.Lock()

def first_function():
    for i in range(5):
        lock.acquire()
        print ('lock acquired')
        print ('Executing the first funcion')
        lock.release()

def second_function():
    for i in range(5):
        lock.acquire()
        print ('lock acquired')
        print ('Executing the second funcion')
        lock.release()

if __name__=="__main__":
    thread_one = threading.Thread(target=first_function)
    thread_two = threading.Thread(target=second_function)

    thread_one.start()
    thread_two.start()

    thread_one.join()
    thread_two.join()
Now, hit F5. You should see an output like this:

CODE EXPLANATION
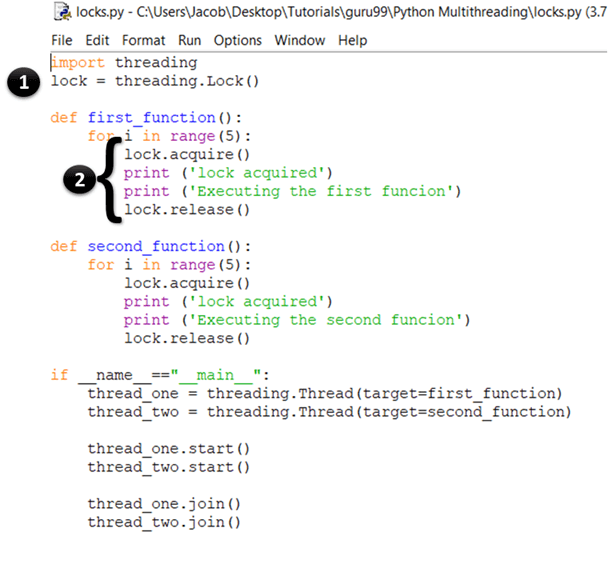
- Here, you are simply creating a new lock by calling the threading.Lock() factory function. Internally, Lock() returns an instance of the most effective concrete Lock class that is maintained by the platform.
- In the first statement, you acquire the lock by calling the acquire() method. When the lock has been granted, you print “lock acquired” to the console. Once all the code that you want the thread to run has finished execution, you release the lock by calling the release() method.
The theory is fine, but how do you know that the lock really worked? If you look at the output, you will see that each of the print statements is printing exactly one line at a time. Recall that, in an earlier example, the outputs from print were haphazard because multiple threads were accessing the print() method at the same time. Here, the print function is called only after the lock is acquired. So, the outputs are displayed one at a time and line by line.
Apart from locks, Python also supports some other mechanisms to handle thread synchronization, as listed below:
- RLocks
- Semaphores
- Conditions
- Events, and
- Barriers
Global Interpreter Lock (and how to deal with it)
Before getting into the details of Python’s GIL, let us define a few terms that will be useful in understanding the upcoming section:
- CPU-bound code: this refers to any piece of code that will be directly executed by the CPU.
- I/O-bound code: this can be any code that accesses the file system through the OS.
- CPython: it is the reference implementation of Python and can be described as the interpreter written in C and Python (programming language).
What is GIL in Python?
Global Interpreter Lock (GIL) in Python is a process lock or a mutex used while dealing with the processes. It makes sure that one thread can access a particular resource at a time, and it also prevents the use of objects and bytecodes at once. This benefits the single-threaded programs with a performance increase. GIL in Python is very simple and easy to implement.
A lock can be used to make sure that only one thread has access to a particular resource at a given time.
One of the features of Python is that it uses a global lock on each interpreter process, which means that every process treats the Python interpreter itself as a resource.
For example, suppose you have written a Python program that uses two threads to perform both CPU and ‘I/O’ operations. When you execute this program, this is what happens:
- The Python interpreter creates a new process and spawns the threads.
- When thread-1 starts running, it will first acquire the GIL and lock it.
- If thread-2 wants to execute now, it will have to wait for the GIL to be released even if another processor is free.
- Now, suppose thread-1 is waiting for an I/O operation. At this time, it will release the GIL, and thread-2 will acquire it.
- After completing the I/O ops, if thread-1 wants to execute now, it will again have to wait for the GIL to be released by thread-2.
Due to this, only one thread can access the interpreter at any time, meaning that there will be only one thread executing Python code at a given point in time.
This is alright in a single-core processor because it would be using time slicing (see the first section of this tutorial) to handle the threads. However, in the case of multi-core processors, a CPU-bound function executing on multiple threads will have a considerable impact on the program’s efficiency since it will not actually be using all the available cores at the same time.
Why was GIL needed?
The CPython garbage collector uses an efficient memory management technique known as reference counting. Here is how it works: Every object in Python has a reference count, which is increased when it is assigned to a new variable name or added to a container (like tuples, lists, etc.). Likewise, the reference count is decreased when the reference goes out of scope or when the del statement is called. When the reference count of an object reaches 0, it is garbage collected, and the allotted memory is freed.
But the problem is that the reference count variable is prone to race conditions like any other global variable. To solve this problem, the developers of Python decided to use the global interpreter lock. The other option was to add a lock to each object, which would have resulted in deadlocks and increased overhead from acquire() and release() calls.
Therefore, GIL is a significant restriction for multithreaded Python programs running heavy CPU-bound operations (effectively making them single-threaded). If you want to make use of multiple CPU cores in your application, use the multiprocessing module instead.