Linux Commands with Examples & Syntax
⚡ Smart Summary
Basics Linux/Unix Commands enable confident navigation, file management, software installation, and system administration through the terminal. This walkthrough explains essential commands, their syntax, real examples, and practical formatting tips that beginners and intermediate users can immediately apply.

File management becomes easy once you know the right basic Linux commands. Commands are often called “programs” because each one runs the corresponding program code written for that command. This tutorial walks you through the must-know Linux basic commands with examples and clear syntax.
Listing files (ls)
To see the list of files on your UNIX or Linux system, use the ls command. It displays the files and directories in your current working directory.
.png)
Note:
- Directories are displayed in blue.
- Files are displayed in white.
- Similar color schemes appear across most Linux distributions.
Suppose your “Music” folder contains the following subdirectories and files:
.png)
You can use ‘ls -R’ to show all files in directories as well as subdirectories.
.png)
NOTE: Linux basic commands are case-sensitive. If you type ls – r instead of ls -R, you will get an error.
The command ‘ls -al’ gives detailed information about files in a columnar format. The columns contain the following information:
| 1st Column | File type and access permissions |
| 2nd Column | Number of hard links to the file |
| 3rd Column | Owner and creator of the file |
| 4th Column | Group of the owner |
| 5th Column | File size in bytes |
| 6th Column | Date and time of last modification |
| 7th Column | Directory or file name |
Here is an example output of ls -al:
.png)
Listing Hidden Files
Hidden items in UNIX/Linux begin with a period (.) at the start of the file or directory name.
![]()
Any directory or file beginning with a “.” is hidden by default. To view hidden files, use the command:
ls -a.png)
Creating & Viewing Files
The cat command is used to display text files. It can also be used for copying, combining, and creating new text files. Let’s see how it works.
To create a new file, use the following steps:
- Type cat > filename
- Add content
- Press Ctrl + D to return to the command prompt.
.png)
To view a file, use the command:
cat filenameLet us view the file we just created:
![]()
Here is another file named sample2:
![]()
The syntax to combine two files is:
cat file1 file2 > newfilenameLet us combine sample1 and sample2:
![]()
Once you press Enter, the files are concatenated but no result is displayed. This is because the Bash shell (terminal) is silent by design. Shell commands do not return confirmation messages such as “OK” or “Command Successfully Executed”. The shell only prints a message when something goes wrong or an error occurs.
To view the new combined file “sample”, use the command:
cat sample
Note: Only text files can be displayed and combined using this command.
Deleting Files
The rm command removes files from the system without asking for confirmation, so use it carefully.
To remove a file, use the syntax:
rm filename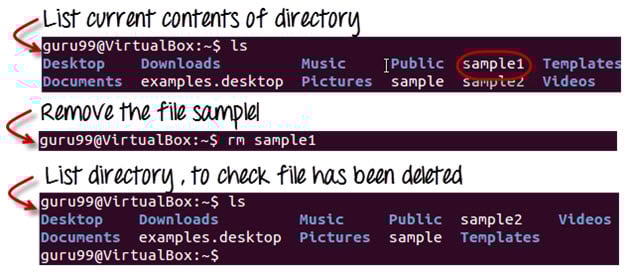
Moving and Re-naming files
To move a file, use the command:
mv filename new_file_locationSuppose we want to move the file “sample2” to the location /home/guru99/Documents. Executing the command:
mv sample2 /home/guru99/Documents
![]()
The mv command needs superuser permission for protected directories. Since we are executing it as a standard user, we get the error above. To overcome this, prefix the command with sudo:
sudo command_you_want_to_executeThe sudo program allows regular users to run programs with the security privileges of the superuser or root. It asks for password authentication; however, you do not need to know the root password — you can supply your own. After authentication, the system invokes the requested command.
sudo also maintains a log of every command run. System administrators can trace back the person responsible for any undesirable changes to the system.
guru99@VirtualBox:~$ sudo mv sample2 /home/guru99/Documents
[sudo] password for guru99: ****
guru99@VirtualBox:~$
For renaming a file:
mv filename newfilename.png)
NOTE: By default, the password entered for sudo is retained for 15 minutes per terminal session, so you do not have to re-enter it for every command.
You only need root/sudo privileges when the command involves files or directories not owned by the user or group running the command.
Directory Manipulations

Enough with file manipulations. Let us learn some directory manipulation commands with examples and syntax.
Creating Directories
Directories can be created on a Linux operating system using the following command:
mkdir directorynameThis command will create a subdirectory inside your present working directory, which is usually your “Home Directory”.
For example:
mkdir mydirectory
If you want to create a directory in a different location, you can use:
mkdir /tmp/MUSICThis will create a directory “MUSIC” under “/tmp”.

You can also create more than one directory at a time:

Removing Directories
To remove a directory, use the command:
rmdir directorynameExample:
rmdir mydirectoryThis will delete the directory “mydirectory”.

Tip: Ensure no files or sub-directories exist under the directory you want to delete. Delete the inner items first, and then remove the parent directory.

Renaming Directory
The mv (move) command, covered earlier, can also be used to rename directories. Use the format below:
mv directoryname newdirectorynameLet us try it:

The ‘Man’ Command
“Man” stands for manual — the reference book of a Linux operating system. It is similar to the HELP files found in popular software.
To get help on any command, type:
man commandnameThe terminal will open the manual page for that command.
For example, typing man man and pressing Enter shows information about the man command itself:
![]()

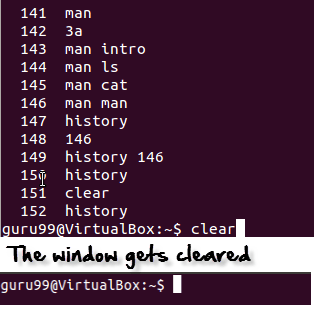
The History Command
The history command shows all the basic commands you have used in the current terminal session. This helps you refer to old commands and reuse them quickly in your operations.

The Clear Command
This command clears all clutter on the terminal and gives you a clean window to work on, just like when you launch the terminal.
Pasting Commands into the Terminal
Many times you will need to type long commands in the terminal. This can be annoying, so copy-pasting comes to the rescue.
For copying text from a source, you use Ctrl + C, but for pasting it into the terminal, you need to use Ctrl + Shift + V. You can also try Shift + Insert or select Edit > Paste from the menu.
NOTE: With Linux upgrades, these shortcuts change occasionally. You can set your preferred shortcuts via Terminal > Edit > Keyboard Shortcuts.
Printing in Unix/Linux
Now let us look at Linux basic commands that can print files in a format you want. Even better, your original file is not affected by the formatting you apply for printing.
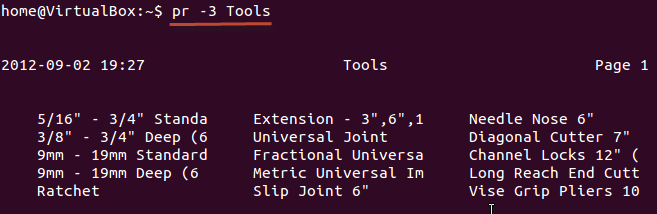
‘pr’ Command
The pr command helps format a file for printing on the terminal. Several options are available that allow you to make formatting changes. The most commonly used pr options are listed below.
| Option | Function |
|---|---|
| -x | Divides the data into “x” columns |
| -h “header” | Assigns the “header” value as the report header |
| -t | Does not print the header and top/bottom margins |
| -d | Double-spaces the output file |
| -n | Numbers all lines |
| -l page length | Defines the number of lines per page. Default is 56 |
| -o margin | Formats the page by the margin number |
Let us try some of these options and study their effects.
Dividing data into columns
“Tools” is a sample file (shown below):

We want its content arranged in three columns. The syntax is:
pr -x FilenameThe -x option with the pr command divides the data into x columns.
Assigning a header
The syntax is:
pr -h "Header" FilenameThe -h option assigns the “header” value as the report header.

As shown above, the file is arranged in three columns and a header has been assigned.
Denoting all lines with numbers
The syntax is:
pr -n FilenameThis command numbers all lines in the file.

These are some of the pr command options you can use to modify file formatting.
Printing a file
Once formatting is complete and it is time to get a hard copy of the file, use:
lp Filenameor
lpr FilenameTo print multiple copies of the file, use the number modifier:

If you have multiple printers configured, you can specify a particular printer using the printer modifier:

Installing Software
On Windows, installing a program is done by running a setup.exe file. The installation bundle contains the program along with various dependent components required to run it correctly.

On Linux, installation files are distributed as packages. A package generally contains only the program itself. Any dependent components must be installed separately and are usually available as packages themselves.

You can use the apt commands to install or remove a package. Let us update all the installed packages on the system using:
sudo apt-get update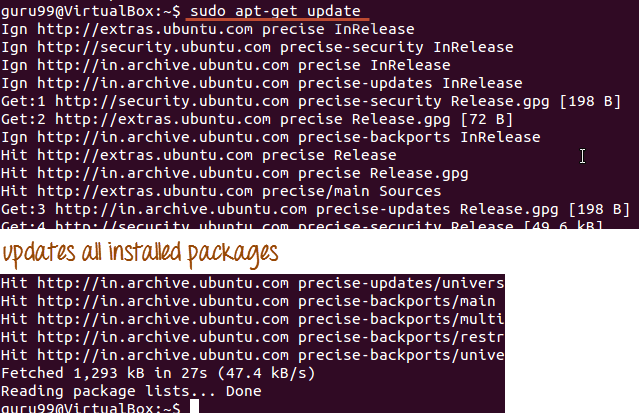
The easiest and most popular way to install programs on Ubuntu is through the Software Center, since most software packages are available there and it is safer than downloading from random sources on the internet.

Also Check: Linux Command Cheat Sheet
Linux Mail Command
To send mails through a terminal, you need to install the mailutils package.
The command syntax is:
sudo apt-get install packagenameOnce installed, use the following syntax to send an email:
mail -s 'subject' -c 'cc-address' -b 'bcc-address' 'to-address'It will look like this:

Press Ctrl + D when you are finished writing the mail. The mail will be sent to the specified address.
Tips for Beginners Learning Linux Commands
Mastering Linux commands becomes much easier when you approach them in the right order and apply consistent practice habits. The terminal can feel intimidating at first, but a few simple workflows make a huge difference for new learners.
Use the tips below to accelerate your learning curve:
- Start with navigation commands: Learn pwd, ls, and cd first. They form the backbone of every other operation you will perform in the terminal.
- Always read the man page: Whenever you encounter a new command, run man command to understand its options before testing them.
- Use Tab completion: Press Tab while typing a filename or command. Bash auto-completes the name, reducing typing errors.
- Experiment in a sandbox folder: Create a dedicated practice directory so destructive commands such as rm never touch important data.
- Keep a personal cheat sheet: Maintain a notebook or text file of useful commands you learn. Revisit it daily during the first month.
- Combine commands with pipes: The pipe operator | chains commands together — for example, ls -al | grep “.txt” filters only text files.
- Use history shortcuts: Press the Up arrow to reuse recent commands or run !n to repeat the n-th command from your history list.
- Backup before bulk operations: Always copy important data before running batch rm, mv, or chmod operations on multiple files.
These habits build muscle memory and prevent the most common beginner mistakes that lead to lost files or broken permissions.
Common Mistakes to Avoid When Using Linux Commands
New Linux users often run into small mistakes that cause big consequences. The terminal does not undo, so a careless command can permanently delete data or corrupt configurations.
- Ignoring case sensitivity: “File.txt” and “file.txt” are two different items in Linux.
- Running rm -rf without verifying the path: A wrong path can wipe out critical system files.
- Overusing sudo: Granting root privileges to every command increases security risk.
- Editing system files without backups: Always copy the original before changing configuration files in /etc.
- Forgetting Tab completion: Manually typing paths increases the chance of typos and accidental data loss.
Avoiding these pitfalls keeps your system safe and your learning experience frustration-free.
Linux Command List
Below is a quick reference cheat sheet of the Linux/Unix basic commands covered in this tutorial:
| Command | Description |
|---|---|
| ls | Lists all files and directories in the current working directory |
| ls -R | Lists files in subdirectories as well |
| ls -a | Lists hidden files as well |
| ls -al | Lists files and directories with details such as permissions, size, and owner |
| cat > filename | Creates a new file |
| cat filename | Displays the file content |
| cat file1 file2 > file3 | Joins two files (file1, file2) and stores the result in file3 |
| mv file “new file path” | Moves the file to the new location |
| mv filename new_file_name | Renames the file to a new filename |
| sudo | Allows regular users to run programs with superuser privileges |
| rm filename | Deletes a file |
| man | Provides help information about a command |
| history | Lists all past commands used in the current terminal session |
| clear | Clears the terminal screen |
| mkdir directoryname | Creates a new directory |
| rmdir | Deletes a directory |
| mv | Renames a directory |
| pr -x | Divides the file into x columns |
| pr -h | Assigns a header to the file |
| pr -n | Numbers each line in the file |
| lp -nc | Prints “c” copies of the file |
| lp -d / lpr -P | Specifies the printer name |
| apt-get | Installs and updates packages |
| mail -s ‘subject’ -c ‘cc’ -b ‘bcc’ ‘to’ | Sends an email |
| mail -s “Subject” to-address < Filename | Sends an email with an attachment |