
JUnit Parameterized Test with Example using @Parameters
 Thomas Hamilton
⚡ Smart Summary
Parameterized tests in JUnit run the same test method repeatedly with different input values, so one method covers many scenarios. The @RunWith and @Parameters annotations supply the data set for every iteration.

What is a Parameterized Test in JUnit?
A parameterized test is a test that executes the same test method over and over again using different values. It helps developers save time when writing tests that differ only in their inputs and expected results.
Using a parameterized test, one can set up a test method that retrieves data from some data source. This makes it the simplest form of data-driven testing available inside JUnit itself, with no external library required.
Consider a simple test that sums different numbers. The code may look like this:

The approach above leads to a lot of redundancy. Every new pair of numbers needs another assert statement inside the same method, and a failure on the first assertion hides every assertion that follows it.
A simpler approach is needed. Using a parameterized test you can add a single method that supplies ten data inputs, and your test will run ten times automatically.
Steps to Create a Parameterized JUnit Test
The following code shows an example of a parameterized test. It tests the sum() method of the Airthematic class, which is the spelling used throughout the sample project.
Step 1) Create a class. In this example, we are going to input two numbers by using the sum(int, int) method, which will return the sum of the given numbers.

Step 2) Create a parameterized test class.
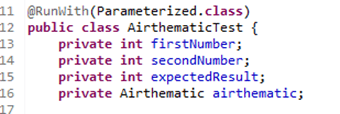
Code Explanation
- Code Line 11: Annotate your test class using @RunWith(Parameterized.class).
- Code Line 13: Declaring the variable ‘firstNumber’ as private and type as int.
- Code Line 14: Declaring the variable ‘secondNumber’ as private and type as int.
- Code Line 15: Declaring the variable ‘expectedResult’ as private and type as int.
- Code Line 16: Declaring the variable ‘airthematic’ as private and type as Airthematic.
@RunWith(class_name.class): the @RunWith annotation is used to specify its runner class name. If we do not specify any type as a parameter, the runtime will choose BlockJUnit4ClassRunner by default.
This class is responsible for tests to run with a new test instance. It is responsible for invoking JUnit lifecycle methods such as setup (associate resources) and teardown (release resources), which are described in the JUnit test fixture tutorial.
To parameterize, you need to annotate the class using @RunWith and pass the required .class to be tested.
Step 3) Create a constructor that stores the test data. It stores 3 variables.

Step 4) Create a static method that generates and returns test data.

Code Line 32,33: Creating a two-dimensional array (providing input parameters for addition). Using the asList method we convert the data into a List type, since the return type of the input method is a Collection.
Code Line 30: Using the @Parameters annotation to create a set of input data to run our test.
The static method identified by the @Parameters annotation returns a Collection where each entry in the Collection will be the input data for one iteration of the test. Consider the element {1,2,3}. Here:
- firstNumber = 1
- secondNumber = 2
- expectedResult = 3
Here each array element will be passed to the constructor, one at a time, as the class is instantiated multiple times. The five arrays declared in the example therefore produce the following five runs:
| Iteration | firstNumber | secondNumber | expectedResult | Console line |
|---|---|---|---|---|
| [0] | 1 | 2 | 3 | Sum of Numbers = : 3 |
| [1] | 11 | 22 | 33 | Sum of Numbers = : 33 |
| [2] | 111 | 222 | 333 | Sum of Numbers = : 333 |
| [3] | 10 | 9 | 19 | Sum of Numbers = : 19 |
| [4] | 100 | 9 | 109 | Sum of Numbers = : 109 |
Step 5) The complete code.

Code Explanation:
- Code Line 25: Using the @Before annotation to set up the resources (Airthematic.class here). The @Before annotation is used here to run before each test case. It contains the precondition of the test.
- Code Line 36: Using the @Test annotation to create our test.
- Code Line 39: Creating an assert statement to check whether our sum is equivalent to what we expected.
Step 6) Create a test runner class to run the parameterized test:

Code Explanation:
- Code Line 8: Declaring the main method of the class Test which will run our JUnit test.
- Code Line 9: Executing test cases using JUnitCore.runClasses, which takes the test class name as a parameter (in our example we are using AirthematicTest.class).
- Code Line 11: Processing the result using a for loop and printing out the failed result.
- Code Line 13: Printing out the successful result.
Output:
Here is the output, which shows a successful test with no failure trace, as given below. Note that the JUnit view lists one entry per data row rather than a single test:

See the result on the console, which shows the addition of the two numbers:

Parameterized Tests in JUnit 5 with @ParameterizedTest
The example above is written for JUnit 4. JUnit 5 (Jupiter) drops the runner model completely, so @RunWith(Parameterized.class), the data constructor and the instance fields all disappear. The JUnit 4 code shown above is not obsolete: it still runs unchanged on the JUnit Platform through the vintage engine. New tests, however, are normally written with @ParameterizedTest.
Two dependencies are required: junit-jupiter-api for the test annotations and junit-jupiter-params for the parameterized support. Without the second artifact the source annotations will not resolve at all.
import static org.junit.jupiter.api.Assertions.assertEquals;

import org.junit.jupiter.params.ParameterizedTest;
import org.junit.jupiter.params.provider.CsvSource;

class AirthematicTest {

    // one row per iteration, no constructor and no runner
    @ParameterizedTest(name = "{0} + {1} = {2}")
    @CsvSource({"1, 2, 3", "11, 22, 33", "111, 222, 333", "10, 9, 19", "100, 9, 109"})
    void sumOfTwoNumbers(int firstNumber, int secondNumber, int expectedResult) {
        assertEquals(expectedResult, new Airthematic().sum(firstNumber, secondNumber));
    }
}
Jupiter offers several argument sources, and the right one depends on the shape of the data:
| Source annotation | Supplies | Use it when |
|---|---|---|
| @ValueSource | A single column of literals | The test takes exactly one argument |
| @CsvSource | Inline comma-separated rows | Small tables of numbers and strings read cleanly in the file |
| @CsvFileSource | Rows read from a CSV on the test classpath | The data set is large or maintained outside the code |
| @MethodSource | A static factory returning a Stream of Arguments | Real objects, computed values or randomised data are needed |
| @EnumSource | The constants of an enum | Every enum value must be exercised |
Two rules catch most beginners. A source annotation placed on a plain @Test method is silently ignored, so the method must carry @ParameterizedTest. And an unquoted empty value in @CsvSource is read as null, while a quoted empty value is read as an empty string.
The JUnit 4 annotations used in this article map onto Jupiter as follows: @RunWith(Parameterized.class) becomes @ParameterizedTest plus a source annotation, @Parameters becomes @MethodSource or @CsvSource, and @Before becomes @BeforeEach. The full list is covered in the JUnit annotations tutorial.
Advantages and Limitations of Parameterized Tests
Parameterization is not free. It removes duplication, but it also constrains how a test can be written, so it is worth knowing both sides before converting an existing suite.
Advantages
- Less duplication: One method replaces a block of near-identical assert statements, as the first screenshot in this article shows.
- Cheaper coverage: Adding an edge case costs one more data row instead of a whole new test case method.
- Precise reporting: Each iteration is reported separately, so the JUnit view identifies exactly which row failed rather than one aggregated failure.
- Centralised data: Inputs live in a single method and can later be moved to a CSV file or a factory without touching the assertions.
Limitations
- One shape of assertion: Every row runs the same assertions, so a scenario that needs different checks still needs its own test method.
- Class-level scope in JUnit 4: The runner parameterizes the whole class, so unrelated @Test methods in that class also run once per row.
- Unreadable reports: Without a name template, failures appear as testAirthematicTest[3], which says nothing about the data that broke.
- Bulky inline data: Large arrays crowd out the test logic; move them to @CsvFileSource or a @MethodSource factory instead.
Common Errors in JUnit Parameterized Tests
Most parameterized failures are initialisation errors raised before a single assertion executes. The table below lists the messages that appear most often and what triggers them.
| Message | Cause | Fix |
|---|---|---|
| Test class should have exactly one public constructor | The class declares no public constructor, or two of them | Keep one public constructor whose parameters match the data columns |
| No public static parameters method on class | The @Parameters method is not public static, or returns the wrong type | Declare it as public static Collection and return Arrays.asList(…) |
| IllegalArgumentException: wrong number of arguments | A row is wider or narrower than the constructor parameter list | Make every array in the Collection the same width as the constructor |
| Configuration error: no arguments provider | A Jupiter test carries @ParameterizedTest with no source annotation | Add @ValueSource, @CsvSource, @CsvFileSource, @MethodSource or @EnumSource |
| The source annotation appears to do nothing | The method is annotated @Test instead of @ParameterizedTest | Replace @Test with @ParameterizedTest and import junit-jupiter-params |
One further trap is shared state. Because JUnit builds a new instance per row, anything held in a static field survives every iteration, and a value written by row [0] can quietly change the outcome of row [4]. Keep per-row state in instance fields and reset shared resources in the @Before or @BeforeEach method. General guidance on isolating tests is covered in the unit testing tutorial.
