Create JUnit Test Suite with Example: @RunWith @SuiteClasses
In Junit, test suite allows us to aggregate all test cases from multiple classes in one place and run it together.
To run the suite test, you need to annotate a class using below-mentioned annotations:
- @Runwith(Suite.class)
- @SuiteClasses(test1.class,test2.class……) or@Suite.SuiteClasses ({test1.class, test2.class……})
With above annotations, all the test classes in the suite will start executing one by one.
Steps to create Test Suite and Test Runner
Step 1) Create a simple test class (e.g. MyFirstClassTest) and add a method annotated with @test.

Step 2) Create another test class to add (e.g. MySecondClassTest) and create a method annotated with @test.

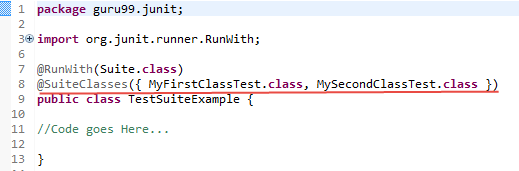
Step 3) To create a testSuite you need to first annotate the class with @RunWith(Suite.class) and @SuiteClasses(class1.class2…..).
Step 4) Create a Test Runner class to run our test suite as given below;

Code Explanation:
- Code Line 8: Declaring the main method of the class test which will run our JUnit test.
- Code Line 9: Executing test cases using JunitCore.runclasses which takes the test class name as a parameter (In the example above, you are using TestSuiteExample.class shown in step 3).
- Code Line 11: Processing the result using for loop and printing out failed result.
- Code Line 13: Printing out the successful result.
Output: Here is the output which shows successful test with no failure trace as given below:

JUnit Test Suite Example
Consider a more complex example
JunitTest.java
JunitTest.java is a simple class annotated with @RunWith and @Suite annotations. You can list out number of .classes in the suite as parameters as given below:
package guru99.junit;
import org.junit.runner.RunWith;
import org.junit.runners.Suite;

@RunWith(Suite.class)
@Suite.SuiteClasses({
  SuiteTest1.class,
  SuiteTest2.class,
})

public class JunitTest {
			// This class remains empty, it is used only as a holder for the above annotations
}
SuiteTest1.java
SuiteTest1.java is a test class having a test method to print out a message as given below. You will use this class as a suite in above mentioned class.
package guru99.junit;

import static org.junit.Assert.assertEquals;

import org.junit.Test;

public class SuiteTest1 {

    public String message = "Saurabh";

    JUnitMessage junitMessage = new JUnitMessage(message);

    @Test(expected = ArithmeticException.class)
    public void testJUnitMessage() {

        System.out.println("Junit Message is printing ");
        junitMessage.printMessage();

    }

    @Test
    public void testJUnitHiMessage() {
        message = "Hi!" + message;
        System.out.println("Junit Hi Message is printing ");
        assertEquals(message, junitMessage.printHiMessage());
        System.out.println("Suite Test 2 is successful " + message);
    }
}
SuiteTest2.java
SuiteTest2.java is another test class similar to SuiteTest1.java having a test method to print out a message as given below. You will use this class as suite in JunitTest.java.
package guru99.junit;

import org.junit.Assert;
import org.junit.Test;

public class SuiteTest2 {


    @Test
    public void createAndSetName() {


        String expected = "Y";
        String actual = "Y";

        Assert.assertEquals(expected, actual);
        System.out.println("Suite Test 1 is successful " + actual);
    }

}
Output
After executing JunitTest.java which contains a suite having test1.java and test2.java, you will get below output:


Summary
In this tutorial, you have learned basics of test harness and test suites in details with an example.
- Test harness or automation Testing is a software or a collection of software, which allows a user to test data with multiple inputs and control the execution
- Test harness actually enables a test framework that does all the work of executing tests using a test library and generating a test report
- In Junit, test suite allows us to aggregate all test cases of many classes in one place and run it together.