TestNG vs JUnit – Difference Between Them
Key Difference between TestNG and JUnit
- TestNG is a Java-based framework, while JUnit is an open-source Unit Testing Framework for JAVA.
- Comparing TestNG Vs JUnit, TestNG annotations are easier to use and understand than JUnit.
- TestNG allows us to create parallel tests, whereas JUnit does not support running parallel tests.
- In TestNG, Test cases can be grouped together, while in JUnit, Grouping tests together is not possible.

What is TestNG?
TestNG is an automation testing framework in which NG stands for “Next Generation”. TestNG is inspired by JUnit which uses the annotations (@). TestNG overcomes the disadvantages of JUnit and is designed to make end-to-end testing easy.
Using TestNG, you can generate a proper report, and you can easily come to know how many test cases are passed, failed, and skipped. You can execute the failed test cases separately.
What is Junit?
JUnit is an open source Unit Testing Framework for JAVA. It is useful for Java Developers to write and run repeatable tests. Erich Gamma and Kent Beck initially develop it. It is an instance of xUnit architecture. As the name implies, it is used for Unit Testing of a small chunk of code.
Developers who are following test-driven methodology must write and execute unit test first before any code.
Once you are done with code, you should execute all tests, and it should pass. Every time any code is added, you need to re-execute all test cases and makes sure nothing is broken.
Differences between JUnit and TestNG
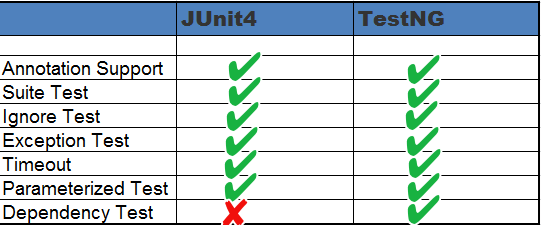
Both TestNG and JUnit4 looks similar, except one or two features. Let’s have a comparison between the two to quickly decide, which technology is more favourable for Unit Testing. Below table highlights the features supported by both:
Annotations
Both JUnit and TestNG uses annotations and almost all the annotations looks similar.
TestNG uses @BeforeMethod ,@AfterMethod similar to @Before ,@After in JUnit4.
Both TestNG and Junit4 uses @Test(timeout = 1000) for timeout .Check the table below for more details-
| S.N. | Description | TestNG | JUnit 4 |
|---|---|---|---|
| 1 | Test annotation | @Test | @Test |
| 2 | Executes before the first test method is invoked in the current class | @BeforeClass | @BeforeClass |
| 3 | Executes after all the test methods in the current class | @AfterClass | @AfterClass |
| 4 | Executes before each test method | @BeforeMethod | @Before |
| 5 | Executes after each test method | @AfterMethod | @After |
| 6 | annotation to ignore a test | @Test(enable=false) | @ignore |
| 7 | annotation for exception | @Test(expectedExceptions = ArithmeticException.class) | @Test(expected = ArithmeticException.class) |
| 8 | timeout | @Test(timeout = 1000) | @Test(timeout = 1000) |
| 9 | Executes before all tests in the suite | @BeforeSuite | n/a |
| 10 | Executes after all tests in the suite | @AfterSuite | n/a |
| 11 | Executes before a test runs | @BeforeTest | n/a |
| 12 | Executes after a test runs | @AfterTest | n/a |
| 13 | Executes before the first test method is invoked that belongs to any of these groups is invoked | @BeforeGroups | n/a |
| 14 | run after the last test method that belongs to any of the groups here | @AfterGroups | n/a |
Suite Test
Suites are used to execute multiple tests together. Suites can be created using both TestNG and JUnit4. However, suites are more powerful in TestNG as it uses very different method for execution of tests. Let’s understand it using code snippet as given below:
Using JUnit4
Below class describes use of suite while working with JUnit4:
package guru99.junit;
import org.junit.runner.RunWith;
import org.junit.runners.Suite;

@RunWith(Suite.class)
@Suite.SuiteClasses({
    SuiteTest1.class,
    SuiteTest2.class,

})

public class JunitTest {
// This class remains empty,it is used only as a holder for the above annotations
}
Using TestNG
TestNG uses xml to bundle all tests at one place.Below xml describes use of suite while working with TestNG:
<!DOCTYPE suite SYSTEM "http://beust.com/testng/testng-1.0.dtd" >
<suite name="My test suite">
<test name="testing">
<classes>
<class name="com.guru99.SuiteTest1" />
<class name="com.guru99.SuiteTest2" />
</classes>
</test>
</suite>
Ignore Test
Using both we can skip a test .Let’s see it using code example as given below:
Using JUnit4
Below code snippet describes use of @ignore annotation while working with JUnit4:
@Ignore
public void method1()
{
	System.out.println("Using @Ignore , this execution is ignored");
}
Using TestNG
Below code snippet describes use of @Test(enabled=false) annotation while working with TestNG:
@Test(enabled=false)
public void TestWithException()
{
	System.out.println("Method should be ignored as it's not ready yet");
}
Exception Test
Exception testing is available both in TestNG and JUnit4. It is used to check, which exception is thrown from the test?
Using JUnit4
Below code snippet describes use of exception test while working with JUnit4:
@Test(expected = ArithmeticException.class)
public void divideByZero()
{
	Int i = 1/0;
}
Using TestNG
Below code snippet describes use of exception test while working with TestNG:
@Test(expectedExceptions = ArithmeticException.class)
public void divideByZero()
{
Int i = 1/0;
}
Timeout
This feature is implemented both in TestNg and JUnit4.Timeout is used to terminate a test which takes longer than specified time (in milliseconds).
Using JUnit4
Below code snippet describes use of timeout test while working with JUnit4:
@Test(timeout = 1000)
public void method1()
{
	while (true);
}
Using TestNG
Below code snippet describes use of timeout test while working with TestNG:
@Test(timeOut = 1000)
public void method1()
{
	while (true);
}
Parameterized Test
JUnit provides an easier and readable approach to test known as Parameterized test. Both TestNG and JUnit supports parameterized test but differ in the way they define the parameter value. Let see this one by one.
Using JUnit4
The “@RunWith” and “@Parameter” annotations are used to provide parameter value for the unit test. The annotation @Parameters have to return List[] .This parameter will be passed into the class constructor as an argument.
@RunWith(value = Parameterized.class)
public class JunitTest{

    privateint number;

    public JunitTest6(int number)
 {
    this.number = number;
     }

     @Parameters
    public static Collection<Object[]> data()
{
       Object[][] data = new Object[][] { { 1 }, { 2 }, { 3 }, { 4 } };
    returnArrays.asList(data);
    }

     @Test
    public void parameterTest()
 {
    System.out.println("Parameterized Number is : " + number);
     }
}
Using TestNG
In TestNG, XML file or “@DataProvider” is used to provide a parameter for testing.
Here @Parameters annotation declared in the method, needs a parameter for testing. The data used as the parameter will provide in TestNG’s XML configuration files. By doing this, we can reuse a single Test Case with different data sets, and we can get different results.
public class Test1 {

    @Test
    @Parameters(value="number")
    public void parameterTest(int number)
	{
    	System.out.println("Parameterized Number is : " + number);
    }

}
See below xml file to be used for above class:
<!DOCTYPE suite SYSTEM "http://beust.com/testng/testng-1.0.dtd" >
<suite name="My test suite">
<test name="testing">

<parameter name="number" value="2"/>

<classes>
<class name="com.guru99.Test1" />
</classes>
</test>
</suite>
Summary
We saw JUnit4 and TestNG comparison in details. We also saw both are similar except parameterized test and dependency test. In short we can say, based on flexibility and requirement we can choose any one of them for Unit Testing.