
JSP Program Examples: Registration & Login Form
 Editorial Team
⚡ Smart Summary
JSP program examples here build three modules — a registration form, a login and logout form, and a form-processing page — each wiring a JSP view to a servlet controller so the MVC split stays visible to beginners.

These worked examples show how to develop sample programs with JSP and how to implement the MVC architecture around them. Three modules are built in order:
- Registration Form
- Login and Logout Form
- JSP Form
How to Create a Registration Form in JSP
In a registration form, we have a form to fill in all the details, which contain name, username, password, address, contact number, etc.
This form helps us to register with the application. It takes all our details and stores them in a database or cache.
In this example, we are going to take the “Guru Registration form”, which has the following fields:
- First Name
- Last Name
- Username
- Password
- Address
- Contact Number
After filling in all these details we have a submit button; on clicking that button all the details are sent to the servlet.
Example 1: Register_1.jsp
<%@ page language="java" contentType="text/html; charset=ISO-8859-1"
    pageEncoding="ISO-8859-1"%>
<!DOCTYPE html PUBLIC "-//W3C//DTD HTML 4.01 Transitional//EN" "http://www.w3.org/TR/html4/loose.dtd">
<html>
<head>
<meta http-equiv="Content-Type" content="text/html; charset=ISO-8859-1">
<title>Guru Registration Form</title>
</head>
<body>
<h1>Guru Register Form</h1>
<form action="guru_register" method="post">
			<table style="with: 50%">
				<tr>
					<td>First Name</td>
					<td><input type="text" name="first_name" /></td>
				</tr>
				<tr>
					<td>Last Name</td>
					<td><input type="text" name="last_name" /></td>
				</tr>
				<tr>
					<td>UserName</td>
					<td><input type="text" name="username" /></td>
				</tr>
					<tr>
					<td>Password</td>
					<td><input type="password" name="password" /></td>
				</tr>
				<tr>
					<td>Address</td>
					<td><input type="text" name="address" /></td>
				</tr>
				<tr>
					<td>Contact No</td>
					<td><input type="text" name="contact" /></td>
				</tr></table>
			<input type="submit" value="Submit" /></form>
</body>
</html>
Explanation of the code:
Code Line 11: Here we are taking a form which has an action, i.e. the servlet to which the request will be submitted, and the servlet name is guru_register.java. The request will be processed through the POST method.
Code Line 14-16: Here we are taking input type as text and the name is first_name.
Code Line 18-20: Here we are taking input type as text and the name is last_name.
Code Line 22-24: Here we are taking input type as text and the name is username.
Code Line 26-28: Here we are taking input type as password (this hides the password while it is typed) and the name as password.
Code Line 30-32: Here we are taking input type as text and the name as address.
Code Line 34-36: Here we are taking input type as text and the name as contact.
Code Line 37: Here we are taking a button of type submit whose value is also Submit. On clicking this button the action goes to the corresponding guru_register servlet, where all the parameter values are passed in the request.
Note: the table attribute in Code Line 12 reads style="with: 50%". The correct CSS property is width, so the listing is reproduced exactly as published, but the table will not be sized until that typo is fixed in your own copy.
Example 2: Guru_register.java
package demotest;

import java.io.IOException;

import javax.servlet.RequestDispatcher;
import javax.servlet.ServletException;
import javax.servlet.http.HttpServlet;
import javax.servlet.http.HttpServletRequest;
import javax.servlet.http.HttpServletResponse;

/**
 * Servlet implementation class guru_register
 */
public class guru_register extends HttpServlet {
	private static final long serialVersionUID = 1L;


     protected void doPost(HttpServletRequest request, HttpServletResponse response) throws ServletException, IOException {
		// TODO Auto-generated method stub
		String first_name = request.getParameter("first_name");
		String last_name = request.getParameter("last_name");
		String username = request.getParameter("username");
		String password = request.getParameter("password");
		String address = request.getParameter("address");
		String contact = request.getParameter("contact");

		if(first_name.isEmpty() || last_name.isEmpty() || username.isEmpty() ||
				password.isEmpty() || address.isEmpty() || contact.isEmpty())
		{
			RequestDispatcher req = request.getRequestDispatcher("register_1.jsp");
			req.include(request, response);
		}
		else
		{
			RequestDispatcher req = request.getRequestDispatcher("register_2.jsp");
			req.forward(request, response);
		}
	}

}
Explanation of the code:
Code Line 14: Here we define the guru_register servlet, which extends HttpServlet.
Code Line 18: This is the doPost() method, which is called when we specify POST as the method attribute in the JSP form above.
Code Line 20-25: Here we are fetching the values from the request, i.e. first_name, last_name, username, password, address and contact, using request.getParameter.
Code Line 27-32: Here we are using an if condition where we check whether any of the parameters fetched from the request are empty. If any parameter is empty, control enters this condition ( first_name.isEmpty() || last_name.isEmpty() || username.isEmpty() || password.isEmpty() || address.isEmpty() || contact.isEmpty()) and we fetch a RequestDispatcher object from the request object, which sends the request back to register_1.jsp. Here we are also including the request and response objects.
Code Line 33-37: This branch executes when none of the parameters are empty. We fetch a RequestDispatcher object from the request object, which forwards the request to register_2.jsp. Here we are forwarding the request and response objects.
The difference between the two branches matters: include() runs register_1.jsp and returns control to the servlet, while forward() hands the request to register_2.jsp and does not come back.
Example 3: Register_2.jsp
<%@ page language="java" contentType="text/html; charset=ISO-8859-1"
    pageEncoding="ISO-8859-1"%>
<!DOCTYPE html PUBLIC "-//W3C//DTD HTML 4.01 Transitional//EN" "http://www.w3.org/TR/html4/loose.dtd">
<html>
<head>
<meta http-equiv="Content-Type" content="text/html; charset=ISO-8859-1">
<title>Guru Success Page</title>
</head>
<body>
           <a><b>Welcome User!!!!</b></a>
</body>
</html>
Explanation of the code:
Code Line 10: Here we display the welcome message. This JSP is called when all the parameters are filled.
When you execute the above code, you get the following output.
Output:
The registration page renders the six labelled fields with a single Submit button, as shown below.
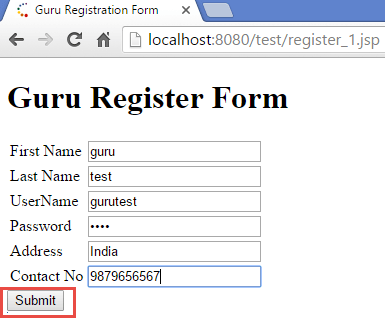
Once every field is filled and Submit is clicked, guru_register forwards to register_2.jsp and the success page appears.

When we click on register_1.jsp, we get a form with first name, last name, username, password, address and contact. After all the details have been filled and the submit button is clicked, we get the message “Welcome User”.
How to Create a Login and Logout Form in JSP
Like the registration form, we will now build a login and logout form.
In this example, we have taken a login form with two fields, “username” and “password”, and a submit button.
When we click the submit button, we get a welcome message with a logout button.
When we click the logout button, we get back to the login form.
Example 1: Register_3.jsp
<%@ page language="java" contentType="text/html; charset=ISO-8859-1"
    pageEncoding="ISO-8859-1"%>
<!DOCTYPE html PUBLIC "-//W3C//DTD HTML 4.01 Transitional//EN" "http://www.w3.org/TR/html4/loose.dtd">
<html>
<head>
<meta http-equiv="Content-Type" content="text/html; charset=ISO-8859-1">
<title>Guru Login Form</title>
</head>
<body>
<form action="guru_login" method="post">
		<table style="with: 50%">

			<tr>
				<td>UserName</td>
				<td><input type="text" name="username" /></td>
			</tr>
				<tr>
				<td>Password</td>
				<td><input type="password" name="password" /></td>
			</tr>
		</table>
		<input type="submit" value="Login" /></form>
</body>
</html>
Explanation of the code:
Code Line 10: Here we are taking a form whose action is the servlet guru_login.java. The method through which the data is passed is POST.
Code Line 13-16: Here we are taking an input field “username”, which is of the type text.
Code Line 17-20: Here we are taking an input field “password”, which is of the type password.
Code Line 22: Here we are taking a “submit” button with the value “Login”. On clicking it, control goes to the servlet guru_login, where both fields are read using the request object.
Example 2: Guru_login.java (servlet)
package demotest;

import java.io.IOException;

import javax.servlet.RequestDispatcher;
import javax.servlet.ServletException;
import javax.servlet.http.HttpServlet;
import javax.servlet.http.HttpServletRequest;
import javax.servlet.http.HttpServletResponse;

/**
 * Servlet implementation class guru_login
 */
public class guru_login extends HttpServlet {

    public guru_login() {
        super();
        // TODO Auto-generated constructor stub
    }

	protected void doPost(HttpServletRequest request, HttpServletResponse response) throws ServletException, IOException {
		// TODO Auto-generated method stub
		String username = request.getParameter("username");
		String password = request.getParameter("password");
		if(username.isEmpty() || password.isEmpty() )
		{
			RequestDispatcher req = request.getRequestDispatcher("register_3.jsp");
			req.include(request, response);
		}
		else
		{
			RequestDispatcher req = request.getRequestDispatcher("register_4.jsp");
			req.forward(request, response);
		}
	}

}
Explanation of the code:
Code Line 5-9: Here we are importing the necessary classes into the code.
Code Line 14: Here we are declaring the guru_login servlet, which extends HttpServlet.
Code Line 21: Here we are using the doPost() method, because the form uses the POST method.
Code Line 23-24: Here we are reading parameters using the request object, i.e. username and password.
Code Line 25-29: In this way we use an “if” condition that checks whether username and password are empty. If either is empty, we get a RequestDispatcher object that sends control back to register_3.jsp with the request and response objects.
Code Line 30-34: This branch executes if both are non-empty; it then forwards the request to register_4.jsp with the request and response objects.
Example 3: Register_4.jsp
<%@ page language="java" contentType="text/html; charset=ISO-8859-1"
    pageEncoding="ISO-8859-1"%>
<!DOCTYPE html PUBLIC "-//W3C//DTD HTML 4.01 Transitional//EN" "http://www.w3.org/TR/html4/loose.dtd">
<html>
<head>
<meta http-equiv="Content-Type" content="text/html; charset=ISO-8859-1">
<title>Guru Logged In</title>
</head>
<body>
	<table style="with: 50%">
	<tr><td>
	<% String username = request.getParameter("username"); %>
<a>Welcome   <% out.println(username); %> User!!!! You have logged in.</a></td></tr>
<tr></tr><tr><td></td><td></td><td><a href="register_3.jsp"><b>Logout</b></a></td></tr>
</table>
</body>
</html>
Explanation of the code:
Code Line 12: Here we get the parameter “username” from the request object into the String object username. This works because forward() keeps the original request, and therefore its parameters, intact.
Code Line 13: Here we have a welcome message with the username.
Code Line 14: Here we have the logout link, which sends the user back to register_3.jsp.
When you execute the above code, you get the following output.
Output:
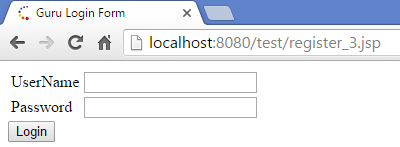
Opening register_3.jsp shows the two credential fields and a Login button.

After clicking the Login button, you get the message below together with a Logout link.
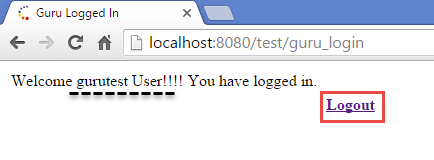
Clicking the Logout link returns you to the login page shown here.
Note: this example compares only for empty values, so any non-empty username is accepted. A production login must verify the credentials against a store and keep passwords hashed, never in plain text.
JSP Form Processing Using getParameter()
Forms are the common method of collecting input in web processing. We need to send information to the web server and then read that information back on the server side.
There are two commonly used methods to send and get back information to the web server.
GET Method:
- This is the default method to pass information from browser to web server.
- It sends the encoded information appended to the page URL, separated by a ? character.
- It also has a size limitation; the classic guidance is roughly 1024 characters per request, although the real ceiling is set by the browser and the server rather than by the HTTP specification.
- We should avoid sending passwords and sensitive information through the GET method.
POST Method:
- POST is the more reliable method of sending information to the server.
- It sends the information as a separate message body rather than in the address bar.
- Because the values never appear after the ? in the URL, they are not stored in browser history or server access logs.
- It is commonly used to send information which is sensitive.
JSP handles form data processing using the following methods:
- getParameter(): used to get the value of a single form parameter.
- getParameterValues(): used to return the multiple values of a parameter.
- getParameterNames(): used to get the names of all parameters.
- getInputStream(): used to read the binary data sent by the client.
Example:
In this example, we have taken a form with two fields, “username” and “password”, and a submit button.
Action_form.jsp
<%@ page language="java" contentType="text/html; charset=ISO-8859-1" pageEncoding="ISO-8859-1"%>

<!DOCTYPE html PUBLIC "-//W3C//DTD HTML 4.01 Transitional//EN" "http://www.w3.org/TR/html4/loose.dtd">
<html>
<head>
<meta http-equiv="Content-Type" content="text/html; charset=ISO-8859-1">
<title>Guru Form</title>
</head>
<body>
<form action="action_form_process.jsp" method="GET">
UserName: <input type="text" name="username">
<br />
Password: <input type="text" name="password" />
<input type="submit" value="Submit" />
</form>
</body>
</html>
Action_form_process.jsp
<%@ page language="java" contentType="text/html; charset=ISO-8859-1"
    pageEncoding="ISO-8859-1"%>
<!DOCTYPE html PUBLIC "-//W3C//DTD HTML 4.01 Transitional//EN" "http://www.w3.org/TR/html4/loose.dtd">
<html>
<head>
<meta http-equiv="Content-Type" content="text/html; charset=ISO-8859-1">
<title>Insert title here</title>
</head>
<body>

<h1>Form Processing</h1>

<p><b>Welcome User:</b>
   <%= request.getParameter("username")%>
</p>

</body>
</html>
Explanation of the code: Action_form.jsp
Code Line 10: Here we have defined a form whose action is processed by another JSP. In the action attribute we add the JSP to which the form has to be submitted through the GET method.
Here we are using the GET method to pass the information, i.e. username and password.
Code Line 11-14: Here we are taking fields like username and password, which are text fields, and we are getting the input from the user.
This input can be fetched using the getParameter method. We also have a submit button, which passes the field values into action_form_process.jsp.
Action_form_process.jsp
Code Line 14: Here we get the values of the input fields from action_form.jsp using the request object’s getParameter method.
When we execute the above code, we get the following output.
Output:
Action_form.jsp first renders the two-field form shown below.

After submitting, action_form_process.jsp echoes the username it read with getParameter().
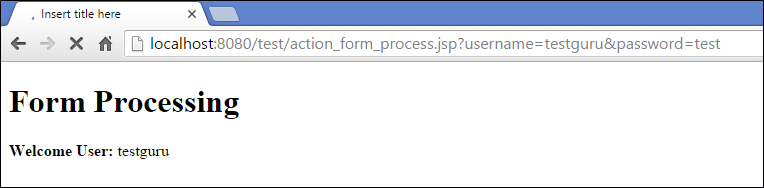
When we execute action_form.jsp, we get a form with two fields, username and password, and a submit button. After entering a username and password we click submit, and the request is processed by the next page, which returns the Form Processing page with a welcome message.
Version note: both servlets above import javax.servlet, which is correct for Tomcat 9 and earlier. Jakarta EE 9 renamed the API, so on Tomcat 10 or later every javax.servlet import becomes jakarta.servlet, or the application must be converted with the Apache Tomcat Migration Tool for Jakarta EE.
