
JSP File Upload and Download
 Editorial Team
⚡ Smart Summary
JSP File Upload and Download are core input and output operations that let a web application receive files from users and serve files back to them. This resource explains both flows using JSP action forms, Apache Commons FileUpload, and servlet classes, with complete working code.
JSP File Upload
- We can upload any files using JSP.
- It can be a text file, binary file, image file or any other document.
- Here in case of file uploading, only POST method will be used and not the GET method.
- Enctype attribute should be set to multipart/form-data.
Example: Using Action
In this example, we are uploading a file using IO object.
Action_file.jsp
<%@ page language="java" contentType="text/html; charset=ISO-8859-1"
    pageEncoding="ISO-8859-1"%>
<!DOCTYPE html PUBLIC "-//W3C//DTD HTML 4.01 Transitional//EN" "http://www.w3.org/TR/html4/loose.dtd">
<html>
<head>
<meta http-equiv="Content-Type" content="text/html; charset=ISO-8859-1">
<title>Guru File</title>
</head>
<body>
<a>Guru File Upload:</a>
Select file: <br />
<form action="action_file_upload.jsp" method="post"
                        enctype="multipart/form-data">
<input type="file" name="file" size="50" />
<br />
<input type="submit" value="Upload File" />
</form>
</body>
</html>
Action_file_upload.jsp
<%@ page language="java" contentType="text/html; charset=ISO-8859-1"
    pageEncoding="ISO-8859-1"%>
<%@ page import="java.io.*,java.util.*, javax.servlet.*" %>
<%@ page import="javax.servlet.http.*" %>
<%@ page import="org.apache.commons.fileupload.*" %>
<%@ page import="org.apache.commons.fileupload.disk.*" %>
<%@ page import="org.apache.commons.fileupload.servlet.*" %>
<%@ page import="org.apache.commons.io.output.*" %>
<!DOCTYPE html PUBLIC "-//W3C//DTD HTML 4.01 Transitional//EN" "http://www.w3.org/TR/html4/loose.dtd">
<html>
<head>
<meta http-equiv="Content-Type" content="text/html; charset=ISO-8859-1">
<title>Guru File Upload</title>
</head>
<body>
<%
   File file ;
   int maxFileSize = 5000 * 1024;
   int maxMemSize = 5000 * 1024;
   String filePath = "E:/guru99/data";

   String contentType = request.getContentType();
   if ((contentType.indexOf("multipart/form-data") >= 0)) {

      DiskFileItemFactory factory = new DiskFileItemFactory();
      factory.setSizeThreshold(maxMemSize);
      factory.setRepository(new File("c:\\temp"));
      ServletFileUpload upload = new ServletFileUpload(factory);
      upload.setSizeMax( maxFileSize );
      try{
         List fileItems = upload.parseRequest(request);
         Iterator i = fileItems.iterator();
         out.println("<html>");
         out.println("<body>");
         while ( i.hasNext () )
         {
            FileItem fi = (FileItem)i.next();
            if ( !fi.isFormField () )  {
                String fieldName = fi.getFieldName();
                String fileName = fi.getName();
                boolean isInMemory = fi.isInMemory();
                long sizeInBytes = fi.getSize();
                file = new File( filePath + "yourFileName") ;
                fi.write( file ) ;
                out.println("Uploaded Filename: " + filePath + fileName + "<br>");
            }
         }
         out.println("</body>");
         out.println("</html>");
      }catch(Exception ex) {
         System.out.println(ex);
      }
   }else{
      out.println("<html>");
      out.println("<body>");
      out.println("<p>No file uploaded</p>");
      out.println("</body>");
      out.println("</html>");
   }
%>
</body>
</html>
Explanation of the code:
Action_file.jsp
Code Line 12-18: Here we are creating a form with a file field, which will upload a file to the server, and the action will be passed to action_file_upload.jsp.
Action_file_upload.jsp
Code Line 20: Here we are giving the file path to a particular path.
Code Line 23-38: Here we check whether the content type is multipart/form-data. If that is the case, then the content is of file type, and it is read. After the file is read, it is written into the temporary file, and then the temporary file gets converted to the main file.
When you execute the above code, you get the following output:
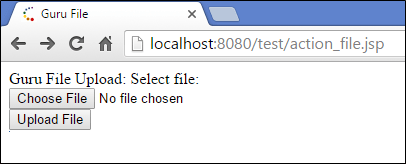
Output:
We are uploading a file using the choose file button option, and the upload file button will upload the file to the server to the path which is provided.
Example: Using JSP operations
In this example, we are going to upload a file using JSP operations. We will take a form which will have an “upload” button, and when you click on the upload button, the file will be uploaded.
Uploading_1.jsp
<%@ page language="java" contentType="text/html; charset=ISO-8859-1"
    pageEncoding="ISO-8859-1"%>
<!DOCTYPE html PUBLIC "-//W3C//DTD HTML 4.01 Transitional//EN" "http://www.w3.org/TR/html4/loose.dtd">
<html>
<head>
<meta http-equiv="Content-Type" content="text/html; charset=ISO-8859-1">
<title>Guru Uploading File</title>
</head>
<body>
File: <br />
<form action="guru_upload" method="post"
                        enctype="multipart/form-data">
<input type="file" name="guru_file" size="50" />
<br />
<input type="submit" value="Upload" />
</form>
</body>
</html>
Explanation of the code:
Code Line 11-12: Here we are taking a form which has an action on the servlet guru_upload, which will pass through a POST method. Also, here the enctype attribute specifies how form data should be encoded and sent to the server, and it is only used with the POST method. Here we are setting it as multipart/form-data, which is for the file (as data will be large).
Code Line 13: Here we are specifying the guru_file element with type file and giving the size as 50.
Code Line 15: This is a submit type button with the name “Upload” on it, through which the action servlet will be called and the request will be processed into that, and the file will be read and written into the servlet.
Guru_upload.java
package demotest;

import java.io.File;
import java.io.IOException;
import java.util.List;

import javax.servlet.ServletException;
import javax.servlet.http.HttpServlet;
import javax.servlet.http.HttpServletRequest;
import javax.servlet.http.HttpServletResponse;

import org.apache.commons.fileupload.FileItem;
import org.apache.commons.fileupload.disk.DiskFileItemFactory;
import org.apache.commons.fileupload.servlet.ServletFileUpload;

public class guru_upload extends HttpServlet {
	private static final long serialVersionUID = 1L;

    public guru_upload() {
        super();
        // TODO Auto-generated constructor stub
    }
	protected void doPost(HttpServletRequest request, HttpServletResponse response) throws ServletException, IOException {
		        if(ServletFileUpload.isMultipartContent(request)){
		            try {
		                List <FileItem> multiparts = new ServletFileUpload(new DiskFileItemFactory()).parseRequest(request);
		                for(FileItem item : multiparts){
		                    if(!item.isFormField()){
		                        String name = new File(item.getName()).getName();
		                        item.write( new File("c:/guru/upload" + File.separator + name));
		                    }
		                }
		               //File uploaded successfully
		               request.setAttribute("gurumessage", "File Uploaded Successfully");
		            } catch (Exception ex) {
		               request.setAttribute("gurumessage", "File Upload Failed due to " + ex);
		            }
		        }else{

		            request.setAttribute("gurumessage","No File found");
 }
		        request.getRequestDispatcher("/result.jsp").forward(request, response);

		    }


}
Explanation of the code:
Code Line 12-14: Here we will have to import the org.apache.commons library into the configuration of the code. We will have to import the fileupload class from the org.apache.commons library.
Code Line 23: Here we have the doPost() method, which will be called as we are passing the POST method in JSP, and it will take request and response objects as its parameters.
Code Line 26: Here we are creating an object of the ServletFileUpload class from the fileUpload package of the org.apache.commons library, which will check whether there are any file objects in JSP. If any are found, then those file objects will be taken from the request.
Code Line 27-32: We will iterate over the number of files by checking how many file items are present in the multiparts object, which is a list object (if we upload more than one file), and save it into the c:/guru/upload folder with the filename which has been provided. We are writing the file using the write method of the file object into the folder which has been mentioned.
Code Line 34: If there is no exception, then we are setting an attribute in the request as gurumessage with the value “File uploaded successfully”.
Code Line 35-36: If an exception occurs, then we set a message that “File upload failed”.
Code Line 40: If the file is not found, then we set the message as “No file found”.
Code Line 42: Forwarding the request using the requestdispatcher object to result.jsp with request and response objects.
Result.jsp
<%@ page language="java" contentType="text/html; charset=ISO-8859-1"
    pageEncoding="ISO-8859-1"%>
<!DOCTYPE html PUBLIC "-//W3C//DTD HTML 4.01 Transitional//EN" "http://www.w3.org/TR/html4/loose.dtd">
<html>
<head>
<meta http-equiv="Content-Type" content="text/html; charset=ISO-8859-1">
<title>Guru Result</title>
</head>
<body>
<% String msg = (String)request.getAttribute("message");
   out.println(msg);
%>
</body>
</html>
Explanation of the code:
Code Line 10: Here we are getting the attribute from the request object with the value gurumessage into a string object.
Code Line 11: Here we are printing that message.
When we execute the above code, we get the following output:
Output:
We get a form wherein there are fields to choose a file from the directory. Once the file is selected, then we have to click on the upload button.

Once the upload button is clicked, we get the message that the file is uploaded successfully.

In the below diagram, we can see that the file had been uploaded to the c:/guru/upload folder.

JSP File Download
In this example, we are going to download a file from a directory by clicking on the button.
Downloading_1.jsp
<%@ page language="java" contentType="text/html; charset=ISO-8859-1"
    pageEncoding="ISO-8859-1"%>
<!DOCTYPE html PUBLIC "-//W3C//DTD HTML 4.01 Transitional//EN" "http://www.w3.org/TR/html4/loose.dtd">
<html>
<head>
<meta http-equiv="Content-Type" content="text/html; charset=ISO-8859-1">
<title>Downloading Guru Example</title>
</head>
<body>
Guru Downloading File<a href="guru_download">Download here!!!</a>
</body>
</html>
Explanation of the code:
Code Line 10: Here we have given a link to download a file from the folder c:/guru/upload using the servlet guru_download.
Guru_download.java
package demotest;

import java.io.FileInputStream;
import java.io.IOException;
import java.io.PrintWriter;

import javax.servlet.ServletException;
import javax.servlet.http.HttpServlet;
import javax.servlet.http.HttpServletRequest;
import javax.servlet.http.HttpServletResponse;

/**
 * Servlet implementation class guru_download
 */
public class guru_download extends HttpServlet {
	private static final long serialVersionUID = 1L;

	protected void doGet(HttpServletRequest request, HttpServletResponse response) throws ServletException, IOException {
		response.setContentType("text/html");
		PrintWriter out = response.getWriter();
		String gurufile = "test.txt";
		String gurupath = "c:/guru/upload/";
		response.setContentType("APPLICATION/OCTET-STREAM");
		response.setHeader("Content-Disposition", "attachment; filename=\""
				+ gurufile + "\"");

		FileInputStream fileInputStream = new FileInputStream(gurupath
				+ gurufile);

		int i;
		while ((i = fileInputStream.read()) != -1) {
			out.write(i);
		}
		fileInputStream.close();
		out.close();
	}


	/**
	 * @see HttpServlet#doPost(HttpServletRequest request, HttpServletResponse response)
	 */
	protected void doPost(HttpServletRequest request, HttpServletResponse response) throws ServletException, IOException {
		// TODO Auto-generated method stub
	}

}
Explanation of the code:
Code Line 3-5: Here we are importing FileInputStream, IOException, and PrintWriter from the java.io package.
Code Line 15: We are defining the guru_download servlet which extends HttpServlet.
Code Line 18: As we have defined an href, which will be enclosed in a URL, so the GET method will get processed (doGet will be called in the servlet), which also encloses request and response objects.
Code Line 19-20: We are setting the content type in the response object and also getting the writer object from the response.
Code Line 21-22: Defining a variable as gurufile with value test.txt and gurupath as c:/guru/upload/.
Code Line 23-25: We are setting the content type using the response object, and we use the setHeader method, which sets the header into the response object as the filename which has been uploaded.
Code Line 27-28: We are creating a FileInputStream in which we will add gurupath+gurufile.
Code Line 31-33: Here we have taken a while loop which will run till the file is read, hence we have given the condition as != -1. In this condition, we are writing using the printwriter object out.
When you execute the above code, you will get the following output:
Output:

We have to click on downloading_1.jsp, and we will get a hyperlink as “Download Here”. When you click on this hyperlink file, it will be downloaded into the system.
