JSP Action Tags
⚡ Smart Summary
JSP Action Tags use XML syntax to control servlet engine behavior, enabling developers to include files, forward requests, work with JavaBeans, and embed dynamic content during request processing.
What is a JSP Action Tag?
JSP Action Tags use XML syntax constructs to control the behavior of the servlet engine. Developers can dynamically insert a file, reuse JavaBean components, forward the user to another page, and perform similar runtime operations through JSP Action Tags like include and forward. Unlike directives, action tags are re-evaluated each time the page is accessed, which makes them ideal for dynamic behavior during request processing.
Syntax:
<jsp:action_name attribute="value" />
In this tutorial on JSP Standard Action Tags, you will learn how each action tag works, what it does, and how to apply it in a real JSP file.
List of the Commonly Used Action Tags in JSP
There are 11 types of Standard Action Tags in JSP, and here is the complete list of them.
| Action Tag Name | Syntax | Description |
|---|---|---|
| jsp:useBean | <jsp:useBean id=”” class=”” /> | Used to invoke and use beans in the JSP page. |
| jsp:include | <jsp:include page=”page URL” flush=”true/false” /> | Includes another JSP file into the current file during request processing. |
| jsp:setProperty | <jsp:setproperty name=”” property=”” /> | Sets the property of a bean. |
| jsp:getProperty | <jsp:getAttribute name=”” property=”” /> | Retrieves the property of a bean and converts it into a string for output. |
| jsp:forward | <jsp:forward page=”value” /> | Forwards the request to another JSP or static page. |
| jsp:plugin | <jsp:plugin type=”applet/bean” code=”objectcode” codebase=”objectcodebase” /> | Introduces Java components like applets or beans into JSP and automatically generates tags. |
| jsp:body | <jsp:body></jsp:body> | Defines XML elements that are generated dynamically during request processing. |
| jsp:text | <jsp:text>template text</jsp:text> | Used to insert template text into JSP pages, containing only text and EL expressions. |
| jsp:param | <jsp:param name=”val” value=”val” /> | Passes parameters within the jsp:plugin action to add extra data. |
| jsp:attribute | <jsp:attribute></jsp:attribute> | Defines XML attributes that are dynamically generated. |
| jsp:output | <jsp:output doctype-root-element=”” doctype-system=”” /> | Specifies the XML or DOCTYPE declaration to be used in the output. |
Now that you have the full list, we will explore each of these JSP Action Tags one by one with syntax and a working example.
jsp:useBean Action Tag
- This action name is used when you want to use JavaBeans in the JSP page.
- With this tag, you can easily invoke a bean and reuse server-side components.
Syntax of jsp:useBean:
<jsp:useBean id="" class="" />
Here id specifies the identifier for this bean and class is the full path of the bean class.
Example:
<%@ page language="java" contentType="text/html; charset=ISO-8859-1"
    pageEncoding="ISO-8859-1"%>
<!DOCTYPE html PUBLIC "-//W3C//DTD HTML 4.01 Transitional//EN" "http://www.w3.org/TR/html4/loose.dtd">
<html>
<head>
<meta http-equiv="Content-Type" content="text/html; charset=ISO-8859-1">
<title>Action JSP1</title>
</head>
<body>
<jsp:useBean id="name" class="demotest.DemoClass">
</body>
</html>
Explanation of the code:
Code Line 10: In the above code, you use the “bean id” and the “class path” of the bean.
jsp:include Action Tag
- jsp:include is used to insert a JSP file into another file during request processing, similar to including Directives.
- It is added during the request processing phase, which means the included content is evaluated each time the page is requested.
Syntax of jsp:include:
<jsp:include page="page URL" flush="true/false">
Example:
In Action_jsp2 (Code Line 10), we are including a date.jsp file.
<%@ page language="java" contentType="text/html; charset=ISO-8859-1"
    pageEncoding="ISO-8859-1"%>
<!DOCTYPE html PUBLIC "-//W3C//DTD HTML 4.01 Transitional//EN" "http://www.w3.org/TR/html4/loose.dtd">
<html>
<head>
<meta http-equiv="Content-Type" content="text/html; charset=ISO-8859-1">
<title>Date Guru JSP</title>
</head>
<body>
<jsp:include page="date.jsp" flush="true" />
</body>
</html>
Date.jsp
<%@ page language="java" contentType="text/html; charset=ISO-8859-1"
    pageEncoding="ISO-8859-1"%>
<!DOCTYPE html PUBLIC "-//W3C//DTD HTML 4.01 Transitional//EN" "http://www.w3.org/TR/html4/loose.dtd">
<html>
<head>
<meta http-equiv="Content-Type" content="text/html; charset=ISO-8859-1">
<title>Insert title here</title>
</head>
<body>
<p>
Today's date: <%= new java.util.Date().toLocaleString()%>
</p>
</body>
</html>
Explanation of the code:
Action_jsp2.jsp
Code Line 10: In the first file, we are including the date.jsp file in action_jsp2.jsp.
Date.jsp:
Code Line 11: We are printing today’s date in code line 11 in date.jsp.
When you execute the code, the following is the output.

Output:
- It displays today’s date with time as the date file is included in the main JSP page.
jsp:setProperty Action Tag
- This standard action in JSP is used to set the property of the bean.
- You need to define a bean before setting the property.
Syntax:
<jsp:setProperty name="" property="" >
Here, the name defines the bean whose property is set, and property is the property you want to set. You can also set value and param attributes. Here value is not mandatory, and it defines the value which is assigned to the property. Here param is the name of the request parameter using which the value can be fetched. The example of setProperty will be demonstrated below with getProperty.
jsp:getProperty Action Tag
- This action is used to get the property of the bean.
- It converts the property into a string and finally inserts it into the output.
Syntax:
<jsp:getProperty name="" property="" >
Here, the name is the bean from which the property has to be retrieved, and the bean should be defined. The property attribute is the name of the bean property to be retrieved.
Example of setProperty and getProperty:
TestBean.java:
package demotest;

import java.io.Serializable;

public class TestBean implements Serializable{

	private String msg = "null";

	public String getMsg() {
		return msg;
	}

	public void setMsg(String msg) {
		this.msg = msg;
	}
}
Action_jsp3.jsp
<%@ page language="java" contentType="text/html; charset=ISO-8859-1"
    pageEncoding="ISO-8859-1"%>
<!DOCTYPE html PUBLIC "-//W3C//DTD HTML 4.01 Transitional//EN" "http://www.w3.org/TR/html4/loose.dtd">
<html>
<head>
<meta http-equiv="Content-Type" content="text/html; charset=ISO-8859-1">
<title>Guru Action 3</title>
</head>
<body>
<jsp:useBean id="GuruTest" class="demotest.TestBean" />
<jsp:setProperty name="GuruTest" property="msg" value="GuruTutorial" />
<jsp:getProperty name="GuruTest" property="msg" />
</body>
</html>
Explanation of the code:
TestBean.java:
Code Line 5: TestBean is implementing the Serializable class. It is a bean class with getters and setters in the code.
Code Line 7: Here we are taking the private string variable msg as “null”.
Code Line 9-14: Here we are using getters and setters of the variable “msg”.
Action_jsp3.jsp
Code Line 10: Here we are using the “useBean” tag, where it specifies the bean (TestBean) that has to be used in this JSP class.
Code Line 11: Here we are setting the value for the property msg for bean TestBean as “GuruTutorial”.
Code Line 12: Here, using getProperty, we are getting the value of property msg for bean TestBean (GuruTutorial), which is shown in the output.
When you execute the above code, you get the following output:

Output:
In this example, using TestBean, we are setting the property “msg” using setProperty and getting the value of the property using getProperty as “GuruTutorial”.
jsp:forward Action Tag
The jsp:forward action tag is used to forward the request to another JSP or any static page.
Here the request can be forwarded with no parameters or with parameters.
Syntax:
<jsp:forward page="value">
Here value represents where the request has to be forwarded.
Example:
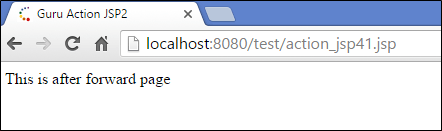
Action_jsp41.jsp
<%@ page language="java" contentType="text/html; charset=ISO-8859-1"
    pageEncoding="ISO-8859-1"%>
<!DOCTYPE html PUBLIC "-//W3C//DTD HTML 4.01 Transitional//EN" "http://www.w3.org/TR/html4/loose.dtd">
<html>
<head>
<meta http-equiv="Content-Type" content="text/html; charset=ISO-8859-1">
<title>Guru Action JSP1</title>
</head>
<body>
<jsp:forward page="jsp_action_42.jsp" />
</body>
</html>
Jsp_action_42.jsp
Guru Action JSP2</title>
</head>
<body>
<a>This is after forward page</a>
</body>
</html>
Explanation of the code:
Action_jsp41.jsp
Code Line 10: Here we are using the forward JSP action to forward the request to the page mentioned in the attribute, i.e., jsp_action_42.jsp.
Jsp_action_42.jsp
Code Line 10: Once we call action_jsp41.jsp, the request gets forwarded to this page, and we get the output as “This is after forward page”.
When we execute the above code, we get the following output.
Output:
We call action_jsp41.jsp, but the request gets forwarded to jsp_action_42.jsp, and we get the output from that page as “This is after forward page”.
jsp:plugin Action Tag
- It is used to introduce Java components into JSP, where the Java components can be either an applet or a bean.
- It detects the browser and adds <object> or <embed> tags into the file.
Syntax:
<jsp:plugin type="applet/bean" code="objectcode" codebase="objectcodebase">
- Here the type specifies either an object or a bean.
- Code specifies the class name of the applet or bean.
- Codebase contains the base URL that contains files of classes.
jsp:param Action Tag
- This is a child object of the plugin object described above.
- It must contain one or more actions to provide additional parameters.
Syntax:
<jsp:params>
<jsp:param name="val" value="val"/ >
</jsp:params>
Example of plugin and param:
Action_jsp5.jsp
<%@ page language="java" contentType="text/html; charset=ISO-8859-1"
    pageEncoding="ISO-8859-1"%>
<!DOCTYPE html PUBLIC "-//W3C//DTD HTML 4.01 Transitional//EN" "http://www.w3.org/TR/html4/loose.dtd">
<html>
<head>
<meta http-equiv="Content-Type" content="text/html; charset=ISO-8859-1">
<title>Action guru jsp5</title>
</head>
<body>
<jsp:plugin type="bean" code="Student.class" codebase="demotest.Student">
  <jsp:params>
     <jsp:param name="id" value="5" />
     <jsp:param name="name" value="guru" />
  </jsp:params>
</jsp:plugin>
</body>
</html>
Student.java
package demotest;

import java.io.Serializable;

public class Student implements Serializable {

	public String getName () {
		return name;
	}
	public void setName (String name) {
		this.name = name;
	}
	public int getId() {
		return id;
	}
	public void setId (int id) {
		this.id = id;
	}
	private String name = "null";
	private int id = 0;

}
Explanation of the code:
Action_jsp5.jsp
Code Line 10: Here we are using the jsp:plugin object where we are taking three attributes.
- Type – in this case it is bean.
- Code – name of the file.
- Codebase – path with the package name.
Code Line 11-14: Here we are taking the jsp:params object, under which there is a child param object with the attributes of name and value, and we are setting the values of id and name in these attributes.
Student.java
Code 7-17: We are using getters and setters for the variables id and name.
Code 19-20: We are initializing the variables id and name.
Here we will get output in the case when the set values of param will be used in the Student bean. In this case, we will not have any output as we are just setting and getting values of param but not printing it anywhere.
jsp:body Action Tag
- This tag is used to define the XML dynamically, where the Elements can be generated during request time rather than compilation time.
- It defines the XML, which is generated dynamically as an element body.
Syntax:
<jsp:body></jsp:body>
Here we write the XML body tag within these tags.
jsp:attribute Action Tag
- This tag is used to define the XML dynamically, where the elements can be generated during request time rather than compilation time.
- It defines the attribute of XML which will be generated dynamically.
Syntax:
<jsp:attribute></jsp:attribute>
Here we write the attribute tag of XML.
Example of body and attribute:
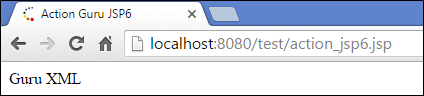
Action_jsp6.jsp
<%@ page language="java" contentType="text/html; charset=ISO-8859-1"
    pageEncoding="ISO-8859-1"%>
<!DOCTYPE html PUBLIC "-//W3C//DTD HTML 4.01 Transitional//EN" "http://www.w3.org/TR/html4/loose.dtd">
<html>
<head>
<meta http-equiv="Content-Type" content="text/html; charset=ISO-8859-1">
<title>Action Guru JSP6</title>
</head>
<body>
<jsp:element name="GuruXMLElement">
<jsp:attribute name="GuruXMLattribute">
Value
</jsp:attribute>
<jsp:body>Guru XML</jsp:body>
</jsp:element>
</body>
</html>
Explanation of the code:
Code Line 10: Here we are defining an element, which is dynamically generated as XML, and its name will be GuruXMLElement.
Code Line 11-13: Here we are defining an attribute, which will be an XML attribute of the dynamically generated XML.
Code Line 14: Here we have the body action, where we are writing the XML body, which will be generated dynamically.
When you execute the above code, you get the following output:
Output:
Here we get the output from the body tag of the generated XML.
jsp:text Action Tag
- It is used to insert template text into JSP pages.
- Its body does not contain any other elements, and it contains only text and EL expressions.
Syntax:
<jsp:text>template text</jsp:text>
Here template text refers to only template text (which can be any generic text that needs to be printed on JSP) or any EL expression.
Example:
Action_jsp7.jsp
<%@ page language="java" contentType="text/html; charset=ISO-8859-1"
    pageEncoding="ISO-8859-1"%>
<!DOCTYPE html PUBLIC "-//W3C//DTD HTML 4.01 Transitional//EN" "http://www.w3.org/TR/html4/loose.dtd">
<html>
<head>
<meta http-equiv="Content-Type" content="text/html; charset=ISO-8859-1">
<title>Guru Action JSP7</title>
</head>
<body>
<jsp:text>Guru Template Text</jsp:text>
</body>
</html>
Explanation of the code:
Code Line 10: Here we are taking the text object to print the template text.
When you execute the above code, you get the following output.

Output:
We are getting Guru Template Text, which is placed within the text action object.
jsp:output Action Tag
- It specifies the XML declaration or the DOCTYPE declaration of JSP.
- The XML declaration and DOCTYPE are declared by the output.
Syntax:
<jsp:output doctype-root-element="" doctype-system="">
Here, doctype-root-element indicates the root element of the XML document in DOCTYPE. Doctype-system indicates the doctype which is generated in output and gives a system literal.
Example:
<%@ page language="java" contentType="text/html; charset=ISO-8859-1"
    pageEncoding="ISO-8859-1"%>
<!DOCTYPE html PUBLIC "-//W3C//DTD HTML 4.01 Transitional//EN" "http://www.w3.org/TR/html4/loose.dtd">
<html>
<head>
<meta http-equiv="Content-Type" content="text/html; charset=ISO-8859-1">
<title>Action Guru JSP8</title>
</head>
<body>
<jsp:output doctype-root-element="html PUBLIC" doctype-system="http://www.w3.org/TR/html4/loose.dtd"/>
</body>
</html>
Explanation of the code:
Code Line 10: Here we are using the output action object to generate a DOCTYPE, and internally it will be generated in this format:
<!DOCTYPE html “http://www.w3.org/TR/html4/loose.dtd”>
There will not be any visible output for this as this will be generated internally.