
JSP Life Cycle: Phases & Diagram Explained
 Editorial Team
⚡ Smart Summary
JSP Life Cycle describes how a container translates a page into a servlet, compiles it, loads the class, creates an instance, initializes it, serves every request through the generated service method, and finally destroys it.
What is JSP Life Cycle?
JSP Life Cycle is defined as the translation of a JSP page into a servlet, because a JSP page has to be converted into a servlet before it can process service requests. The life cycle starts with the creation of the JSP and ends with the destruction of the servlet instance generated from it.
Because the generated class is an ordinary servlet, everything you already know about the servlet contract still applies. The Java code the container writes is what actually runs; the JSP file is only the source you maintain.
Different Phases of JSP Life Cycle
When the browser asks for a JSP, the JSP engine first checks whether it needs to compile the page. If the JSP has never been compiled, or if it has been modified since the last compilation, then the JSP engine compiles the page.
The compilation process of a JSP page involves three steps:
- Parsing of JSP
- Turning JSP into servlet
- Compiling the servlet
JSP Life Cycle Diagram
The JSP life cycle is depicted in the diagram below, which traces a single page from source file through to the class the container executes.
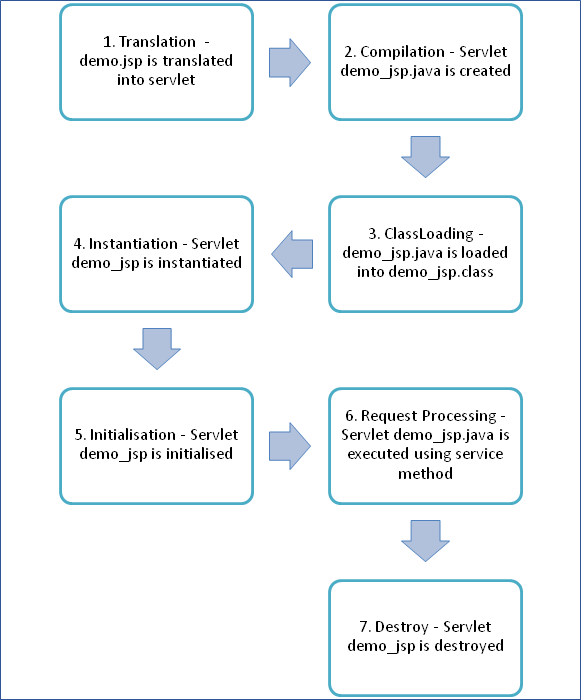
The following steps explain the life cycle of JSP:
- Translation of JSP page
- Compilation of JSP page (compilation of the JSP page into _jsp.java)
- Classloading (_jsp.java is converted to the class file _jsp.class)
- Instantiation (an object of the generated servlet is created)
- Initialization (the jspInit() method is invoked by the container)
- Request Processing (the _jspService() method is invoked by the container)
- Destroy (the jspDestroy() method is invoked by the container)
Phases of the JSP Life Cycle Explained
Let us look at each of the above points in more detail.
1) Translation of the JSP Page:
A Java servlet file is generated from a JSP source file. This is the first step of the JSP life cycle. In the translation phase, the container validates the syntactic correctness of the JSP page and tag files.
- The JSP container interprets the standard directives and actions, and the custom actions referencing tag libraries (they are all part of the JSP page and are covered in the JSP elements tutorial) used in this JSP page.
- In the pictorial description above, demo.jsp is translated to demo_jsp.java in the first step
Let us take an example of “demo.jsp” as shown below:
Demo.jsp
<html>
<head>
<title>Demo JSP</title>
</head>
<%
int demvar=0;%>
<body>
Count is:
<% Out.println(demovar++); %>
<body>
</html>
Note on the listing above: it is reproduced exactly as published so that it matches the generated servlet screenshot that follows. Two spellings in it will not compile if copied verbatim — the variable is declared as demvar but printed as demovar, and the implicit output object is out in lower case, not Out. Correct both before running the page yourself.
Code Explanation for Demo.jsp
Code Line 1: html start tag
Code Line 2: Head tag
Code Line 3 – 4: Title tag, i.e. Demo JSP, and closing head tag
Code Line 5 – 6: Scriptlet tag wherein the variable demo is initialized
Code Line 7 – 8: In the body tag, a text to be printed in the output (Count is: )
Code Line 9: Scriptlet tag where we try to print the variable demovar with its incremented value
Code Line 10 – 11: Body and HTML tags closed
The Demo JSP page is converted into the demo_jsp servlet shown in the code below.

Code explanation for Demo_jsp.java
Code Line 1: Servlet class demo_jsp is extending the parent class HttpServlet
Code Line 2 – 3: Overriding the service method of the JSP, i.e. _jspService, which has HttpServletRequest and HttpServletResponse objects as its parameters
Code Line 4: Opening method
Code Line 5: Calling the method getWriter() of the response object to get a PrintWriter object (prints a formatted representation of objects to a text output stream)
Code Line 6: Calling the setContentType method of the response object to set the content type
Code Line 7: Using the write() method of the PrintWriter object to parse html
Code Line 8: Initializing the demovar variable to 0
Code Line 9: Calling the write() method of the PrintWriter object to parse the text
Code Line 10: Calling the print() method of the PrintWriter object to increment the variable demovar from 0 + 1 = 1. Hence, the output will be 1
Code Line 11: Using the write() method of the PrintWriter object to parse html
Output:
The browser then renders the counter, as the screenshot below shows.
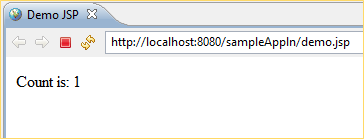
- Here you can see that in the screenshot the output is 1, because demvar is initialized to 0 and then incremented to 0 + 1 = 1
In the above example,
- demo.jsp is a JSP where one variable is initialized and incremented. This JSP is converted to the servlet (demo_jsp.class) wherein the JSP engine loads the JSP page and converts it to servlet content.
- When the conversion happens, all template text is converted to println() statements and all JSP elements are converted to Java code.
This is how a simple JSP page is translated into a servlet class.
2) Compilation of the JSP Page
- The generated Java servlet file is compiled into a Java servlet class
- The translation of the Java source page to its implementation class can happen at any time between the deployment of the JSP page into the container and processing of the JSP page.
- In the pictorial description above, demo_jsp.java is compiled to a class file demo_jsp.class
- On Apache Tomcat both artefacts are written under the server work directory, in
work/Catalina/localhost/<app>/org/apache/jsp, which is the first place to look when a translation error has to be diagnosed
3) Classloading
- The servlet class that has been generated from the JSP source is now loaded into the container
4) Instantiation
- In this step the object, i.e. the instance of the class, is generated.
- The container manages one or more instances of this class in response to requests and other events. Typically, a JSP container is built using a servlet container. A JSP container is an extension of a servlet container, as both containers support JSP and servlets.
- The JspPage interface, which is provided by the container, declares the jspInit() and jspDestroy() methods.
- There is an interface HttpJspPage which serves HTTP requests, and it also contains the service method. Its signature depends on the protocol, which is why the container generates that method instead of asking the page author to declare it.
5) Initialization
public void jspInit()
{
	//initializing the code
}
- The jspInit() method initializes the servlet instance that was generated from the JSP, and is invoked by the container in this phase.
- Once the instance is created, the init method is invoked immediately after that
- It is only called once during a JSP life cycle, and the method for initialization is declared as shown above
6) Request Processing
void _jspservice(HttpServletRequest request HttpServletResponse response)
{
	//handling all request and responses
}
- The _jspService() method is invoked by the container for all the requests raised by the JSP page during its life cycle
- For this phase, the page has to go through all the phases above, and only then can the service method be invoked.
- It passes the request and response objects
- This method cannot be overridden, because the container writes it during translation
- The method is shown above. It is responsible for handling all HTTP methods, i.e. GET, POST and the rest.
7) Destroy
public void _jspdestroy()
{
            //all clean up code
}
- The jspDestroy() method is also invoked by the container
- This method is called when the container decides it no longer needs the servlet instance to service requests.
- Once the call to the destroy method is made, the servlet is ready for garbage collection
- This is the end of the life cycle.
- We can override jspDestroy() when we perform any cleanup, such as releasing database connections or closing open files.
One naming note worth carrying forward: from Jakarta EE 9 onward these types live in the jakarta.servlet.jsp package rather than javax.servlet.jsp, so older imports have to be updated when an application is moved to a current server.
