
SAP BW Process Chain Tutorial (RSPC Tcode)
 Editorial Team
⚡ Smart Summary
Process chains in SAP BW automate, schedule, and monitor sequences of background processes such as data loads, using transaction RSPC to link a start process, connectors, and variants into a controlled, repeatable data warehouse workflow.
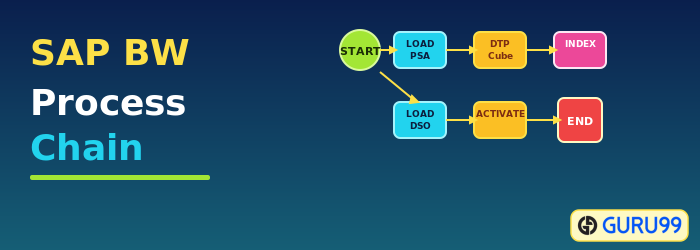
What is a Process Chain?
- A process chain is a sequence of processes that wait in the background for an event.
- Some of these processes trigger a separate event that can start other processes in turn.
- It provides various connectors that allow alternative and parallel execution of processes.
- For example, when a retail store receives a customer order, it triggers a sequence of events such as checking material in stock → ordering the product from the warehouse → manufacturing the product, and so on.
- Process chains provide graphical scheduling and monitoring features that help automate, visualize, and monitor tasks and processes.
- Process chains are integrated into the portal-based BI administration cockpit.
- Process chains can be thought of as flowcharts that are scheduled to wait in the background and are triggered for an event by another process.

A process chain involves three main steps:
- Start Process: Describes when the process will start (immediately, scheduled job, meta chain, or API).
- Connector: A linking process that chooses the option for starting the next process.
- Variant: The object on which the process is executed. It is a set of parameters passed to the process, such as the name of the InfoPackage or InfoObjects.
Steps to Create a Process Chain
RSPC is the central transaction used for process chain maintenance. In this screen, existing process chains are sorted by “Application Components”. Two views are available: Check View and Planning View. The default mode is Planning View.
Step 1) Creating a process chain: click the “Create” icon.

Step 2)
- Enter the technical name of the process chain.
- Enter a meaningful description for the process chain.
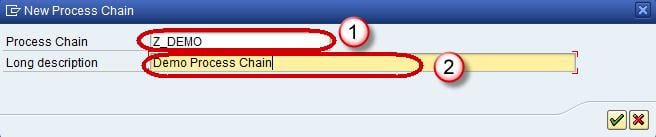
Click the check mark.
Step 3) A new window pops up. Click on the “New” icon to create a new “Start Process”.

Step 4)
- Enter the technical name of the Start Process.
- Enter a meaningful description for the Start Process and click the Enter button.
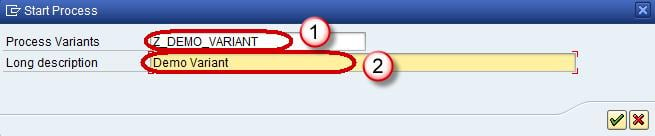
Step 5) The subsequent screen assigns a time-based or event-based trigger for the process chain.
- Click “Direct Schedule” to schedule the process chain for a specific time.
- Click “Change Selections” to enter the details for scheduling the process chain for execution.

Step 6) Steps for scheduling a process chain:
- Click the “Date/Time” button. Specify the scheduled start date/time and end date/time.
- To set frequency, click the “Periodic Job” check box.
- Click the “Period Values” button.
- In the next screen, select the required frequency (Hourly/Daily/Weekly/Monthly/Other Period). Click the Save icon and the Back button to return to the RSPC screen.

Click Save.
Step 7) Add InfoPackage: click the icon for “Process Types” to proceed.

Step 8) As discussed earlier, a data load can be triggered via an InfoPackage or a DTP.
- If the data load is done via an InfoPackage, use the process type “Execute InfoPackage”.
- If the data load is done via a DTP, use the process type “Data Transfer Process”.

Step 9) A new pop-up window appears. Here you can choose the required InfoPackage.

Step 10) Connect both the Start Variant and the InfoPackage. There are two ways to do this: right click on the first step, click “Connect With” -> “Load Data”; or select the “Start Variant”, keep the left mouse button pressed, move to the target step until an arrow follows, and release to create the connection. From the start process to every second step there is a black line.

The process chain appears as below after a connection between the Start Variant and the InfoPackage is created.

For any subsequent step, you can choose whether the successor step is executed only if the predecessor:
- Was successful: typically used in normal processing.
- Ended with errors: typically used to send failure messages.
- Executes irrespective of success or failure of the previous step.

Steps to Check Consistency of a Process Chain
- Select the menu “Goto”.
- Choose “Checking view”.

SAP verifies that all steps are connected and have at least one predecessor. Logical errors are not detected. If you get warnings or a “Chain is OK” message, you can activate it. If the check identifies errors, you must remove them first.

Steps to Activate a Process Chain
- Click on the menu “Process Chain”.
- Select “Activate”.
- Or select the “Activate” button.

Steps to Assign a Process Chain to an Application Component
By default, the process chain is created under the application component “Not Assigned”.
- Choose the “Application Component” button.
- Select the required component and re-activate the chain.

Steps to Schedule a Process Chain
- Click on the menu “Execution”.
- Choose “Schedule”.
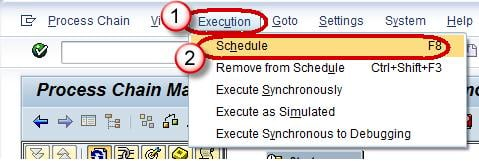
Alternatively, press the “Schedule” button. The chain is scheduled as a background job and can be viewed in transaction SM37. You will find a job named “BI_PROCESS_TRIGGER”; all process chains are scheduled with the same job name.

How to Monitor Process Chains
A number of work environments are available for monitoring process chain runs:
- Navigate to the Administration tab from the Data Warehousing Workbench (RSA1).
- BI Monitor in the Computing Center Management System (CCMS).
- Monitoring of daily process chains (transaction RSPCM).
- Log view for runs of a process chain in process chain maintenance (transaction RSPC).

