How to Download & Install XAMPP on Windows
⚡ Smart Summary
XAMPP and NetBeans together give beginners a complete local PHP development stack. XAMPP bundles Apache, MariaDB, PHP, and Perl into one installer, while the NetBeans editor adds syntax highlighting, autocomplete, and debugging for writing PHP projects.

What is XAMPP?
XAMPP is an open-source, cross-platform web server that consists of a web server, a MySQL or MariaDB database engine, and PHP and Perl programming packages. It is compiled and maintained by Apache Friends. It allows users to build and test websites on a local web server on their computer, and it supports Windows, Linux, and Mac.
The acronym XAMPP stands for:
- X – [cross-platform operating systems] meaning it can run on any OS: Mac OS X, Windows, Linux etc.
- A – Apache – this is the web server software.
- M – MySQL or MariaDB – Database.
- P – PHP
- P – Perl – scripting language
Why use XAMPP?
XAMPP provides an easy-to-use control panel to manage Apache, MySQL, and other programs without using commands. To use PHP, we need to install Apache and MySQL. It is not easy to install Apache and configure it, as it needs to be set up and integrated with PHP and Perl, among other things. XAMPP deals with all the complexity of setting up and integrating Apache with PHP and Perl.
Unlike Java, which runs with the Java SDK only, PHP requires a web server to work.
How to Install XAMPP
We look into the step by step process to install XAMPP for Windows. For other operating systems, the XAMPP installation steps are similar.
Step 1) Download XAMPP
Click here to download XAMPP for Windows: https://www.apachefriends.org/download.html
Step 2) Start Installation
XAMPP installation is just like installing any other Windows program. There are, however, a few things that we must note.
Step 3) Run the Setup
After you have downloaded XAMPP, run the setup. The warning message dialog window shown below appears.
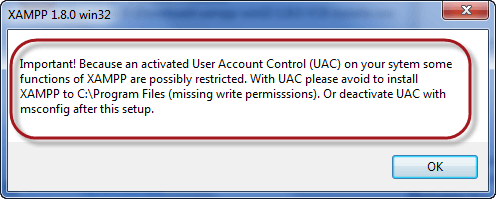
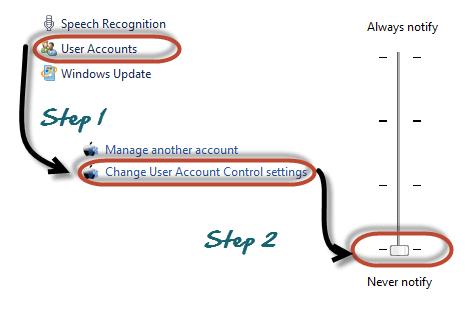
Step 4) Change User Control Settings
If you are using an older Windows version such as Vista or Windows 7, make sure that you deactivate the User Account Control feature. To do this, select Control Panel > User Accounts > Change User Access Control settings. The diagram below illustrates the main steps.
Step 5) Save the settings
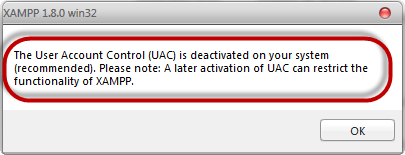
- After you have deactivated the User Account Control, click on the OK button on the warning message box.
- This time you get the following message
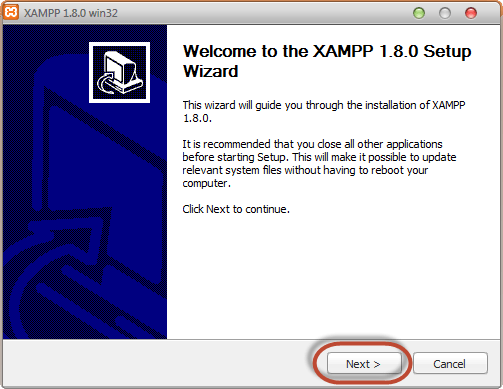
Step 6) Click Next
In the succeeding screen, click Next
Step 7) Choose the Installation path
In the next screen, change the installation path if required. Click Next

Step 8) Check the necessary services
In the next screen, select Apache and MySQL. You may optionally select FileZilla (FTP Client) if needed. Click Install

Note: a service is a long-running program in Windows that does not require user intervention. Services can be set to run automatically whenever the Windows operating system is started. For you to use Apache and MySQL, they are supposed to be running in the background. Installing them as services runs both Apache and MySQL automatically in the background whenever you power up your computer. If you have not installed Apache and MySQL as services, then you have to manually start them every time that you want to use them. You will have to do this from the XAMPP control panel.
Step 9) Finish the installation
On successful completion of installation, you will see the following window
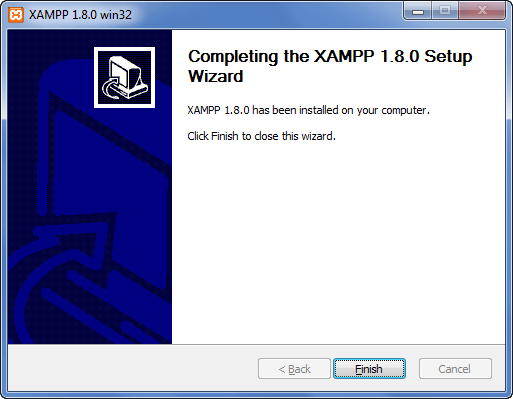
- Click on the Finish button
Before we test our XAMPP installation, let us first look at the basic directories that we will be working with.
Basic XAMPP Web Server Configuration
This XAMPP tutorial assumes that you have installed XAMPP on drive C in Windows using the steps mentioned above. The following is a list of the basic directories that you are supposed to be aware of.
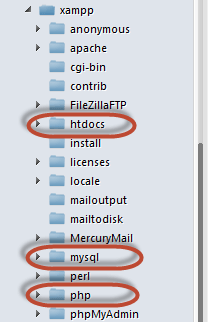
- htdocs: this is the web root directory. All of our PHP code will be placed in this directory.
- mysql – this directory contains all the information related to the MySQL or MariaDB database engine, which by default runs on port 3306.
- php – this directory contains PHP installation files. It contains an important file named php.ini. This directory is used to configure how PHP behaves on your server.
By default, the Apache web server runs on port 80. If port 80 is taken by another web server, you can use a different port number. For this tutorial we will assume we are using port 80. Note, if you use Skype, it uses the same port. Close Skype if you want to use XAMPP for PHP on port 80.
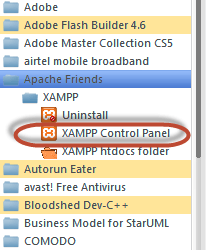
XAMPP Control Panel
The control panel is used to manage programs installed via XAMPP. To open the XAMPP Server control panel:
- Click on the start menu
- Explore the programs directory and locate Apache Friends, then XAMPP as shown in the diagram below
- The diagram below shows the control panel.

1) This section lists the installed services, modules and the process IDs (PIDs). A green tick means the module has been installed as a service. The red mark means it has not been installed as a service. To install a service, click on the red mark. If the button shows a green tick and you click on it, the control panel will ask you if you want to uninstall the system.
2) This section shows the port(s) associated with the modules. The actions section is for:
- starting and stopping modules
- Opening the administrative windows for Apache and MySQL
- Opening configuration files for Apache, MySQL etc. to make changes
- Viewing log files for the modules
3) This section contains useful utilities such as Netstat, Windows services shortcuts etc.
4) This section displays status information on the modules. The control panel can be used to:
- Install and uninstall services such as Apache, MySQL etc. that are installed via XAMPP
- Start and stop services.
- Open configuration files etc.
Configure XAMPP
Let us now look at the basic configuration required before we start using our XAMPP installation for developing PHP-powered websites. Type the URL http://localhost/xampp/ in your favorite browser. For this tutorial, we will be using Firefox as our web browser.

If you are able to see the above screen, then you have installed XAMPP successfully. The panel on the left-hand side contains links to useful information such as:
- The version of PHP installed
- Security settings of XAMPP
- Access to utilities such as phpMyAdmin etc.
Modern XAMPP releases ship with PHP 8.x, for example PHP 8.2, along with MariaDB as a drop-in MySQL replacement. The much older XAMPP 1.8.0 shown in some of these screenshots shipped PHP 5.4.4.
What is the best PHP IDE?
A PHP IDE is a program that allows you to easily write PHP code. PHP IDEs are often equipped with syntax highlighting features and, in some cases, autocomplete features too. This means that if you write a PHP keyword that is known by the PHP interpreter, then the keyword will be highlighted in a different color from the one used for regular statements. The autocomplete feature automatically pops up known PHP keywords as you type them. Notepad can also be used to write and edit PHP code. The disadvantage of using an editor such as Notepad is that debugging the scripts becomes difficult, because it is not easy to spot errors such as misspelt keywords, unclosed braces etc. An IDE will highlight the statements with errors, so it is easy for you to spot them. The table below shows 5 popular PHP editors.
| Editor | License | Cross Platform | Brief description |
|---|---|---|---|
| Netbeans IDE | Open Source | Yes |
|
| Dreamweaver | Commercial | Yes |
|
| Zend Studio | Commercial | Yes |
|
| PHP Eclipse | Open Source | Yes |
|
| Notepad++ | Freeware | Windows only |
|
Netbeans IDE PHP editor. As briefly highlighted in the above table, NetBeans IDE has powerful features that enhance the productivity of PHP coders. The IDE can be freely downloaded from https://netbeans.apache.org/front/main/download/
- Syntax highlighting and auto-complete features enhance your productivity
- It has native support for database systems like MySQL. You do not need to use two programs to code and develop your database.
- The IDE can be used in a collaborative environment. This comes in handy when you have to work with other developers as a team.
- The IDE has support for other languages such as:
- Java SE
- Java EE
- C
- C++
NetBeans is now maintained by the Apache Software Foundation as Apache NetBeans, and it releases four times a year. Version 30 is the current release as of 2026, while the screenshots below use the older NetBeans 7.3.
Introduction to Netbeans IDE
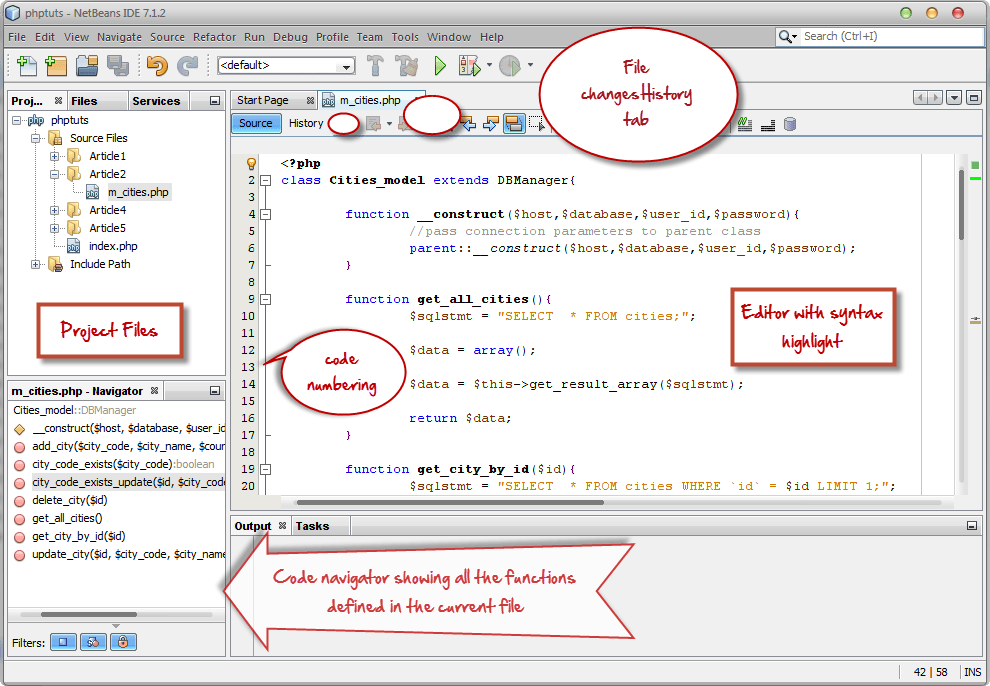
After you have successfully installed the NetBeans IDE PHP editor, run the program just like any other Windows program. The window shown below appears

1. Project explorer – this panel is used to display all the opened projects. The projects are listed in a tree view.
2. Shortcuts tool bar – this toolbar contains shortcuts to frequently performed tasks such as creating a new project, opening an existing project, undo and redo actions etc.
3. Startup page – this page contains 3 tabs, namely Learn & Discover, My NetBeans, and What’s New.
- The first tab [Learn and Discover] introduces you to the features of the NetBeans IDE, and showcases some demos and tutorials that can be developed in the NetBeans IDE.
- The second tab [My NetBeans] lists the recently opened projects, and allows you to install plugins and activate features of the IDE.
4. Output window – it is used to display output from programs such as Java console applications. It is also used to display log and debug information. The screenshot below shows the IDE with a project open.
Creating a new PHP project using the Netbeans IDE
- Click on the create new project button on the tool bar as shown below

- If you downloaded all the bundles available in the XAMPP NetBeans IDE, make sure you choose PHP under project category, PHP Application under Projects, then click on the Next button.

- Enter the project name as shown below.
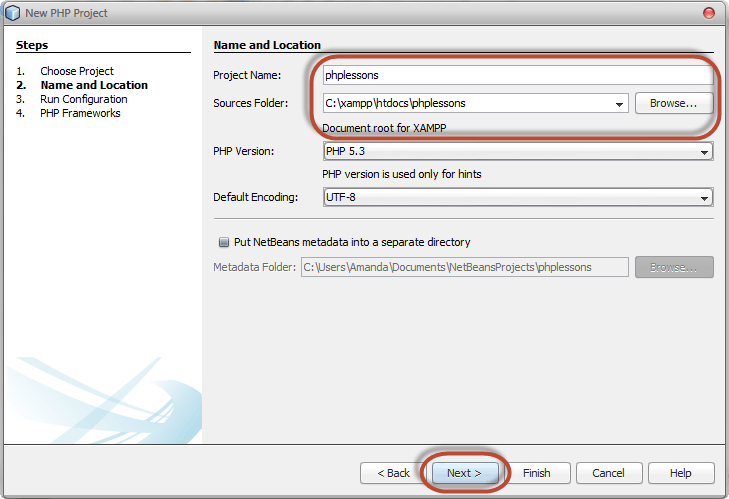
- Make sure the folder is saved in the XAMPP PHP installation directory as shown above.
- Click on the Next button when done.

- Make sure Run as: is set to Local Web Site (running on local web server)
- The Project URL: is set to http://localhost/phplessons/
Note the above settings will be set for you by default. You do not have to change anything unless you are an expert
- Click on the Next button

- The NetBeans PHP editor allows for integration with PHP MVC frameworks such as Symfony and Zend. For now we will not select any MVC framework. Click on the Finish button.
- Your newly created project will be displayed in the project browser and an index.php page created for you.
- The newly created page contains some HTML code. Replace it with the following code shown below.
Running your first PHP Example
<?php
echo "Hello World!";
?>
- Click on the run button on the toolbar as shown below

- Your default browser will be opened with the URL http://localhost/phplessons/index.php. The output “Hello World!” will be displayed in your browser.