
SQL Server Database: Create, Alter, Drop & Restore
 Editorial Team
⚡ Smart Summary
SQL Server databases are containers that hold tables, views, stored procedures, and other objects. Creating, altering, dropping, and restoring a database can be done through SQL Server Management Studio or with Transact-SQL statements.

What is Database?
A database is a collection of objects such as tables, views, stored procedures, triggers, and functions. In SQL Server, a database is the organized home where all of these related objects are stored and interlinked.
Consider a few examples from real life:
- A bookcase is where books reside.
- A home is where we live.
- A parking lot is where vehicles are parked, and such examples are countless.
Similarly, a database is a kind of home for all of our tables, views, and stored procedures. Technically, a database stores data in a well-organized manner for easy access and retrieval. In SQL Server, there are two types of databases:
- System databases: These are created automatically when you install SQL Server. They play a crucial role in the server, especially in ensuring that database objects run correctly. Examples of SQL Server system databases include master, msdb, model, tempdb, and resource.
- User databases: These are created by database users like you, who have been granted access to create databases.
Rules to Create a Database
First, you need to know the basic rules for creating a new database:
- Database names must be unique within an instance of SQL Server.
- Database names can be a maximum of 128 characters.
- The CREATE DATABASE statement must run in auto-commit mode.
The image below outlines the two available approaches for creating a database in SQL Server.

There are 2 ways to create a database in SQL Server:
- SQL Server Management Studio
- Transact-SQL
How To Create Database in SQL Server Management Studio
Here is a step-by-step process to create a database in SQL Server Management Studio:
Step 1) Right-click on ‘Database’ in the ‘Object Explorer’ window and then select ‘New Database.’
The right-click menu with the New Database option is shown below.

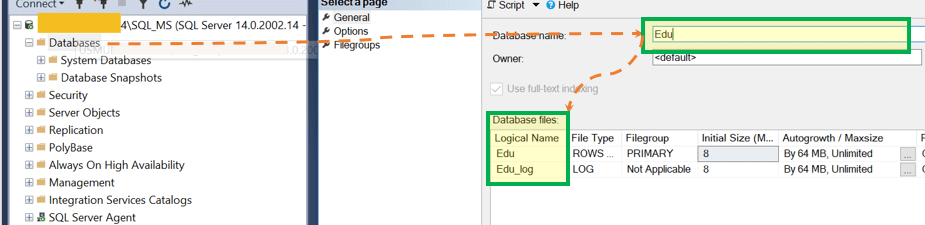
Step 2) The ‘New Database’ screen appears. Enter a ‘Database name’. The ‘Logical Name’ column is auto-populated with:
- Edu – Filetype: Rows Data and Filegroup: PRIMARY
- Edu_log – Filetype: LOG and Filegroup: ‘Not Applicable’
The New Database dialog with the database name and its logical files is shown below.
Here:
- A) Edu (Filetype: Rows Data, Filegroup: PRIMARY) is the .mdf data file.
- B) Edu_log (Filetype: LOG, Filegroup: ‘Not Applicable’) is the .ldf log file.
Step 3) (Optional) For more complex settings, you can navigate to the ‘Options’ and ‘Filegroups’ pages. At beginner level, creating the database from the General tab will suffice.
The Options and Filegroups pages are shown below.

Step 4) Click on ‘Add’ (the OK button) to create the database.
The button that confirms creation is highlighted below.

Result: The ‘Edu’ database is created. You can expand the database ‘Edu’, which will contain Tables, Views, and so on. These are initially blank until you create new tables, views, etc.

View the Source Query: You can view the source query of the newly created ‘Edu’ database. Navigate as follows: Right-click on the database name > Script Database as > CREATE To > New Query Editor Window.
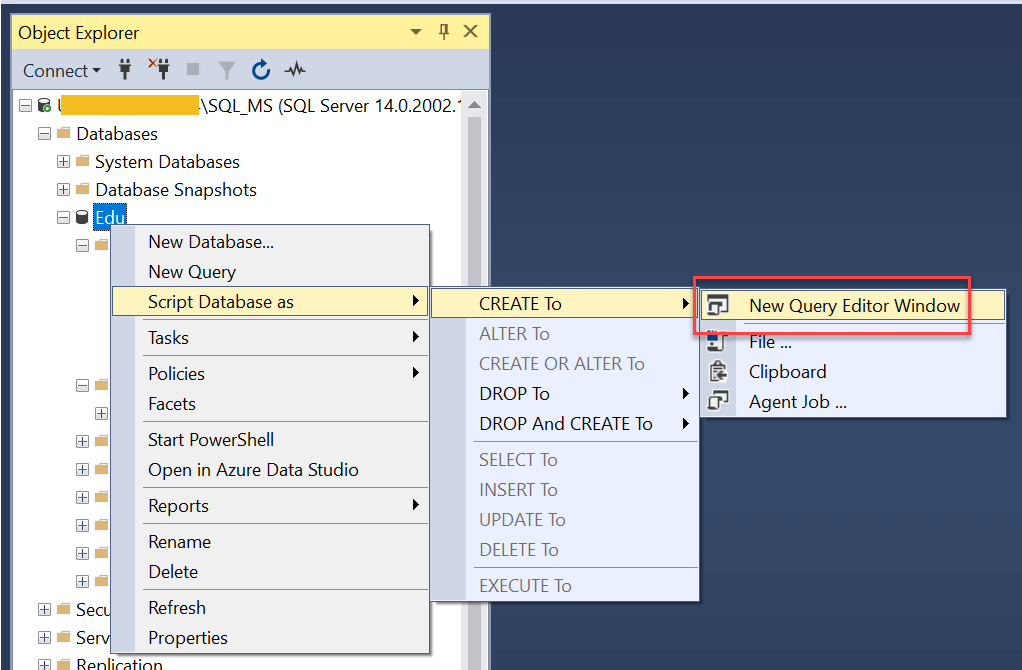
Query Window: The generated CREATE script opens in a new query window, as shown below.

Create Script:
USE [master]
GO

CREATE DATABASE [Edu]
 CONTAINMENT = NONE
 ON  PRIMARY
( NAME = N'Edu', FILENAME = N'C:\Program Files\Microsoft SQL Server\MSSQL14.SQL_MS\MSSQL\DATA\Edu.mdf' , SIZE = 8192KB , MAXSIZE = UNLIMITED, FILEGROWTH = 65536KB )
 LOG ON
( NAME = N'Edu_log', FILENAME = N'C:\Program Files\Microsoft SQL Server\MSSQL14.SQL_MS\MSSQL\DATA\Edu_log.ldf' , SIZE = 8192KB , MAXSIZE = 2048GB , FILEGROWTH = 65536KB )
Create Database with T-SQL
Another method is to write a T-SQL query to create a database and then execute it. Let us look at the simplest database-creation T-SQL query.
Syntax:
CREATE DATABASE <Database_name>
Query:
CREATE DATABASE [Edu_TSQL_file]
Click on ‘Execute’ to run the query, as shown below.

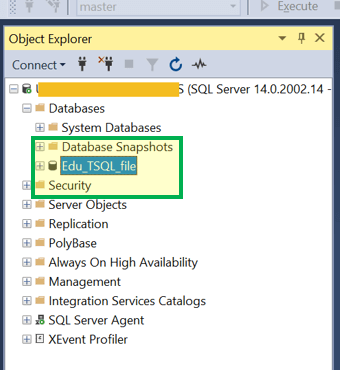
Result: You can see Edu_TSQL_file created in the SQL Object Explorer.

Now let us look at how to create a database with explicit .mdf and .ldf files. Here, you can give the file location as an explicit part of the query.
Syntax:
CREATE DATABASE database_name
[ CONTAINMENT = { NONE | PARTIAL } ]
[ ON
      [ PRIMARY ] <filespec> [ ,...n ]
      [ , <filegroup> [ ,...n ] ]
      [ LOG ON <filespec> [ ,...n ] ]
];
Query:
CREATE DATABASE [Edu_TSQL_file]
 CONTAINMENT = NONE
 ON  PRIMARY
( NAME = N'Edu_TSQL_file', FILENAME = N'C:\Program Files\Microsoft SQL Server\MSSQL14.SQL_MS\MSSQL\DATA\Edu_TSQL_file.mdf' , SIZE = 8192KB , MAXSIZE = UNLIMITED, FILEGROWTH = 65536KB )
 LOG ON
( NAME = N'Edu_TSQL_file_log', FILENAME = N'C:\Program Files\Microsoft SQL Server\MSSQL14.SQL_MS\MSSQL\DATA\Edu_TSQL_file_log.ldf' , SIZE = 8192KB , MAXSIZE = 2048GB , FILEGROWTH = 65536KB )
The database created with its explicit data and log files appears in Object Explorer, as shown below.

How to Alter Database
Like the CREATE DATABASE query, you can also alter a database. You can rename the database, change a file location or setting, and more.
Basic rules for altering a database:
- The ALTER DATABASE statement must run in auto-commit mode.
- ALTER DATABASE is not allowed in an explicit or implicit transaction.
There are 2 ways to alter a database in SQL Server:
- SQL Server Management Studio
- Transact-SQL
How To Alter Database in SQL Server Management Studio
Below are the steps to alter a database in SQL Server Management Studio. Let us try to alter the name of our pre-created database ‘Edu’. The pre-created Edu database is shown below in Object Explorer.

Step 1) Rename the database. Right-click on the database name and click on ‘Rename’.

Step 2) The database name becomes editable. Enter the new name and press Enter.

Result: The database is now renamed as “Edu_Alter” from ‘Edu’.

Alter Database with Transact-SQL
Now let us alter a database using T-SQL.
Syntax:
ALTER DATABASE <Databse_name>
MODIFY NAME = <New Name>
Query:
ALTER DATABASE Edu_TSQL
MODIFY NAME = Edu_TSQL_Alter;
Run the above query by clicking on ‘Execute’.
Result: The database is now renamed as “Edu_TSQL_Alter” from ‘Edu_TSQL’, as shown below.

General Syntax: The full ALTER DATABASE syntax supports many options, including renaming, collation, file options, and the compatibility level.
ALTER DATABASE { database_name  | CURRENT }
{   MODIFY NAME = new_database_name
  | COLLATE collation_name
  | <file_and_filegroup_options>
  | SET <option_spec> [ ,...n ] [ WITH <termination> ]
  | SET COMPATIBILITY_LEVEL = { 140 | 130 | 120 | 110 | 100 | 90 }
} ;
Note: The compatibility levels shown above reflect older releases. Current versions add 150 (SQL Server 2019), 160 (SQL Server 2022), and 170 (SQL Server 2025), while still supporting several earlier levels.
Changing the .mdf/.ldf file name
Query:
Alter DATABASE Edu_TSQL_Alter;
MODIFY FILE ( NAME = Edu_TSQL, NEWNAME = Edu_TSQL_newName );
The renamed logical file is reflected in the database properties, as shown below.

Changing the .mdf/.ldf file location
Query:
Alter DATABASE Edu_TSQL_Alter;
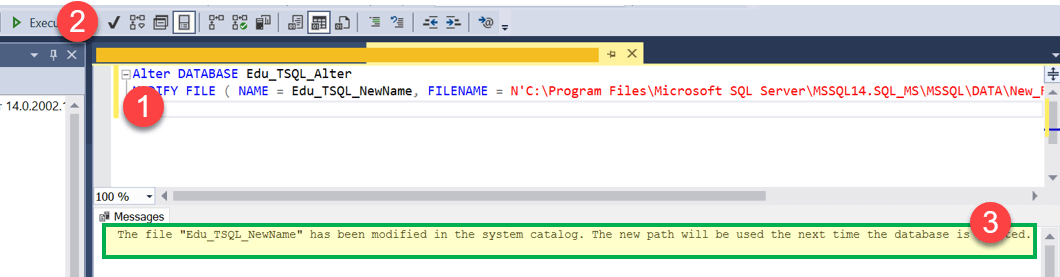
MODIFY FILE ( NAME = Edu_TSQL_NewName, FILENAME = N'C:\Program Files\Microsoft SQL Server\MSSQL14.SQL_MS\MSSQL\DATA\New_File\Edu_TSQL_log.ldf' );
The updated file path for the database is shown below.
Delete Database
There are 2 ways to delete (drop) a database in SQL Server:
- SQL Server Management Studio
- Transact-SQL
How To Drop Database in SQL Server Management Studio
Following is the process to drop a database in SQL Server Management Studio. Let us try to delete our pre-created database ‘Edu_Alter’.
Step 1) Right-click on the database, click on ‘Delete’, and then click ‘OK’.

Result: ‘Edu_Alter’ is deleted from the ‘Object Explorer’ database list.
Delete Database using Transact-SQL
Let us try to delete our pre-created database ‘Edu_TSQL_Alter’.
Syntax:
DROP DATABASE <Databse_name>
Query:
USE master;
GO
DROP DATABASE Edu_TSQL_Alter;
GO
Run the above query by clicking on ‘Execute’.
Result: ‘Edu_TSQL_Alter’ is deleted from the ‘Object Explorer’ database list, as shown below.

Restore Database in SQL Server
You can create a database by restoring a database that you had backed up earlier. It can be done by running the RESTORE DATABASE command, which takes the following syntax:
restore Database <database name> from disk = '<Backup file location + filename>
The query should be executed within the query window, just like the previous commands. For example:
restore database Edu from disk = 'C:\Backup\Edu_full_backup.bak'
You can also use the GUI navigation: Right-click on Database > Restore Database > Device > import the backup file > click OK.
