Attribute View in SAP HANA: How to Create?
⚡ Smart Summary
Attribute views in SAP HANA model master data as a reusable dimension, joining tables such as PRODUCT and PRODUCT_DESC so reports read descriptive text alongside keys, without any measure or aggregation.

What is an Attribute View in SAP HANA?
An attribute view in SAP HANA acts like a dimension. It joins multiple tables, behaves as master data for other views, and is a reusable object.
Attribute views offer these advantages.
- It acts as the master data context, providing text or a description for key and non-key fields.
- It can be reused in an analytic view and in a calculation view.
- It selects a subset of columns and rows from a database table.
- Attributes (fields) can be calculated from fields of several tables.
- It holds no measure and no aggregation option.
Attribute View Types
Three attribute view types are available, and the type is chosen in the creation dialog.
| Attribute View Type | Description |
|---|---|
| Standard | A standard view built from table fields, used in the walkthrough below. |
| Time | Based on the default time tables. Gregorian: M_TIME_DIMENSION, M_TIME_DIMENSION_YEAR, M_TIME_DIMENSION_MONTH, M_TIME_DIMENSION_WEEK. Fiscal: M_FISCAL_CALENDAR. |
| Derived | Derived from an existing attribute view. It opens read-only, and only the description can be edited. |
Copy From in the same dialog defines a view by copying an existing one. The difference matters: a derived view allows only its description to be edited, while a copy can be modified entirely.
How to Create an Attribute View in SAP HANA
Standard view creation follows the predefined sequence below, from table creation to data preview.

Table Creation for Attribute View
A standard attribute view is built here for a product table, so the “PRODUCT” and “PRODUCT_DESC” tables are created first with the scripts below.
Product table script –
CREATE	 COLUMN TABLE "DHK_SCHEMA"."PRODUCT"
(
"PRODUCT_ID"	NVARCHAR (10) PRIMARY KEY,
"SUPPLIER_ID"	NVARCHAR (10),
"CATEGORY" NVARCHAR (3),
"PRICE"	 DECIMAL (5,2)
);

INSERT	INTO "DHK_SCHEMA"."PRODUCT" VALUES ('A0001','10000','A', 500.00);
INSERT	INTO "DHK_SCHEMA"."PRODUCT" VALUES ('A0002','10000','B', 300.00);
INSERT INTO "DHK_SCHEMA"."PRODUCT" VALUES ('A0003','10000','C', 200.00);
INSERT	INTO "DHK_SCHEMA"."PRODUCT" VALUES ('A0004','10000','D', 100.00);
INSERT	INTO "DHK_SCHEMA"."PRODUCT" VALUES ('A0005','10000','A', 550.00);
Product description table script –
CREATE COLUMN TABLE "DHK_SCHEMA"."PRODUCT_DESC"
(
"PRODUCT_ID" NVARCHAR (10) PRIMARY KEY,
"PRODUCT_NAME" NVARCHAR (10)
);

INSERT INTO	"DHK_SCHEMA"."PRODUCT_DESC"	VALUES ('A0001','PRODUCT1');
INSERT INTO	"DHK_SCHEMA"."PRODUCT_DESC"	VALUES ('A0002','PRODUCT2');
INSERT INTO	"DHK_SCHEMA"."PRODUCT_DESC"	VALUES ('A0003','PRODUCT3');
INSERT INTO	"DHK_SCHEMA"."PRODUCT_DESC"	VALUES ('A0004','PRODUCT4');
INSERT INTO	"DHK_SCHEMA"."PRODUCT_DESC"	VALUES ('A0005','PRODUCT5');
Both tables now exist in schema “DHK_SCHEMA”, so the modeling steps can begin.
Attribute View Creation
Step 1) Select the SAP HANA system, then work down the content node as shown below.
- Select the Content folder.
- Select the non-structural package MODELLING under DHK_SCHEMA, then right-click and choose New.
- Select the Attribute View option.

Step 2) Enter the view information in the creation dialog shown below.
- Enter the attribute view name and label.
- Select the view type, here Attribute View.
- Select the subtype “Standard”.
- Click the Finish button.

Step 3) Check the view editor screen. The information view editor opens, and each numbered part of it is described below.
- Scenario pane: contains the Semantics and Data Foundation nodes.
- Detail pane: contains the Column, View Properties and Hierarchies tabs.
- Semantics node: the output structure of the view, here a dimension.
- Data Foundation node: the tables that define the view, dropped here.
- The tabs of the detail pane are displayed.
- Local: shows every local attribute detail.
- Show: filter for local attributes.
- Detail of the selected attribute.
- Toolbar: performance analysis, find column, validate, activate, data preview.

Step 4) Click the Data Foundation node to include database tables, then follow the sequence below.
- Drag tables “PRODUCT” and “PRODUCT_DESC” from the TABLE node under DHK_SCHEMA.
- Drop “PRODUCT” and “PRODUCT_DESC” on the Data Foundation node.
- Select the fields of “PRODUCT” as output; the field icon turns from grey to orange.
- Select the fields of “PRODUCT_DESC” as output in the same way.
- Output fields from both tables appear in the column list of the output pane.

Join the “PRODUCT” table to “PRODUCT_DESC” on the “PRODUCT_ID” field.
Step 5) Select the join path, right-click it and choose Edit. The Edit Join Condition screen appears.
- Select the join type “Inner”.
- Select the cardinality “1..1”.

Click OK to confirm. Other SAP HANA join types, such as referential and text joins, are set in the same dialog.
Step 6) Select the columns and define the output key.
- Select the Semantics node.
- The Column tab appears in the detail pane.
- Select “PRODUCT_ID” as Key.
- Check Hidden for field PRODUCT_ID_1, from PRODUCT_DESC.
- Click the Validate button.
- After successful validation, click the Activate button.

The Job Log section at the bottom of the screen reports validation and activation.

Step 7) The attribute view “AT_PRODUCT” now exists; refresh the Attribute View folder to see it.
- Go to the DHK_SCHEMA->MODELLING package.
- AT_PRODUCT appears under the Attribute View folder.

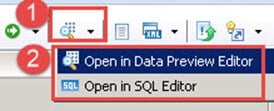
Step 8) Check the data. Select Data Preview on the toolbar; two options are offered, as shown below.
- Open in Data Preview Editor, with analysis options.
- Open in SQL Editor, with only the query output.
Step 9) Check the view data. The preview editor offers three tabs: Analysis, Distinct Values and Raw Data.
Analysis is a graphical representation of the attribute view.
- Select attributes for the label and value axes.
- An attribute on the label axis appears on the X axis.
- An attribute on the value axis appears on the Y axis.
- Output is available as chart, table, grid and HTML.

Distinct Values lists the distinct values of a column with the record count for the selected attribute.

Raw Data displays the attribute view data in table format.
- Click the Raw Data tab.
- The data appears in table format.

Step 10) Check the data from the SQL editor, chosen in the same preview menu.
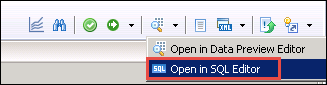
This option reads the column view generated in the “_SYS_BIC” schema when “AT_PRODUCT” was activated, so the editor also shows the SQL statement used.
- The SQL query used for data selection is displayed.
- The output is displayed.

Every data preview therefore reads from _SYS_BIC, not from the design-time object. The screenshot below shows column view “AT_PRODUCT” under that schema in the catalog node.

One planning note: attribute views are deprecated, so on current releases the same dimension is built as a calculation view of data category Dimension. The steps above still apply to existing content in SAP HANA Studio, and the wider SAP HANA modeling material covers the replacements.