Puppet Tutorial for Beginners: What is Puppet & How to Use?
Before we learn Puppet, let’s understand:
What is Configuration Management?
Configuration management is the process of maintaining software and computer systems (for example servers, storage, networks) in a known, desired and consistent state. It also allows access to an accurate historical record of system state for project management and audit purposes.
System Administrators mostly perform repetitive tasks like installing servers, configuring those servers, etc. These professionals can automate this task, by writing scripts.
However, it is a difficult job when they are working on a massive infrastructure. The Configuration Management tool like a Puppet was introduced to resolve such issues.
What is Puppet?
Puppet is a system management tool for centralizing and automating the configuration management process. Puppet is also used as a software deployment tool. It is an open-source configuration management software widely used for server configuration, management, deployment, and orchestration of various applications and services across the whole infrastructure of an organization.
Puppet is specially designed to manage the configuration of Linux and Windows systems. It is written in Ruby and uses its unique Domain Specific Language (DSL) to describe system configuration.
What are the Puppet versions?
Puppet comes in two versions:
- Open Source Puppet: It is a basic version of Puppet configuration management tool, which is also known as Open Source Puppet. It is available directly from Puppet’s website and is licensed under the Apache 2.0 system.
- Puppet Enterprise: Commercial version that offers features like compliance reporting, orchestration, role-based access control, GUI, API, and command-line tools for effective management of nodes.
What Puppet can do?
For example, you have an infrastructure with about 100 servers. As a system admin, it’s your role to ensure that all these servers are always up to date and running with full functionality.

To do this, you can use Puppet, which allows you to write a simple code which can be deployed automatically on these servers. This reduces the human effort and makes the development process fast and effective.

Puppet performs the following functions:
- Puppet allows you to define distinct configurations for every host.
- The tool allows you to continuously monitor servers to confirm whether the required configuration exists or not and it is not altered. If the config is changed, Puppet tool will revert to the pre-defined configuration on the host.
- It also provides control over all the configured system, so a centralized change gets automatically effected.
- It is also used as a deployment tool as it automatically deploys software to the system. It implements the infrastructure as a code because policies and configurations are written as code.
Puppet DSL and Programming Paradigms
Before we learn Puppet DSL, let’s understand programming paradigms:
A programming paradigm is a style you are using in computer programming.
Four types of paradigms are:
- Imperative.
- Declarative.
- Functional (which is considered a subset of that declarative paradigm)
- Object-oriented.
We will focus on Imperative and Declarative.
Imperative Paradigms
This programming paradigm expresses the logic of a computation(What to do) and describes its control flow(How to do)
Example:
Assume you are going to your office, you book a cab and start giving step by step directions to the driver until you reach the office. Specifying what to do and how to do is an imperative style.
Declarative Paradigms
This programming paradigm expresses the logic of a computation(What to do) without describing its control flow(How to do)
Example:
Assume you are going to your office, you book Uber cab and specify the final destination (Office). Specifying what to do not how to do is a declarative style.
| Paradigm | What to do | How to do |
|---|---|---|
| Imperative | Yes | Yes |
| Declarative | Yes | No |
Puppet uses a declarative programming paradigm
Puppet uses a declarative programming approach.
Example: Create a user on the system:
It can be done using Imperative programming pattern by a shell script: Here we specify how to create the user and what commands to use on the operating system.
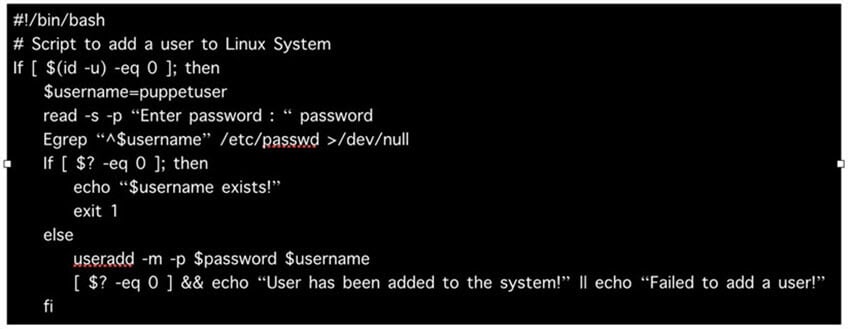
However, it can be done using Declarative programming pattern with only a few lines of puppet code, Puppet domain specific language (DSL), and still achieve the same result.

Deployment models of configuration management tools
There are two deployment models for configuration management tools :
- Push-based deployment model: initiated by a master node.
- Pull-based deployment model: initiated by agents.
Push-based deployment model
In this deployment model master server pushes the configurations and software to the individual agents. After verifying a secure connection, the master runs commands remotely on the agents. For example, Ansible and Salt Stack.
Pull-based deployment model.
In this deployment model, individual servers contact a master server, verify and establish a secure connection, download their configurations and software and then configure themselves accordingly — for example, Puppet and Chef.
How Puppet works?
Puppet is based on a Pull deployment model, where the agent nodes check in regularly after every 1800 seconds with the master node to see if anything needs to be updated in the agent. If anything needs to be updated the agent pulls the necessary puppet codes from the master and performs required actions.
Let’s explain it by an example:
Example: Master – Agent Setup:
The Master
A Linux based machine with Puppet master software installed on it. It is responsible for maintaining configurations in the form of puppet codes. The master node can only be Linux.
The Agents
The target machines managed by a puppet with the puppet agent software installed on them.
The agent can be configured on any supported operating system such as Linux or Windows or Solaris or Mac OS.
The communication between master and agent is established through secure certificates.

Communication between the Master and the Agent
Step 1) Once the connectivity is established between the agent and the master, the Puppet agent sends the data about its state to the Puppet master server. These are called Facts: This information includes the hostname, kernel details, IP address, file name details, etc.…

Step 2) Puppet Master uses this data and compiles a list with the configuration to be applied to the agent. This list of configuration to be performed on an agent is known as a catalog. This could be changed such as package installation, upgrades or removals, File System creation, user creation or deletion, server reboot, IP configuration changes, etc.

Step 3) The agent uses this list of configuration to apply any required configuration changes on the node.
In case there are no drifts in the configuration, Agent does not perform any configuration changes and leaves the node to run with the same configuration.

Step 4) Once it is done the node reports back to puppet master indicating that the configuration has been applied and completed.
Puppet Blocks
Puppet provides the flexibility to integrate Reports with third-party tools using Puppet APIs.
Four types of Puppet building blocks are
- Resources
- Classes
- Manifest
- Modules
Puppet Resources
Puppet Resources are the building blocks of Puppet.
Resources are the inbuilt functions that run at the back end to perform the required operations in puppet.
Puppet Classes
A combination of different resources can be grouped together into a single unit called class.
Puppet Manifest
Manifest is a directory containing puppet DSL files. Those files have a .pp extension. The .pp extension stands for puppet program. The puppet code consists of definitions or declarations of Puppet Classes.
Puppet Modules
Modules are a collection of files and directories such as Manifests, Class definitions. They are the re-usable and sharable units in Puppet.
For example, the MySQL module to install and configure MySQL or the Jenkins module to manage Jenkins, etc..

Types of Puppet resources
In general, a system consists of files, users, services, processes, packages, etc. In Puppet, these are called resources. Resources are the fundamental building blocks in
Puppet. All the operations on puppet agents are performed with the help of puppet resources.
Puppet resources are the readymade tools that are used to perform various tasks and operations on any supported platform. We can use a single puppet resource to perform a specific task, or we can use multiple puppet resources together to perform some complex application configurations deployments.
Resources can have different types. Puppet uses resources and resource types in order to describe a system’s configuration.
There are three kinds of resource types:
- Puppet core or built-in resource types.
- Puppet defined resource types.
- Puppet custom resource types.
Puppet core or built-in resource types
Core or built-in resource types are the pre-built puppet resource types shipped with puppet software. All of the core or built-in Puppet resource types are written and maintained by Puppet team.
Puppet defined resource types
Defined resource types are lightweight resource types written in Puppet declarative language using a combination of existing resource types.
Puppet custom resource types
Custom resource types are completely customized resource types written in Ruby.
Let’s explore about puppet resource types …
In the terminal, type the following command to display a list of Puppet relevant subcommands:
Puppet --help

In our case, we are interested in the subcommand “resource” which we will use to find the information about inbuilt puppet resource types.
In the terminal, type any of the following commands to display a list of actions associated with the puppet subcommand “resource“:
Puppet help resource
Puppet resource --help

In this case, we have the resource as subcommand and –types as action.
Puppet has 49 inbuilt core resource types.
In the terminal, type the following command to display a list of available inbuilt puppet resource types:
puppet resource –types

Each type supports a list of attributes. These attributes provide a detailed description that Puppet uses to manage the resource.
To find out all the attributes associated with the puppet resource type, use the following command:
puppet describe <resource type name>
Parameters will list all the available attributes for that resource type.
puppet describe package

It’s hard for a new person to understand and relate many unmanaged puppet code files. This is where we need some grouping to tie together operations. The aim is to solve a single problem, such as all operations required to configure ssh on a server or ntp service or a complete web server or database server from scratch.
What are Puppet Classes?
Puppet classes are the collection of puppet resources bundled together as a single unit.
Puppet introduced classes to make the structure re-usable and organized.
First, we need to define a class using class definition syntax; classes must be unique and can be declared only once with the same name:
class <class-name> {
<Resource declarations>
}
Example:
class ntpconfig {
    file {
        "/etc/ntp.conf":
     ensure=> "present", content=> "server 0.centos.pool.ntp.org iburst\n",
    }
}
So far we have only defined the class, but we have not used it anywhere. Meaning this code that we have written will never get executed unless we declare this class elsewhere.
Class Declaration
To use a defined class in code, use the include keyword.
class ntpconfig {
    file {
        "/etc/ntp.conf":
      ensure=> "present",
      content=> "server 0.centos.pool.ntp.org iburst\n",
    }
}
include ntpconfig
Let’s understand this with a real case scenario.
Demo install NTP
First, make sure the NTP package is not already present on the server, the following command will return nothing if the telnet is not present on the server:
rpm -qa | grep -i ntp

As we can see, the NTP package is already present on the server. Let’s remove the existing NTP package:
yum remove ntp
After removing the package, ensure that ntp.conf file is not existing:
ls -lrt /etc/ntp.conf

Verify the ntp service does not exist by running the following command:
systemctl status ntp

Create a new .pp file to save the code. From the command line:
vi demontp.pp
Change to insert mode by pressing i from the keyboard.
Type the following code to create a new file:
# Class Definition
class ntpconfig {
    # Installing NTP Package
  package {"ntp":
    ensure=> "present",
    }
    # Configuring NTP configuration file
  file {"/etc/ntp.conf":
    ensure=> "present",
    content=> "server 0.centos.pool.ntp.org iburst\n",
    }
    # Starting NTP services
  service {"ntpd":
    ensure=> "running",
    }
}
After done with editing : press esc
To save the file, press :wq!
Next step is to check whether the code has any syntax errors. Execute the following command:
puppet parser validate demontp.pp
Make sure that you switched to the root to be able to complete the test without any error, by executing the command :
su root
Test is the next step in the code creation process. Execute the following command to perform a smoke test:
Puppet applies demontp.pp --noop
Last step is to run the puppet in real mode and verify the output.
puppet apply demontp.pp
Puppet didn’t perform anything because the demo class was just defined but not declared.
So, until you declare the puppet class, the code will not get applied.
Let’s declare the demo class inside the same code using include class name at the end of the code:
# Class Definition
class ntpconfig {
    # Installing NTP Package
  package {"ntp":
    ensure=> "present",
    }
    # Configuring NTP configuration file
  file {"/etc/ntp.conf":
    ensure=> "present",
    content=> "server 0.centos.pool.ntp.org iburst\n",
    }
    # Starting NTP services
  service {"ntpd":
    ensure=> "running",
    }
}

# Class Declaration
include ntpconfig
Again check whether the code has any syntax errors. Execute the following command:
puppet parser validate demontp.pp
Make sure that you switched to the root to be able to complete the test without any error, by executing the command :
su root
Testing is the next step in the code creation process. Execute the following command to perform a smoke test:
Puppet apply demontp.pp --noop
Last step is to run the puppet in real mode and verify the output.
puppet apply demontp.pp
This time the code gets applied because the class was defined and then declared.

Ensure that ntp.conf is now existing:
ls -lrt /etc/ntp.conf
Verify the ntp service has been started by running the following command:
systemctl status ntpd
