Ansible Tutorial for Beginners: Playbook, Commands & Example
What is Ansible?
Ansible is an open source automation and orchestration tool for software provisioning, configuration management, and software deployment. Ansible can easily run and configure Unix-like systems as well as Windows systems to provide infrastructure as code. It contains its own declarative programming language for system configuration and management.
Ansible is popular for its simplicity of installation, ease of use in what concerns the connectivity to clients, its lack of agent for Ansible clients and the multitude of skills. It functions by connecting via SSH to the clients, so it doesn’t need a special agent on the client-side, and by pushing modules to the clients, the modules are then executed locally on the client-side and the output is pushed back to the Ansible server.
Since it uses SSH, it can very easily connect to clients using SSH-Keys, simplifying though the whole process. Client details, like hostnames or IP addresses and SSH ports, are stored in files called inventory files. Once you have created an inventory file and populated it, ansible can use it.
Why use Ansible?
Here are some important pros/benefits of using Ansible
- One of the most significant advantages of Ansible is that it is free to use by everyone.
- It does not need any special system administrator skills to install and use Ansible, and the official documentation is very comprehensive.
- Its modularity regarding plugins, modules, inventories, and playbooks make Ansible the perfect companion to orchestrate large environments.
- Ansible is very lightweight and consistent, and no constraints regarding the operating system or underlying hardware are present.
- It is also very secure due to its agentless capabilities and due to the use of OpenSSH security features.
- Another advantage that encourages the adoption of Ansible is its smooth learning curve determined by the comprehensive documentation and easy to learn structure and configuration.
History of Ansible
Here, are important land marks from the history of ansible:
- In February 2012 the Ansible project began. It was first developed by Michael DeHaan, the creator of Cobbler and Func, Fedora Unified Network Controller.
- Initially called AnsibleWorks Inc, the company funding the ansible tool was acquired in 2015 by RedHat and later on, along with RedHat, moved under the umbrella of IBM.
- In the present, Ansible comes included in distributions like Fedora Linux, RHEL, Centos and Oracle Linux.
Important terms used in Ansible
-
Ansible server
The machine where Ansible is installed and from which all tasks and playbooks will be ran
-
Module
Basically, a module is a command or set of similar Ansible commands meant to be executed on the client-side
-
Task
A task is a section that consists of a single procedure to be completed
-
Role
A way of organizing tasks and related files to be later called in a playbook
-
Fact
Information fetched from the client system from the global variables with the gather-facts operation
-
Inventory
File containing data about the ansible client servers. Defined in later examples as hosts file
-
Play
Execution of a playbook
-
Handler
Task which is called only if a notifier is present
-
Notifier
Section attributed to a task which calls a handler if the output is changed
-
Tag
Name set to a task which can be used later on to issue just that specific task or group of tasks.
Ansible Installation in Linux
Once you have compared and weighed your options and decided to go for Ansible, the next step is to have it installed on your system. We will go through the steps of installation in different Linux distributions, the most popular ones, in the next small tutorial.
Install Ansible on Centos/RedHat systems
Step 1) Install EPEL repo
[root@ansible-server ~]# sudo yum install epel-release
Step 2) Install ansible package
[root@ansible-server ~]# sudo yum install -y ansible

Install ansible on Ubuntu/Debian systems
Step 1) Perform an update to the packages
$ sudo apt update
Step 2) Install the software-properties-common package
$ sudo apt install software-properties-common
Step 3) Install ansible personal package archive
$ sudo apt-add-repository ppa:ansible/ansible
Step 4) Install ansible
$ sudo apt update
$ sudo apt install ansible
Ansible ad-hoc commands
One of the simplest ways Ansible can be used is by using ad-hoc commands. These can be used when you want to issue some commands on a server or a bunch of servers. Ad-hoc commands are not stored for future uses but represent a fast way to interact with the desired servers.
For this Ansible tutorial, a simple two servers hosts file will be configured, containing host1 and host2.
You can make sure that the hosts are accessible from the ansible server by issuing a ping command on all hosts.
[root@ansible-server test_ansible]# ansible -i hosts all -m ping
host1 | SUCCESS => {
    "changed": false,
    "ping": "pong"
}
host2 | SUCCESS => {
    "changed": false,
    "ping": "pong"
}

Explanation:
- Status of the command, in this case, SUCCESS
- Host on which the command ran
- The command issued via the -m parameter, in this case, ping
- With the -i parameter, you can point to the hosts file.
You can issue the same command only on a specific host if needed.
[root@ansible-server test_ansible]# ansible -i hosts all -m ping --limit host2
host2 | SUCCESS => {
    "changed": false,
    "ping": "pong"
}

Explanation:
- Limit parameter can be used to issue commands only on specific hosts in the host’s file
- Name of the host as defined in the inventory file
If you need to copy a file to multiple destinations rapidly, you can use the copy module in ansible which uses SCP. So the command and its output look like below:
[root@ansible-server test_ansible]# ansible -i hosts all -m copy -a "src=/root/test_ansible/testfile dest=/tmp/testfile"
host1 | SUCCESS => {
    "changed": true,
    "checksum": "da39a3ee5e6b4b0d3255bfef95601890afd80709",
    "dest": "/tmp/testfile",
    "gid": 0,
    "group": "root",
    "md5sum": "d41d8cd98f00b204e9800998ecf8427e",
    "mode": "0644",
    "owner": "root",
    "size": 0,
    "src": "/root/.ansible/tmp/ansible-tmp-1562216392.43-256741011164877/source",
    "state": "file",
    "uid": 0
}
host2 | SUCCESS => {
    "changed": true,
    "checksum": "da39a3ee5e6b4b0d3255bfef95601890afd80709",
    "dest": "/tmp/testfile",
    "gid": 0,
    "group": "root",
    "md5sum": "d41d8cd98f00b204e9800998ecf8427e",
    "mode": "0644",
    "owner": "root",
    "size": 0,
    "src": "/root/.ansible/tmp/ansible-tmp-1562216392.6-280302911361278/source",
    "state": "file",
    "uid": 0
}

Explanation:
- Copy module defined
- Module arguments, in this case, are source absolute path and destination absolute path.
- Ansible command output reflecting the success of the copy command and other details like the sha1 or md5 checksums for file integrity check and metadata like owner, size, or permissions.It is effortless to have a package installed on a bunch of servers. Ansible has several modules that interact with used installers, like yum, apt, dnf, etc.
In the next example, you will find out how to install a package via the yum module on two Centos hosts.
[root@ansible-server test_ansible]# ansible -i hosts all -m yum -a 'name=ncdu state=present'
host1 | SUCCESS => {
    "changed": true,
    "msg": "",
    "rc": 0,
    "results": [


"Loaded plugins: fastestmirror\nLoading mirror speeds from cached hostfile\n * base: mirror.netsite.dk\n * elrepo: mirrors.xservers.ro\n * epel: fedora.mirrors.telekom.ro\n * extras: centos.mirrors.telekom.ro\n * remi-php70: remi.schlundtech.de\n * remi-safe: remi.schlundtech.de\n * updates: centos.mirror.iphh.net\nResolving Dependencies\n--> Running transaction check\n---> Package ncdu.x86_64 0:1.14-1.el7 will be installed\n--> Finished Dependency Resolution\n\nDependencies Resolved\n\n================================================================================\n Package         Arch              Version                Repository       Size\n================================================================================\nInstalling:\n ncdu            x86_64            1.14-1.el7             epel             51 k\n\nTransaction Summary\n================================================================================\nInstall  1 Package\n\nTotal download size: 51 k\nInstalled size: 87 k\nDownloading packages:\nRunning transaction check\nRunning transaction test\nTransaction test succeeded\nRunning transaction\n  Installing : ncdu-1.14-1.el7.x86_64                                       1/1 \n  Verifying  : ncdu-1.14-1.el7.x86_64                                       1/1 \n\nInstalled:\n  ncdu.x86_64 0:1.14-1.el7                                                      \n\nComplete!\n"
    ]
}
host2 | SUCCESS => {
    "changed": true,
    "msg": "",
    "rc": 0,
    "results": [
        "Loaded plugins: fastestmirror\nLoading mirror speeds from cached hostfile\n * base: mirror.netsite.dk\n * elrepo: mirrors.leadhosts.com\n * epel: mirrors.nav.ro\n * extras: centos.mirrors.telekom.ro\n * remi-php70: mirrors.uni-ruse.bg\n * remi-safe: mirrors.uni-ruse.bg\n * updates: centos.mirror.iphh.net\nResolving Dependencies\n--> Running transaction check\n---> Package ncdu.x86_64 0:1.14-1.el7 will be installed\n--> Finished Dependency Resolution\n\nDependencies Resolved\n\n================================================================================\n Package         Arch              Version                Repository       Size\n================================================================================\nInstalling:\n ncdu            x86_64            1.14-1.el7             epel             51 k\n\nTransaction Summary\n================================================================================\nInstall  1 Package\n\nTotal download size: 51 k\nInstalled size: 87 k\nDownloading packages:\nRunning transaction check\nRunning transaction test\nTransaction test succeeded\nRunning transaction\n  Installing : ncdu-1.14-1.el7.x86_64                                       1/1 \n  Verifying  : ncdu-1.14-1.el7.x86_64                                       1/1 \n\nInstalled:\n  ncdu.x86_64 0:1.14-1.el7                                                      \n\nComplete!\n"
    ]
}

Explanation:
- Yum module is used in this example
- It defines the module arguments, and in this case, you will choose the name of the package and its state. If the state is absent, for example, the package will be searched and if found, removed
- When colored in yellow, you will see the output of the ansible command with the state changed, meaning in this case, that the package was found and installed.
- Status of the yum install command issued via ansible. In this case the package ncdu.x86_64 0:1.14-1.el7 was installed.
Of course, all of the yum installer options can be used via ansible, including update, install, latest version, or remove.
In the below example the same command was issued to remove the previously installed ncdu package.
[root@ansible-server test_ansible]# ansible -i hosts all -m yum -a 'name=ncdu state=absent'
host1 | SUCCESS => {
    "changed": true,
    "msg": "",
    "rc": 0,
    "results": [
        "Loaded plugins: fastestmirror\nResolving Dependencies\n--> Running transaction check\n---> Package ncdu.x86_64 0:1.14-1.el7 will be erased\n--> Finished Dependency Resolution\n\nDependencies Resolved\n\n================================================================================\n Package         Arch              Version               Repository        Size\n================================================================================\nRemoving:\n ncdu            x86_64            1.14-1.el7            @epel             87 k\n\nTransaction Summary\n================================================================================\nRemove  1 Package\n\nInstalled size: 87 k\nDownloading packages:\nRunning transaction check\nRunning transaction test\nTransaction test succeeded\nRunning transaction\n  Erasing    : ncdu-1.14-1.el7.x86_64                                       1/1 \n  Verifying  : ncdu-1.14-1.el7.x86_64                                       1/1 \n\nRemoved:\n  ncdu.x86_64 0:1.14-1.el7                                                      \n\nComplete!\n"
    ]
}
host2 | SUCCESS => {
    "changed": true,
    "msg": "",
    "rc": 0,
    "results": [
        "Loaded plugins: fastestmirror\nResolving Dependencies\n--> Running transaction check\n---> Package ncdu.x86_64 0:1.14-1.el7 will be erased\n--> Finished Dependency Resolution\n\nDependencies Resolved\n\n================================================================================\n Package         Arch              Version               Repository        Size\n================================================================================\nRemoving:\n ncdu            x86_64            1.14-1.el7            @epel             87 k\n\nTransaction Summary\n================================================================================\nRemove  1 Package\n\nInstalled size: 87 k\nDownloading packages:\nRunning transaction check\nRunning transaction test\nTransaction test succeeded\nRunning transaction\n  Erasing    : ncdu-1.14-1.el7.x86_64                                       1/1 \n  Verifying  : ncdu-1.14-1.el7.x86_64                                       1/1 \n\nRemoved:\n  ncdu.x86_64 0:1.14-1.el7                                                      \n\nComplete!\n"
    ]
}

Explanation:
- The output of the yum command shows that the package was removed.
Another useful and essential feature that ansible uses to interact with the client’s server is to gather some facts about the system. So, it fetches hardware, software, and versioning information from the system and stores each value in a variable that can be later on used.
If you need detailed information about the systems to be modified via ansible, the next command can be used. The setup module gathers facts from the system variables.
![]()
Ansible Playbooks
Ansible Playbooks are the way of sending commands to remote systems through scripts. Ansible playbooks are used to configure complex system environments to increase flexibility by executing a script to one or more systems. Ansible playbooks tend to be more of a configuration language than a programming language.
Ansible playbook commands use YAML format, so there is not much syntax needed, but indentation must be respected. Like the name is saying, a playbook is a collection of plays. Through a playbook, you can designate specific roles to some hosts and other roles to other hosts. By doing so, you can orchestrate multiple servers in very diverse scenarios, all in one playbook.
To have all the details precise before continuing with Ansible playbook examples, we must first define a task. These are the interface to ansible modules for roles and playbooks.
Now, let’s learn Ansible playbook through an example with one playbook with one play, containing multiple tasks as below:
---

- hosts: group1
  tasks:
  - name: Install lldpad package
    yum:
      name: lldpad
      state: latest
  - name: check lldpad service status
    service:
      name: lldpad
      state: started

In the above Ansible playbook example, the group1 of hosts in the host’s file is targeted for lldpad package installation using the yum module and afterward the service lldpad created after the installation is then started using the service module used mostly to interact with systemd ensemble.
Explanation:
- Group of hosts on which the playbook will run
- Yum module is used in this task for lldpad installation
- The service module is used to check if the service is up and running after installation
Each ansible playbook works with an inventory file. The inventory file contains a list of servers divided into groups for better control for details like IP Address and SSH port for each host.
The inventory file you can use for this Ansible playbook example looks like below. There are two groups, named group1 and group2 each containing host1 and host2 respectively.
[group1]
host1 ansible_host=192.168.100.2 ansible_ssh_port=22
[group2]
host2 ansible_host=192.168.100.3 ansible_ssh_port=22

Explanation:
- Group name
- Hostname, with IP address and ssh port, in this case, the default one, 22.
Another useful Ansible playbook example containing this time two plays for two hosts is the next one. For the first group of hosts, group1, selinux will be enabled. If it is enabled, then a message will appear on the screen of the host.
For the second group of hosts, httpd package will be installed only if the ansible_os_family is RedHat and ansible_system_vendor is HP.
Ansible_os_family and ansible_system_vendor are variables gathered with gather_facts option and can be used like in this conditional example.
---

- hosts: group1
  tasks:
  - name: Enable SELinux
    selinux:
      state: enabled
    when: ansible_os_family == 'Debian'
    register: enable_selinux

  - debug:
      Imsg: "Selinux Enabled. Please restart the server to apply changes."
    when: enable_selinux.changed == true

- hosts: group2
  tasks:
  - name: Install apache
    yum:
      name: httpd
      state: present
    when: ansible_system_vendor == 'HP' and ansible_os_family == 'RedHat'
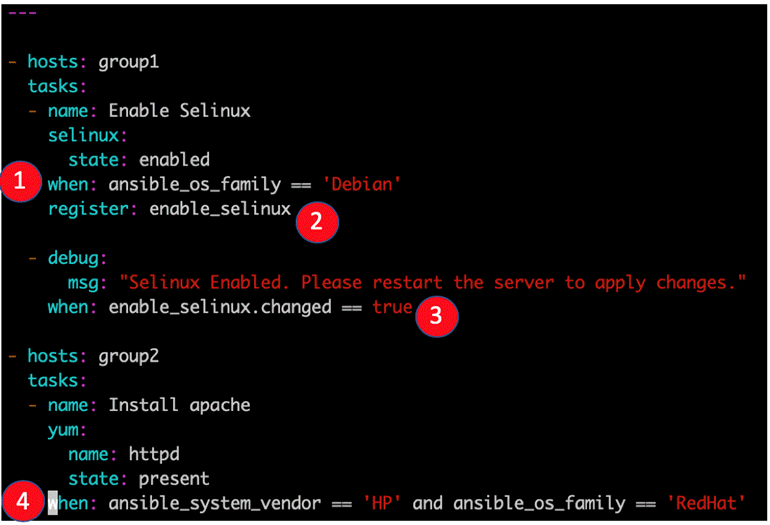
Explanation:
- Example of the when clause, In this case, when OS type is Debian. The ansible_os_family variable is gathered via gather_facts functionality.
- The task output is registered for future use, with its name enable_selinux
- Another example of the when clause. In this case, a message will be displayed for the host user if the SELinux was indeed enabled before.
- Another example of the when clause consisting of two rules
Besides tasks, there are also some particular tasks called handlers. Handlers must have a unique name throughout the playbook. These work in the same way as a regular task but a handler can be notified via a notifier.
If a handler is not notified during the run of the playbook, it will not run. However, if more than one task notifies a handler, this will run only once after all the tasks are finished.
In the example shown below, you can see how a specific task has a notify section which calls upon another task. If the output of the first task is changed, then a handler task will be called. The best example is to have a configuration file changed and afterward restart that specific service.
---

- hosts: group2
  tasks:
  - name: sshd config file modify port
    lineinfile:
     path: /etc/ssh/sshd_config
     regexp: 'Port 28675'
     line: '#Port 22'
    notify:
       - restart sshd
handlers
    - name: restart sshd
      service: sshd
        name: sshd
        state: restarted
In this case, if the first task, “sshd config file modify port” is changed, meaning that if the port is not 28675 in the first place, then it will be modified and the task will notify the handler with the same name to run, and it will restart the sshd service.
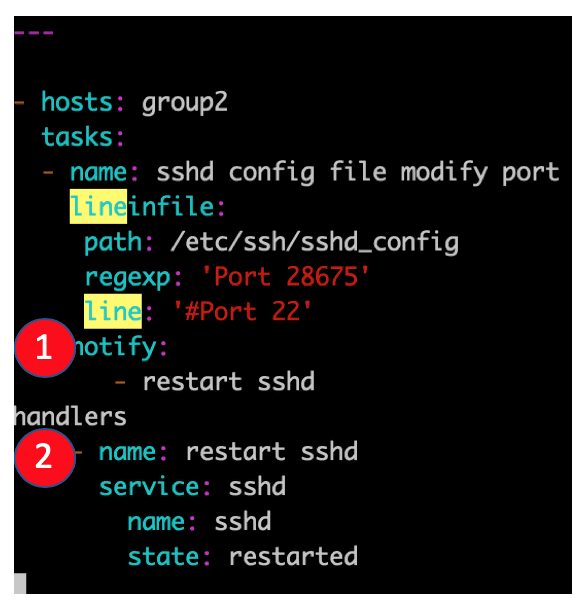
Explanation:
- Example of a notifier
- Example of a handler
Ansible Roles
When dealing with extensive playbooks, it is easier to split the tasks into roles. This also helps in reusing the roles in the future. Roles are a collection of tasks, which can be moved from one playbook to another, can be run independently but only through a playbook file.
Roles are stored in separate directories and have a particular directory structure.
[root@ansible-server test2]# tree
.
`-- role1
    |-- defaults
    |   `-- main.yml
    |-- handlers
    |   `-- main.yml
    |-- meta
    |   `-- main.yml
    |-- README.md
    |-- tasks
    |   `-- main.yml
    |-- tests
    |   |-- inventory
    |   `-- test.yml
    `-- vars
        `-- main.yml

7 directories, 8 files
The yaml file in the defaults directory contains a list of default variables that are to be used along with the playbook. The handlers directory is used to store handlers. The meta-directory is supposed to have information about the author and role dependencies. In the tasks directory, there is the main yaml file for the role.
The tests directory contains a sample yaml playbook file and a sample inventory file and is mostly used for testing purposes before creating the actual role.
The vars directory contains the yaml file in which all the variables used by the role will be defined. The directory templates and the directory files should contain files and templates that will be used by the tasks in the role.
To create the directory tree for a role, you should use the following command with the last parameter, the role name:
[root@ansible-server test2]# ansible-galaxy init role1
Ansible also works well with templates. As a language for templating, it uses Jinja2.
In the next example, you will find out how a basic jinja2 template looks like and use it in a role.
At the run time, depending on, let’s say in which datacenter your server is located, you can select from more than one nameservers, each corresponding to a datacenter, using the variable “resolver_ip_addresses.”
{% for resolver in resolver_ip_addresses %}
nameserver {{ resolver }}
{% endfor %}

options timeout:1
options attempts:5
options rotate
In this example, in the playbook directory, there are defined some variables, including a variable named resolver_ip_addresses with different values depending on the datacenter.
- name: Set resolver for server
  template:
    src: dns.j2
    dest: /etc/resolv.conf
    group: root
    owner: root
    mode: "0644"
    tag: resolver

Explanation:
- Name of the template to be used. Template is located in templates dir in the role path
- Destination path of the filename to be replaced with the template, on the client-side.
- Permissions of the destination file
The roles tasks can also have a tag field, which has a name attributed. More than one task can share the same tag. When running an ansible playbook, you can specify the tag as well, so those tasks will be executed.
Ansible Case Study
In this section, we will analyze a Case study of an essential ansible playbook that has three roles. The purpose of this is to give a practical example of what we talked about before. Some of the examples used before in this Ansible playbook tutorial will be adapted and used in this playbook.
Below is the directory structure of the playbook. The Yaml file that will be used will be p4.yml.
[root@ansible-server test_ansible]# ls -lrth
total 16K
-rw-r--r--. 1 root root   0 Jul  3 10:13 testfile
-rw-r--r--. 1 root root 203 Jul  3 13:30 p1.yml
-rw-r--r--. 1 root root 125 Jul  3 15:00 hosts
-rw-r--r--. 1 root root 488 Jul  3 16:40 p2.yml
-rw-r--r--. 1 root root 188 Jul  4 17:33 p4.yml
drwxr-xr-x. 5 root root  47 Jul  4 17:35 roles
[root@ansible-server test_ansible]# cd roles
[root@ansible-server roles]# ls -lrth
total 12K
drwxr-xr-x. 9 root root 4.0K Jul  4 12:52 httpd
drwxr-xr-x. 9 root root 4.0K Jul  4 13:55 selinux
drwxr-xr-x. 9 root root 4.0K Jul  4 16:54 resolver
The playbook has three roles, one called resolver that sets a specific nameserver on the servers by copying a file from the server to the /etc/resolv.conf destination. Another one is called httpd, and it installs the httpd package with yum module, and the third one enables SELinux and notifies the logged user to reboot the system. Each role was created using ansible-galaxy command.
Resolver role, main.yml task:

Httpd role, main.yml task:

Selinux role, main.yml task:

Below is the p4.yml playbook defined. It will run on all hosts if not otherwise specified in the command line, it will run as root user on port 22 (SSH), it will gather facts before running the roles, and it will run all three roles mentioned before. Each role can be run independently by specifying the tag in the ansible-playbook command line with the –t parameter.
---

- hosts: all
  user: root
  port: 22
  gather_facts: True
  roles:
    - { role: selinux, tags: selinux }
    - { role: httpd, tags: httpd }
    - { role: resolver, tags: resolver }
Running the p4.yml playbook on two hosts and interpreting the output. The same command can be run with the –check parameter for a dry-run. In case you want to use password authentication, use -k parameter.
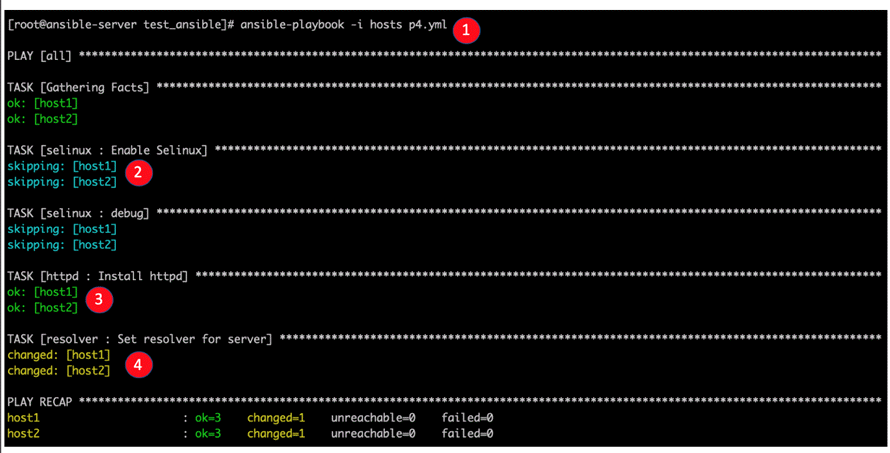
Explanation:
- Ansible-playbook command that runs p4.yml
- Playbook skipsSELinux role because it is already enabled.
- Ansible found that httpd package is already installed, so it returns ok.
- Resolver was set, and role resolver got status changed.
Ansible Commands Cheat Sheet
Install EPEL repo on Centos/RHEL systems
[root@ansible-server ~]# sudo yum install epel-release
Install ansible package on Centos/RHEL systems
[root@ansible-server ~]# sudo yum install -y ansible
Perform an update to the packages on Debian/Ubuntu systems
$ sudo apt update
Install the software-properties-common package on Debian/Ubuntu systems
$ sudo apt install software-properties-common
Install ansible personal package archive on Debian/Ubuntu systems
$ sudo apt-add-repository ppa:ansible/ansible
Install ansible on Debian/Ubuntu systems
$ sudo apt update
$ sudo apt install ansible
Issue a ping command on all servers defined in the inventory file named hosts
[root@ansible-server test_ansible]# ansible -i hosts all -m ping
Issue a ping command only on host2
[root@ansible-server test_ansible]# ansible -i hosts all -m ping --limit host2
Copy the file “testfile” on all hosts in the inventory file
[root@ansible-server test_ansible]# ansible -i hosts all -m copy -a "src=/root/test_ansible/testfile dest=/tmp/testfile"
Install ncdu package on all hosts
[root@ansible-server test_ansible]# ansible -i hosts all -m yum -a 'name=ncdu state=present'
Remove ncdu package on all hosts
[root@ansible-server test_ansible]# ansible -i hosts all -m yum -a 'name=ncdu state=absent'
Build the directory structure for role named role1.
[root@ansible-server test2]# ansible-galaxy init role1
Dry-run p4.yml playbook
[root@ansible-server test_ansible]# ansible-playbook -i hosts p4.yml --check
Run p4.yml playbook with password authentication for all hosts
[root@ansible-server test_ansible]# ansible-playbook -i hosts p4.yml -k
Summary
In a world with technology that is continuously changing at a swift pace and growing incredibly fast at the same time, system administrators and devops engineers must think of different approaches on how to automate routine tasks and orchestrate large pools of servers.
While there are many alternative to Ansible (Chef, Puppet) out there that do the same thing with some differences, Ansible managed to rise above all of them with its simplicity, improved security, and most important its smooth learning curve. Due to these qualities and fast adoption of Ansible, we created a tutorial full of examples so you can have an even more seamless first experience in working with Ansible.
In this Ansible basics tutorial, we described ansible and talked a bit about its history. We mentioned the strong points of Ansible and the advantages that ansible can bring to automation and orchestration of infrastructures of different sizes. We defined the essential ansible used terms and defined the structure of Ansible playbooks. Thorough examples accompanied all information with detailed explanations.