PostgreSQL ALTER TABLE: Add & Rename Column
⚡ Smart Summary
PostgreSQL ALTER TABLE changes the structure of an existing table, letting you add or drop columns, rename a column or the whole table, set default values, and attach check constraints without recreating the object.
What is ALTER TABLE in PostgreSQL?
The ALTER TABLE command is used to alter the structure of a PostgreSQL table. It is the command used to change the table columns or the name of the table itself, without dropping and recreating the object.
Syntax
Here is the syntax for the PostgreSQL ALTER TABLE command:
ALTER TABLE table-name action;
The table-name parameter is the name of the table that you need to change. The action parameter is the action that you need to perform, such as changing the name of a column or changing the data type of a column.
Description
The ALTER TABLE command changes the definition of an existing table. It takes the following subforms:
- ADD COLUMN: this uses similar syntax as the CREATE TABLE command to add a new column to a table.
- DROP COLUMN: for dropping a table column. The constraints and indexes imposed on the columns will also be dropped.
- SET/DROP DEFAULT: used for setting or removing the default value for a column. The change only applies to subsequent INSERT statements.
- SET/DROP NOT NULL: changes whether a column will allow nulls or not.
- SET STATISTICS: for setting the statistics-gathering target for each column for ANALYZE operations.
- SET STORAGE: for setting the mode of storage for a column, whether inline or in a supplementary table.
- SET WITHOUT OIDS: used for removing the old OID column of the table.
- RENAME: for changing the table name or a column name.
- ADD table_constraint: used for adding a new constraint to a table. It uses the same syntax as the CREATE TABLE command.
- DROP CONSTRAINT: used for dropping a table constraint.
- OWNER: for changing the owner of a table, sequence, index, or view to a certain user.
- CLUSTER: for marking a table to be used for future cluster operations.
Modifying a Column
A column may be modified in a number of ways. Such modifications are done using the ALTER TABLE command. Let us discuss these below.
Adding a New Column
To add a new column to a PostgreSQL table, the ALTER TABLE command is used with the following syntax:
ALTER TABLE table-name
  ADD new-column-name column-definition;
The table-name is the name of the table to be modified. The new-column-name is the name of the new column to be added. The column-definition is the data type of the new column. See the Book table shown below:
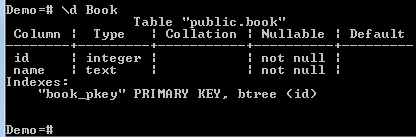
The table has two columns, id and name. We need to add a new column to the table and give it the name author. Just run the following command:
ALTER TABLE Book
  ADD author VARCHAR(50);
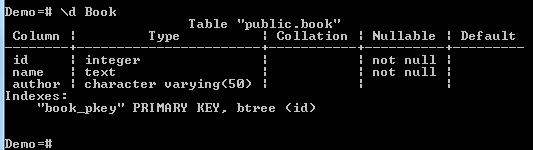
After running the above command, the Book table is now as follows:

The new column was added successfully.
Renaming a Table Column
We can use the ALTER TABLE command to change the name of a column. In this case, the command is used with the following syntax:
ALTER TABLE table-name
  RENAME COLUMN old-name TO new-name;
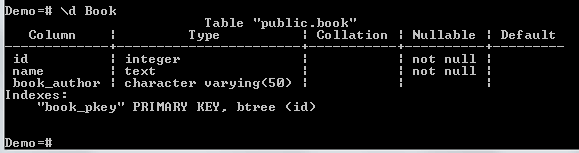
The table-name is the name of the table whose column is to be renamed. The old-name is the current name of the column, and the new-name is the new name of the column. Consider the table Book shown below:
Book:
We need to change the name of the column author to book_author. Here is the command:
ALTER TABLE Book
  RENAME COLUMN author TO book_author;
After running the command, we can view the structure of the table:
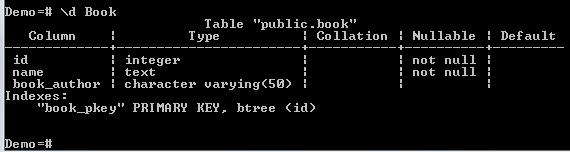
The column name was changed successfully.
Setting a Default Value for a Column
We can set a default value for a column so that even when you do not specify a value for that column during INSERT operations, the default value will be used. In this case, the ALTER TABLE command can be used with the following syntax:
ALTER TABLE table-name ALTER COLUMN column-name [SET DEFAULT value];
The table-name is the name of the table whose column is to be modified. The column-name is the name of the column whose default value is to be set, and the value is the default value for the column. Consider the Book table given below:
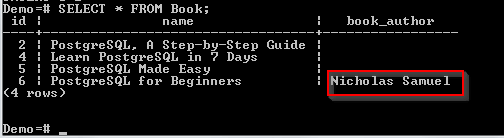
We need to set a default value for the book_author column. We can run the following command:
ALTER TABLE Book ALTER COLUMN book_author SET DEFAULT 'Nicholas Samuel';
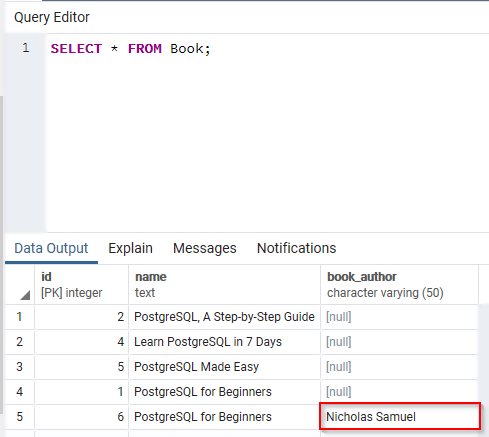
Now, let us insert a row into the table:
INSERT INTO Book (id, name)
 VALUES (6, 'PostgreSQL for Beginners');
Note that we inserted values for only two columns, id and name. However, the default value has been used for the book_author column:
Adding a Check Constraint
A check constraint helps in validating the records that are being inserted into a table. We can do this by combining the ALTER TABLE command with the ADD CHECK statement. Syntax:
ALTER TABLE table-name ADD CHECK expression;
The table-name is the name of the table to be altered, and the expression is the constraint to be imposed on the table column. Let us modify the book_author column of the Book table so that it only accepts the values Nicholas and Samuel:
ALTER TABLE Book ADD CHECK (book_author IN ('Nicholas', 'Samuel'));
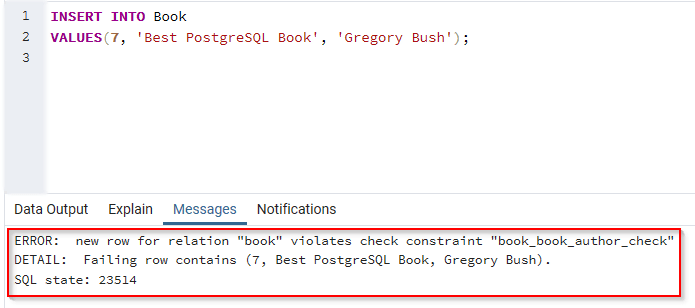
Now, let us try to insert a value other than Nicholas or Samuel into the book_author column of the Book table:
INSERT INTO Book
VALUES(7, 'Best PostgreSQL Book', 'Gregory Bush');
The statement will return the following error:

The insert operation failed because we violated the check constraint.
Renaming a Table
Here is the syntax for the ALTER TABLE command for renaming a table:
ALTER TABLE table-name
  RENAME TO new-table-name;
The table-name is the current name of the table, and the new-table-name is the new name to be assigned to the table. For example, let us change the name of the Book table to Books:
ALTER TABLE Book
  RENAME TO Books;
Using pgAdmin
So far the actions have been run from the SQL shell. Now let us see how these same actions can be performed visually using pgAdmin.
Adding a New Column
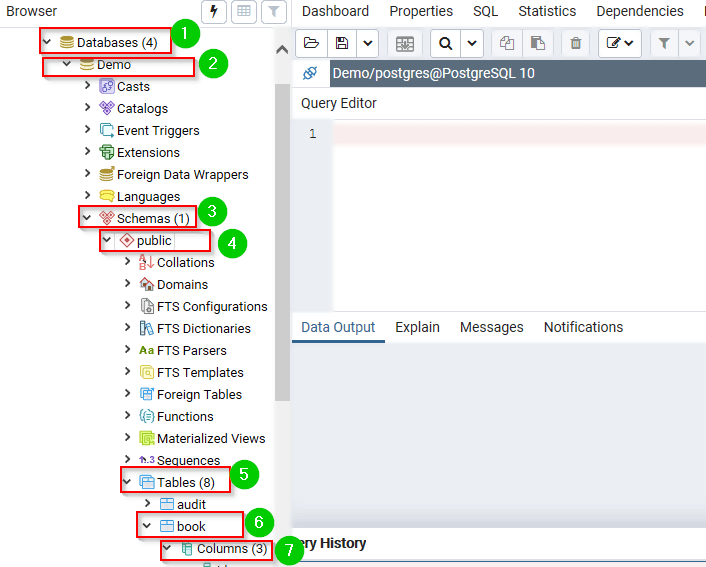
Step 1) Login to your pgAdmin account.
Step 2)
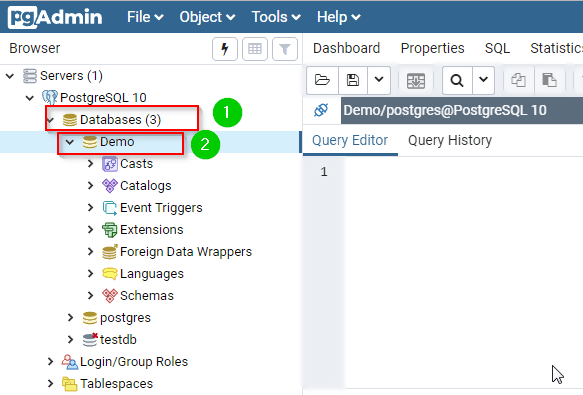
- From the navigation bar on the left, click Databases.
- Click Demo.

Step 3) Type the query in the query editor:
ALTER TABLE Book
  ADD author VARCHAR(50);
Step 4) Click the Execute button.

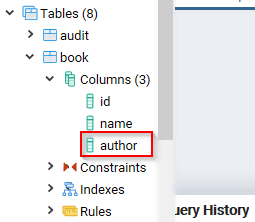
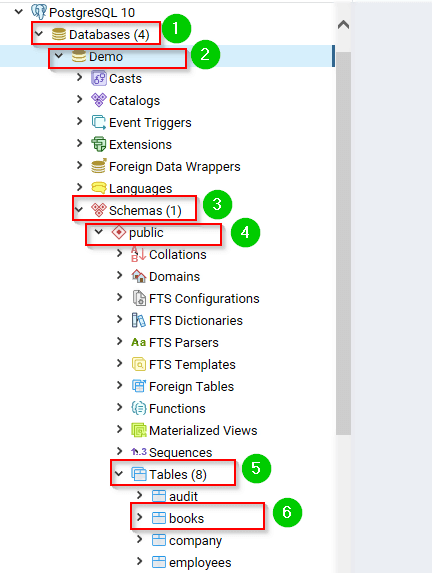
Step 5) To check whether the column was added, do the following:
- Click Databases from the left navigation.
- Expand Demo.
- Expand Schemas.
- Expand Public.
- Expand Tables.
- Expand book.
- Expand Columns.

The column should have been added, as shown below:
Renaming a Table Column
Step 1) Login to your pgAdmin account.
Step 2)
- From the navigation bar on the left, click Databases.
- Click Demo.

Step 3) Type the query in the query editor:
ALTER TABLE Book
  RENAME COLUMN author TO book_author;
Step 4) Click the Execute button.

Step 5) To check whether the change was successful, expand the book table columns as before:
The columns should now be as follows:
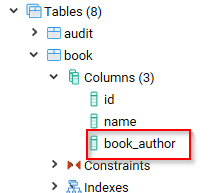
The column was changed successfully.
Setting a Default Value for a Column
Step 1) Login to your pgAdmin account.
Step 2)
- From the navigation bar on the left, click Databases.
- Click Demo.

Step 3) Type the query in the query editor:
ALTER TABLE Book ALTER COLUMN book_author SET DEFAULT 'Nicholas Samuel';
Step 4) Click the Execute button.

Step 5) To test, run the following command in the query editor:
INSERT INTO Book (id, name)
 VALUES (6, 'PostgreSQL for Beginners')
Step 6) Now, we can query the table to check whether the default value was inserted in the book_author column:
Adding a Check Constraint
Step 1) Login to your pgAdmin account.
Step 2)
- From the navigation bar on the left, click Databases.
- Click Demo.
Step 3) Type the query in the query editor:
ALTER TABLE Book ADD CHECK (book_author IN ('Nicholas', 'Samuel'))
Step 4) Click the Execute button.

Step 5) To test this, type the following query in the query editor and click the Execute button:
INSERT INTO Book
VALUES(7, 'Best PostgreSQL Book', 'Gregory Bush');

It will return the following:
Renaming a Table
Step 1) Login to your pgAdmin account.
Step 2)
- From the navigation bar on the left, click Databases.
- Click Demo.

Step 3) Type the query in the query editor:
ALTER TABLE Book
  RENAME TO Books;
Step 4) Click the Execute button.

Step 5) To check whether the table was renamed, expand Databases > Demo > Schemas > Public > Tables:
The table was renamed successfully.
Download the Database used in this Tutorial