How to Download & Install PostgreSQL for Windows
⚡ Smart Summary
Downloading and installing PostgreSQL for Windows involves choosing the EnterpriseDB installer, running a seventeen-step setup wizard, setting a super-user password, and launching pgAdmin. This walkthrough also covers system requirements, verifying the installation, and removing PostgreSQL cleanly when needed.

To use Postgre in your machine, you need to install:
- Postgre Database Server
- A graphical tool to administer and manage the DB. pgAdmin is the most popular tool GUI Tool for Postgre
You could individually Download PostgreSQL for Windows and install these components but coupling the settings between the DB server, and a GUI tool could be a challenge. It’s best to use a bundled installer which takes care of configuration complexities.
System Requirements for Installing PostgreSQL
Before you download PostgreSQL for Windows, make sure your machine meets the basic requirements. PostgreSQL is lightweight, so most modern computers can run it without any problem:
- Operating system: A supported 64-bit version of Windows, such as Windows 10 or Windows 11, or a current Windows Server release.
- Processor: A 1 GHz or faster processor is enough for learning and small projects.
- Memory: At least 2 GB of RAM, though 4 GB or more gives smoother performance with pgAdmin.
- Disk space: Around 1 GB of free space for the database server, pgAdmin, and sample data.
- Administrator rights: An account with administrator privileges, because the installer registers a Windows service.
- Internet connection: Needed only to download the installer from the official PostgreSQL website.
Meeting these requirements ensures the database server and the pgAdmin graphical tool install and start correctly.
How to Download & Install PostgreSQL
Following is a step by step process on How to Install PostgreSQL on Windows Machine:
Step 1) Open your browser.
Go to https://www.postgresql.org/download and select Windows

Step 2) Check options.
You are given two options 1) Interactive Installer by EnterpriseDB and 2) Graphical Installer by BigSQL.
BigSQL currently installs pgAdmin version 3 which is deprecated. It’s best to choose EnterpriseDB which installs the latest version 4

Step 3) Select PostgreSQL version.
- You will be prompted to desired PostgreSQL version and operating system. Select the latest PostgreSQL version and OS as per your environment
- Click the Download Button

Download will begin
Step 4) Open exe file.
Once you Download PostgreSQL, open the downloaded exe and Click next on the install welcome screen.

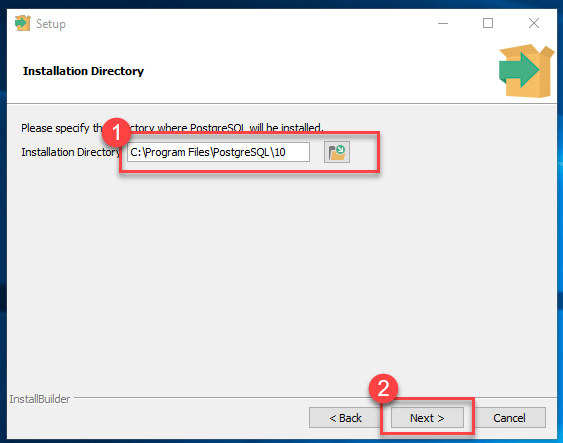
Step 5) Update location.
- Change the Installation directory if required, else leave it to default
- Click Next
Step 6) Select components.
- You may choose the components you want to install in your system. You may uncheck Stack Builder
- Click Next

Step 7) Check data location.
- You may change the data location
- Click Next

Step 8) Enter password.
- Enter super user password. Make a note of it
- Click Next

Step 9) Check port option.
- Leave the port number default
- Click Next

Step 10) Check summary.
- Check the pre-installation summary:
- Click Next

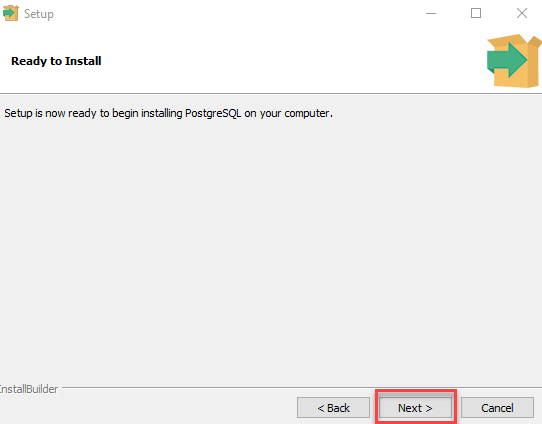
Step 11) Ready to install.
Click the next button.
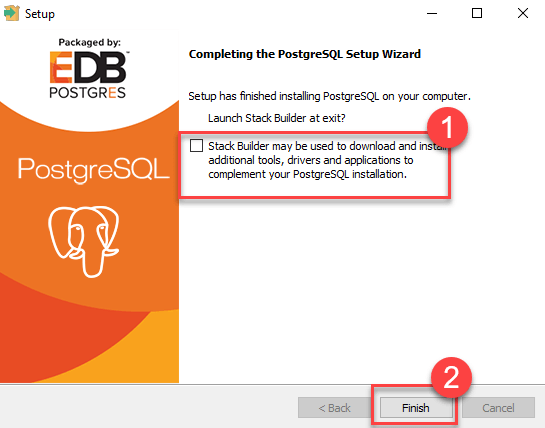
Step 12) Check stack builder prompt.
Once install is complete you will see the Stack Builder prompt
- Uncheck that option. We will use Stack Builder in more advance tutorials
- Click Finish
Step 13) Launch PostgreSQL.
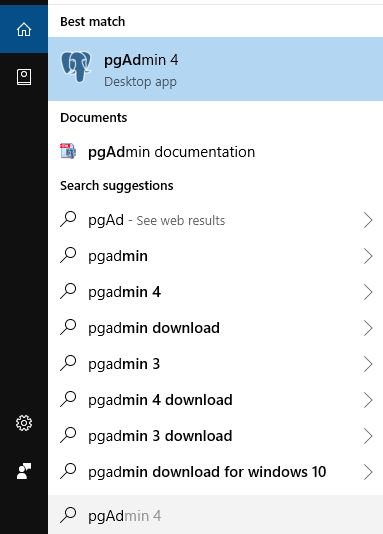
To launch PostgreSQL go to Start Menu and search pgAdmin 4
Step 14) Check pgAdmin.
You will see pgAdmin homepage.

Step 15) Find PostgreSQL 10.
Click on Servers > PostgreSQL 10 in the left tree

Step 16) Enter password.
- Enter super user password set during installation
- Click OK

Step 17) Check Dashboard.
You will see the Dashboard

That’s it to PostgreSQL installation.
Also learn more about How to Install PostgreSQL on Ubuntu
How to Verify the PostgreSQL Installation
After the installer finishes, it is a good idea to confirm that PostgreSQL is running correctly before you start building databases. There are two simple ways to check the installation: through the pgAdmin graphical tool and through the psql command-line client.
Using pgAdmin, open the Start Menu, search for pgAdmin 4, and launch it. When prompted, enter the super-user password you set during installation. Expand the Servers node in the left tree and open your PostgreSQL server. If the dashboard loads and shows server activity, the installation is working.
To verify from the command line, follow these steps:
- Open the Start Menu and launch the SQL Shell (psql) program.
- Press Enter to accept the default server, database, port, and username values.
- Type the super-user password when asked.
- At the prompt, run the command SELECT version(); and press Enter.
If PostgreSQL is installed correctly, the shell prints the exact version number and build details. You can also confirm that the background service is running by opening the Windows Services panel and checking that the postgresql service shows a status of Running. Once either check succeeds, your PostgreSQL environment is ready for creating databases and running queries.
How to Uninstall PostgreSQL on Windows
If you need to remove PostgreSQL, whether to free up space or to install a fresh version, Windows makes the process straightforward. Follow these steps to uninstall the database server and the pgAdmin tool completely:
- Close any running PostgreSQL or pgAdmin windows so that no files are locked during removal.
- Open the Start Menu, go to Settings, and select Apps, or open Control Panel and choose Programs and Features.
- Find PostgreSQL in the list of installed programs and select it.
- Click Uninstall and confirm. The built-in uninstaller removes the server, pgAdmin, and related components.
- When the uninstaller finishes, restart your computer to release any remaining locked files.
After the uninstaller completes, some files may remain. To remove PostgreSQL fully, clean up the leftover items:
- Delete the PostgreSQL installation folder, usually located in C:\Program Files\PostgreSQL.
- Delete the data directory if you chose a custom location during installation.
- Remove the PostgreSQL entry from the Windows Services list if it was not cleared automatically.
- Optionally delete the postgres Windows user account that the installer created.
Removing these leftover folders ensures a clean system, which is important if you plan to reinstall a different PostgreSQL version later or switch to another database.