
Oracle PL/SQL LOOP with Example
 Editorial Team
⚡ Smart Summary
PL/SQL Loops execute a section of code repeatedly for a desired number of times. PL/SQL offers basic, FOR, and WHILE loops, controlled by CONTINUE, EXIT, EXIT WHEN, and GOTO, and loops can be labelled to manage nested structures cleanly.

What are Loops?
Loops allow a certain part of the code in a program to be executed for the desired number of times. In this tutorial, we look at the loop concept in PL/SQL and the flow of control in loops.
Introduction to the Loops Concept
The loops concept provides the following advantages in coding:
- Reusability of code.
- Reduced code size.
- Easy flow of control.
- Reduced complexity.
The diagram below shows the looping concept.

In the diagram above, the loop condition is checked, and as long as it is satisfied, the execution block runs.
In each iteration, the loop counter variable that decides the loop condition should change to make the control exit the loop. In some cases this counter is an increment or decrement for a predefined count, and in others it is a search condition that keeps executing the block until it is satisfied.
Loop Control Statements
Before learning the loops concept, it is important to learn the loop control statements. These statements control the flow of execution inside a loop.
CONTINUE
This keyword instructs the PL/SQL engine that whenever it encounters CONTINUE inside a loop, it skips the remaining code in the execution block and starts the next iteration immediately. This is mainly used when the code inside the loop should be skipped for certain iteration values.
EXIT / EXIT WHEN
This keyword instructs the PL/SQL engine to immediately exit the current loop. In a nested loop, EXIT in the inner loop exits only the inner loop, not the outer loop. ‘EXIT WHEN’ is followed by an expression that gives a Boolean result; if the result is TRUE, control exits.
GOTO
This statement transfers control to a labelled statement (“GOTO <label>;”). It has the following restrictions:
- Transfer of control can be done only within the subprograms.
- Transfer of control cannot be done from the exception-handling part to the execution part.
Using this statement is not recommended unless there is no alternative, because the code-control traceability becomes very difficult when control is transferred from one part to another.
Types of Loop in PL/SQL
PL/SQL provides the following three types of loops:
- Basic loop statement
- For loop statement
- While loop statement
The table below contrasts the three before the basic loop is covered in detail.
| Loop | Exit criteria | Best used when |
|---|---|---|
| Basic loop | Explicit EXIT in the block | The exit is not based on a fixed count or condition |
| FOR loop | Counter reaches its range end | The number of iterations is known in advance |
| WHILE loop | Condition becomes false | The loop should run while a condition holds |
Basic Loop Statement
This is the simplest loop structure in PL/SQL. The execution block starts with the keyword ‘LOOP’ and ends with ‘END LOOP’. The exit condition should be given inside the execution block so that control exits the loop, and the EXIT keyword must be given explicitly.

LOOP
<execution block starts>
<EXIT condition based on developer criteria>
<execution_block_ends>
END LOOP;
Syntax Explanation:
- The keyword ‘LOOP’ marks the beginning of the loop and ‘END LOOP’ marks the end.
- The execution block contains all the code that needs to run, including the EXIT condition.
- The execution part can contain any executable statement.
Note: A basic loop statement with no EXIT keyword is an infinite loop that never stops.
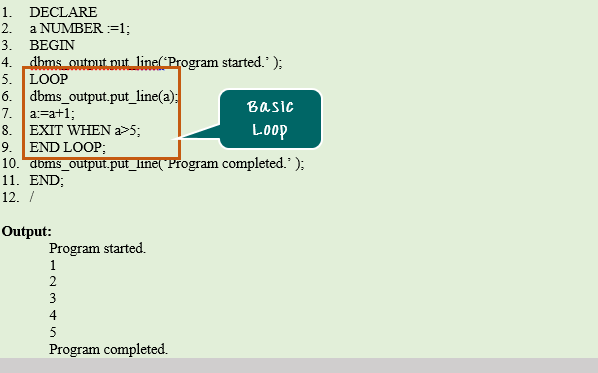
Example 1: In this example, we print numbers from 1 to 5 using a basic loop statement.
DECLARE
a NUMBER:= 1;
BEGIN
dbms_output.put_line('Program started.');
LOOP
dbms_output.put_line(a);
a:= a+1;
EXIT WHEN a>5;
END LOOP;
dbms_output.put_line('Program completed');
END;
/
Code Explanation:
- Code line 2: Declaring the variable ‘a’ as ‘NUMBER’ and initializing it with value ‘1’.
- Code line 4: Printing the statement “Program started”.
- Code line 5: The keyword ‘LOOP’ marks the beginning of the loop.
- Code line 6: Prints the value of ‘a’.
- Code line 7: Increments the value of ‘a’ by 1.
- Code line 8: Checks whether the value of ‘a’ is greater than 5.
- Code line 9: The keyword ‘END LOOP’ marks the end of the execution block.
- Lines 6 to 8 continue to execute until ‘a’ reaches 6, at which point the condition returns TRUE and control exits the loop.
- Code line 10: Printing the statement “Program completed”.
Labeling of Loops
In PL/SQL, loops can be labelled. The label should be enclosed between “<<” and “>>”. Labelling loops, particularly in nested loops, gives more readability. The label can be given in an EXIT command to exit that particular loop, so control can exit the outer loop of a nested structure directly by giving the EXIT command followed by the outer loop label.

<<OUTER_LOOP>>
LOOP
<execution_block_starts>
.
<<INNER_LOOP>>
LOOP --inner
<execution_part>
END LOOP;
.
<execution_block_ends>
END LOOP;
Syntax Explanation:
- The outer loop has one more loop inside it.
- ‘<<OUTER_LOOP>>’ and ‘<<INNER_LOOP>>’ are the labels of these loops.
Example 1: In this example, we print numbers starting from 1 using a basic loop statement. Each number is printed as many times as its value. The upper limit of the series is fixed in the declaration part. We use the label concept to achieve this.


DECLARE
a NUMBER:= 0;
b NUMBER;
upper_limit NUMBER := 4;
BEGIN
dbms_output.put_line('Program started.');
<<outer_loop>>
LOOP
a:= a+1;
b:= 1;
<<inner_loop>>
LOOP
EXIT outer_loop WHEN a > upper_limit;
dbms_output.put_line(a);
b:= b+1;
EXIT inner_loop WHEN b>a;
END LOOP;
END LOOP;
dbms_output.put_line('Program completed.');
END;
/
Code Explanation:
- Code line 2-3: Declaring the variables ‘a’ and ‘b’ as ‘NUMBER’ data type.
- Code line 4: Declaring the variable ‘upper_limit’ as ‘NUMBER’ with value ‘4’.
- Code line 6: Printing the statement “Program started”.
- Code line 7: The outer loop is labelled “outer_loop”.
- Code line 9: The value of ‘a’ is incremented by 1.
- Code line 11: The inner loop is labelled “inner_loop”.
- Code line 13: EXIT condition that checks whether ‘a’ is higher than the ‘upper_limit’ value. If not, it goes further; otherwise it exits the outer loop directly.
- Code line 14: Printing the value of ‘b’.
- Code line 15: Increments the value of ‘b’ by 1.
- Code line 16: EXIT condition that checks whether ‘b’ is higher than ‘a’. If so, it exits the inner loop.
- Code line 19: Printing the statement “Program completed”.
