Kali Linux Tutorial: How to Use, Install & Commands
⚡ Smart Summary
Kali Linux is a Debian-based security distribution maintained by OffSec, bundling more than 600 preinstalled tools for penetration testing, digital forensics, reverse engineering and security research across desktops, virtual machines and cloud instances.

What is Kali Linux?
Kali Linux is a security distribution of Linux derived from Debian and specifically designed for computer forensics and advanced penetration testing. It was developed by rewriting BackTrack, the work of Mati Aharoni and Devon Kearns of Offensive Security. Kali Linux contains several hundred tools that are well designed for various information security tasks, such as penetration testing, security research, computer forensics and reverse engineering.
BackTrack was their previous information security operating system. The first iteration, Kali 1.0.0, was introduced in March 2013. OffSec (formerly Offensive Security) still funds and maintains Kali Linux, and ships a new point release roughly every quarter. If you visit kali.org today you will see a banner describing it as the most advanced penetration testing distribution ever released, and the project has spent more than a decade defending that claim.
Kali Linux ships with over 600 preinstalled penetration testing applications, each with its own flexibility and use case. Kali Linux does an excellent job of separating these utilities into the following categories:
- Information Gathering
- Vulnerability Analysis
- Wireless Attacks
- Web Applications
- Exploitation Tools
- Stress Testing
- Forensics Tools
- Sniffing & Spoofing
- Password Attacks
- Maintaining Access
- Reverse Engineering
- Reporting Tools
- Hardware Hacking
The 2026.1 release continued that cadence, adding eight new tools and moving the distribution to the 6.18 Linux kernel. Because the catalogue changes every quarter, it helps to know who actually relies on this toolset day to day.
Who Uses Kali Linux and Why?
Kali Linux is a genuinely unusual operating system, because it is one of the few platforms used openly by both defenders and attackers. Security administrators and black hat hackers both use it extensively: one group to detect and prevent security breaches, the other to identify and exploit them. The sheer number of tools configured and preinstalled makes Kali Linux the Swiss Army knife in any security professional’s toolbox.
Professionals that use Kali Linux:
- Security Administrators – Security administrators are responsible for safeguarding their institution’s information and data. They use Kali Linux to review their environments and confirm there are no easily discoverable vulnerabilities.
- Network Administrators – Network administrators are responsible for maintaining an efficient and secure network. They use Kali Linux to audit their network. For example, Kali Linux has the ability to detect rogue access points.
- Network Architects – Network architects are responsible for designing secure network environments. They use Kali Linux to audit their initial designs and confirm nothing was overlooked or misconfigured.
- Penetration Testers – Penetration testers use Kali Linux to audit environments and perform reconnaissance on the corporate networks they have been hired to review.
- CISO – Chief information security officers use Kali Linux to internally audit their environment and discover whether any new applications or rogue configurations have been put in place.
- Forensic Engineers – Kali Linux offers a “Forensic Mode” that boots without touching the internal disks, which allows a forensic engineer to perform data discovery and recovery without altering the evidence.
- White Hat Hackers – White hat hackers, like penetration testers, use Kali Linux to audit and discover vulnerabilities that may be present in an environment.
- Black Hat Hackers – Black hat hackers use Kali Linux to discover and exploit vulnerabilities. Kali Linux also carries numerous social engineering applications, which a black hat hacker can use to compromise an organization or an individual.
- Grey Hat Hackers – Grey hat hackers sit between white hat and black hat hackers. They use Kali Linux in the same ways as the two groups listed above.
- Computer Enthusiast – Computer enthusiast is a broad term, but anyone interested in learning more about networking or computers in general can use Kali Linux to study information technology, networking and common vulnerabilities.
Whichever of those roles fits you, the next decision is how to get Kali onto a machine you are allowed to test.
Kali Linux Installation Methods
Kali Linux can be installed using the following methods. Each option trades convenience against how closely the environment matches real hardware, so the right choice depends on whether you are learning, running a lab, or testing wireless equipment.
Ways to Run Kali Linux:
- Directly on a PC or Laptop – Using a Kali ISO image, Kali Linux can be installed directly onto a PC or laptop. This method is best if you have a spare machine and are already familiar with Kali Linux. If you plan on doing any access point testing, installing Kali Linux directly onto a Wi-Fi enabled laptop is recommended, because virtual machines rarely pass wireless adapters through cleanly.
- Virtualized (VMware, Hyper-V, Oracle VirtualBox, Citrix) – Kali Linux supports every widely used hypervisor and can be deployed into the most popular ones in minutes. Pre-configured images are available for download from kali.org, or an ISO can be used to install the operating system into your preferred hypervisor manually.
- Cloud (Amazon AWS, Microsoft Azure) – Given the popularity of Kali Linux, both AWS and Azure publish official Kali images in their marketplaces.

- USB Boot Disc – Using the Kali Linux ISO, a boot disc can be created to run Kali Linux on a machine without installing it, or to boot a suspect machine into Forensic Mode.
- Windows (WSL) – Kali Linux runs natively on Windows 10 and Windows 11 through the Windows Subsystem for Linux. It is no longer a beta feature, and the Win-KeX package adds a full graphical desktop on top of WSL 2.

- macOS (Dual or Single boot) – Kali Linux can be installed on a Mac as a secondary operating system or as the primary one. Parallels or the built-in boot manager can be used to configure this setup, although Apple Silicon machines require the ARM64 build.


How to Install Kali Linux Using VirtualBox
Here is a step-by-step process for installing Kali Linux using VirtualBox, and for taking your first look around the desktop:
The easiest method, and arguably the most widely used, is installing Kali Linux and running it from Oracle VirtualBox.
This method allows you to keep using your existing hardware while experimenting with the feature-rich Kali Linux in a completely isolated environment. Best of all, everything is free: both Kali Linux and Oracle VirtualBox cost nothing to use. This Kali Linux tutorial assumes you have already installed Oracle VirtualBox on your system and have enabled 64-bit virtualization in the BIOS.
Step 1) Go to kali.org/get-kali/ and choose the pre-built Virtual Machines option.
This will download an OVA image, which can be imported into VirtualBox.
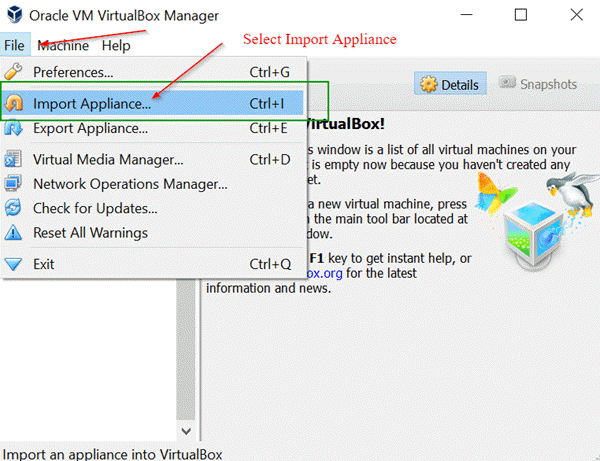
Step 2) Open the Oracle VirtualBox application, and from the File menu select Import Appliance.
File Menu -> Import Appliance
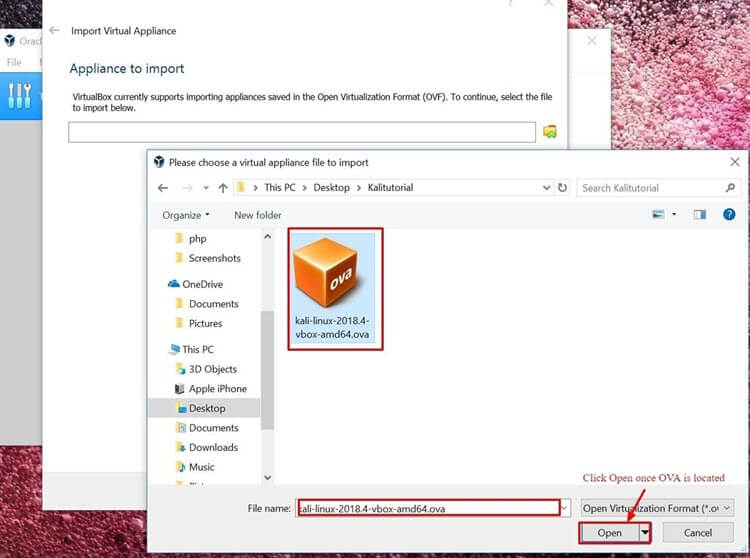
Step 3) On the following screen, “Appliance to Import”, browse to the location of the downloaded OVA file and click Open.
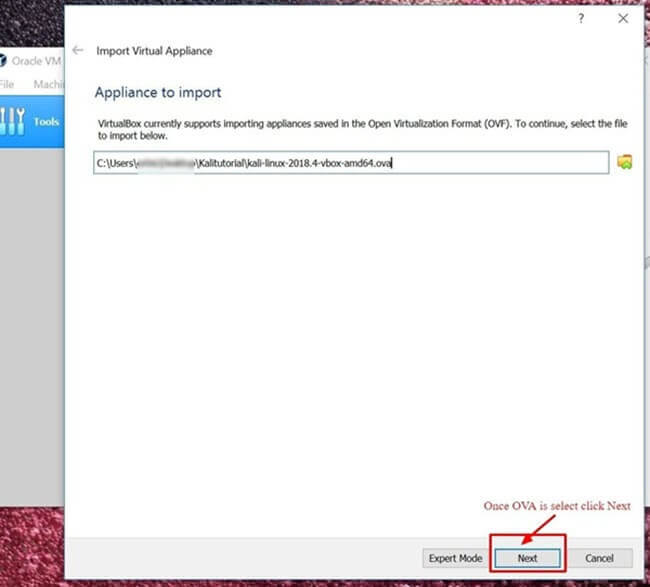
Step 4) Once you click Open, you will be taken back to the “Appliance to Import” screen. Simply click Next.
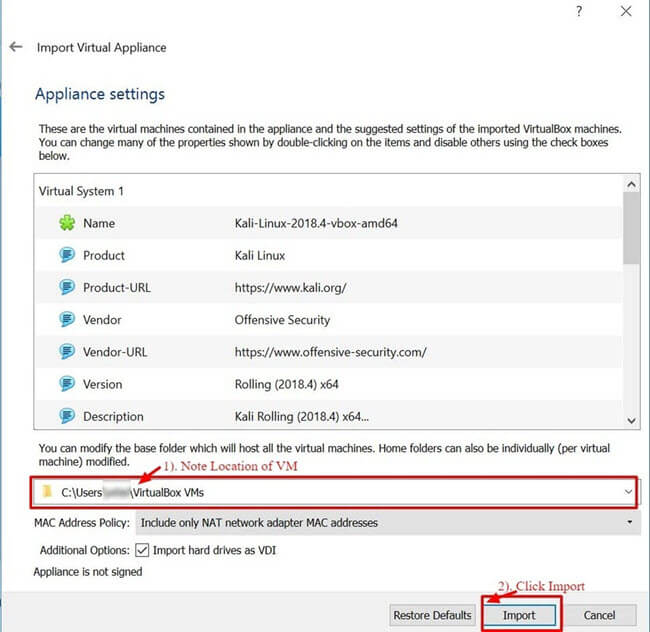
Step 5) The following screen, “Appliance Settings”, displays a summary of the system settings. Leaving the defaults in place is fine. As shown in the screenshot below, make a note of where the virtual machine is stored and then click Import.
Step 6) VirtualBox will now import the Kali Linux OVA appliance. This process can take anywhere from 5 to 10 minutes to complete.

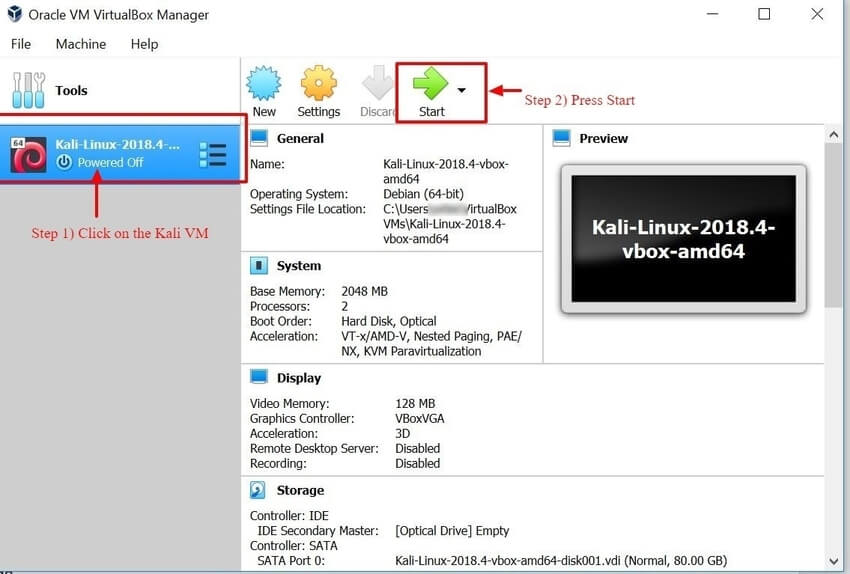
Step 7) Congratulations, Kali Linux has been successfully installed on VirtualBox. You should now see the Kali Linux VM in the VirtualBox console. Next, we will take a look at Kali Linux and some initial steps to perform.

Step 8) Click on the Kali Linux VM within the VirtualBox dashboard and click Start. This will boot the Kali Linux operating system.
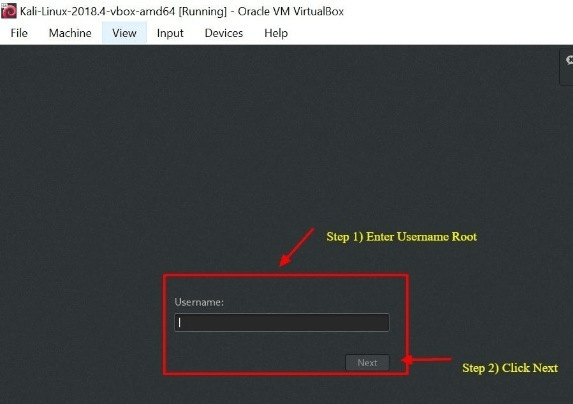
Step 9) On the login screen, enter your username and click Next. On current images the account is kali, not root. Offensive Security removed the default root login in Kali 2020.1, and the installer now asks you to create your own standard user account instead.
Step 10) Enter the matching password and click Sign In. On the pre-built virtual machine images the password is kali; on a manual install it is whatever you set during setup. Older tutorials that tell you to use root and toor describe releases from before 2020, and those credentials will simply be rejected. Change the default password the moment you log in.
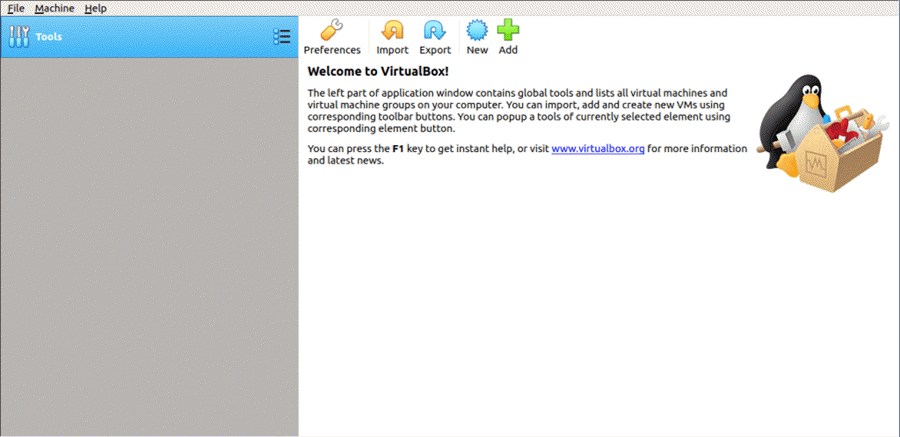
You will now be presented with the Kali Linux GUI desktop. Congratulations, you have successfully logged into Kali Linux.

Getting Started with the Kali Linux GUI
The Kali desktop has a few areas you should note and become familiar with straight away: the Applications tab, the Places tab, and the Kali Linux dock. The screenshot below shows all three on a freshly booted desktop.

Applications Tab – Provides a graphical dropdown list of every application and tool preinstalled on Kali Linux. Reviewing the Applications tab is a great way to become familiar with the feature-rich Kali Linux operating system. The two applications discussed later in this Kali Linux tutorial are Nmap and Metasploit. Applications are grouped into numbered categories, which makes finding a specific tool much easier.
Accessing Applications
Step 1) Click on the Applications tab.
Step 2) Browse to the particular category you are interested in exploring.
Step 3) Click on the application you would like to start.

Places Tab – Similar to any other graphical operating system, such as Windows or macOS, quick access to your folders, pictures and documents is essential. The Places menu on Kali Linux provides that accessibility. By default it contains Home, Desktop, Documents, Downloads, Music, Pictures, Videos, Computer and Browse Network.
Accessing Places
Step 1) Click on the Places tab.
Step 2) Select the location you would like to access.

Kali Linux Dock – Similar to the macOS Dock or the Microsoft Windows taskbar, the Kali Linux dock provides quick access to frequently used and favorite applications. Applications can be added or removed easily.
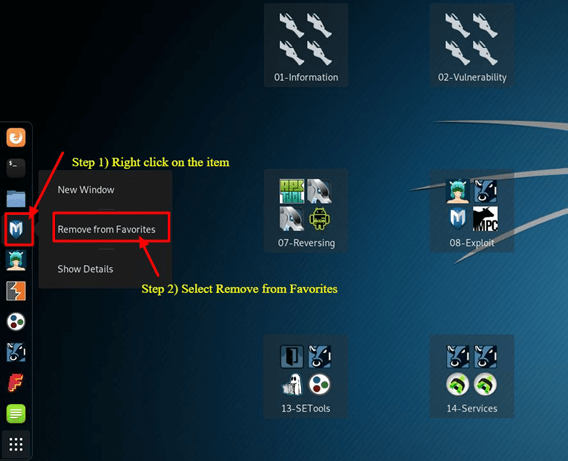
To Remove an Item from the Dock
Step 1) Right-click on the dock item.
Step 2) Select Remove From Favorites.
To Add an Item to the Dock
Adding an item to the dock is very similar to removing one.
Step 1) Click on the Show Applications button at the bottom of the dock.
Step 2) Right-click on the application.
Step 3) Select Add to Favorites.
Once completed, the item will be displayed within the dock, as shown below.

Kali Linux has many other features that make it the primary choice for security engineers and hackers alike. Covering them all is not possible within a single Kali Linux tutorial; explore the different buttons on the desktop at your own pace. Two tools deserve a closer look first, and the natural place to start is the scanner almost every engagement opens with.
What is Nmap?
Network Mapper, better known as Nmap, is a free, open-source utility used for network discovery and vulnerability scanning. Security professionals use Nmap to discover the devices running in their environments. Nmap can also reveal the services and ports each host is serving, exposing potential security risks. At the most basic level, think of Nmap as ping on steroids: the more your technical skills evolve, the more use you will find for it.
Nmap offers the flexibility to monitor a single host or a vast network of hundreds, if not thousands, of devices and subnets. That flexibility has grown over the years, but at its core Nmap remains a port-scanning tool that gathers information by sending raw packets to a host system. Nmap then listens for responses and determines whether a port is open, closed or filtered.
The first scan you should be familiar with is the basic Nmap scan, which checks the first 1000 TCP ports. When it finds a port it reports that port as open, closed or filtered. Filtered usually means a firewall is in place modifying traffic on that particular port. Below is a list of Nmap commands that can be used to run the default scan.
Nmap Target Selection
| Scan a single IP | nmap 192.168.1.1 |
| Scan a host | nmap www.testnetwork.com |
| Scan a range of IPs | nmap 192.168.1.1-20 |
| Scan a subnet | nmap 192.168.1.0/24 |
| Scan targets from a text file | nmap -iL list-of-ipaddresses.txt |
How to Perform a Basic Nmap Scan on Kali Linux
To run a basic Nmap scan in Kali Linux, follow the steps below. As the table above shows, you can scan a single IP, a DNS name, a range of IP addresses, whole subnets, or a list of targets read from a text file. For this example we will scan the localhost IP address, which is always a system you own.
Step 1) From the dock menu, click on the second tab, which is the Terminal.
Step 2) When the terminal window opens, enter the command ifconfig. This returns the local IP address of your Kali Linux system. In this example, the local IP address is 10.0.2.15.
Step 3) Make a note of the local IP address.
Step 4) In the same terminal window, enter nmap 10.0.2.15. This scans the first 1000 ports on the localhost. Because this is a base install, no ports should be open.
Step 5) Review the results.

By default, Nmap only scans the first 1000 ports. If you need to scan the complete range of 65535 ports, simply modify the command above to include -p-.
Nmap 10.0.2.15 -p-
Nmap OS Scan
Another basic but useful feature of Nmap is the ability to detect the operating system of the host. Kali Linux is secure by default, so for this example the host system running Oracle VirtualBox is used instead. The host system is a Windows machine at 10.28.2.26.
In the terminal window, enter the following Nmap command:
nmap 10.28.2.26 – A
Review the results.
Adding -A tells Nmap to perform not only a port scan but also service and operating system detection. Note that the command above reproduces the source formatting; type a plain hyphen before the A when you run it.

Nmap is a vital utility in any security professional’s toolbox. Use the command nmap -h to explore more options and commands. Once you know what is listening on a network you control, the next question is what those services are vulnerable to, which is where Metasploit comes in.
What is Metasploit?
The Metasploit Framework is an open-source project that provides a public resource for researching vulnerabilities and developing code, allowing security professionals to test their own networks and identify security risks. Metasploit has been owned and developed by Rapid7 since 2009, and the free community edition still ships with Kali Linux. It remains by far the world’s most widely used penetration testing framework.
It is important to be careful when using Metasploit, because scanning a network or environment that is not yours is illegal in most jurisdictions. In this Kali Linux Metasploit tutorial, we will show you how to start Metasploit and run a basic scan against your own lab subnet. Metasploit is considered an advanced utility and takes time to master, but once you are familiar with it the framework becomes an invaluable resource.
Metasploit and Nmap
Within Metasploit, we can actually use Nmap. In this case you will learn how to scan your local VirtualBox subnet from Metasploit using the Nmap utility covered above.
Step 1) On the Applications tab, scroll down to 08-Exploitation Tools and then select Metasploit.
Step 2) A terminal box will open with msf in the prompt. This is Metasploit.
Step 3) Enter the following command:
db_nmap -V -sV 10.0.2.15/24
(Be sure to replace 10.0.2.15 with your own local IP address.)
Here:
db_ stands for database
-V stands for verbose mode
-sV stands for service version detection
The results are written straight into the Metasploit database, as shown below.

Metasploit Exploit Utility
Metasploit is very robust in both features and flexibility. One common use is reviewing which known vulnerabilities apply to the hosts you have discovered. Below we go through the steps of listing and filtering the available modules on a lab machine you control.
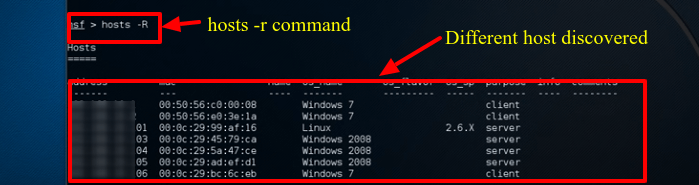
Step 1) Assuming Metasploit is still open, enter Hosts -R in the terminal window. This adds the recently discovered hosts to the Metasploit database.
Step 2) Enter “show exploits”. This command provides a comprehensive look at all the modules available to Metasploit.

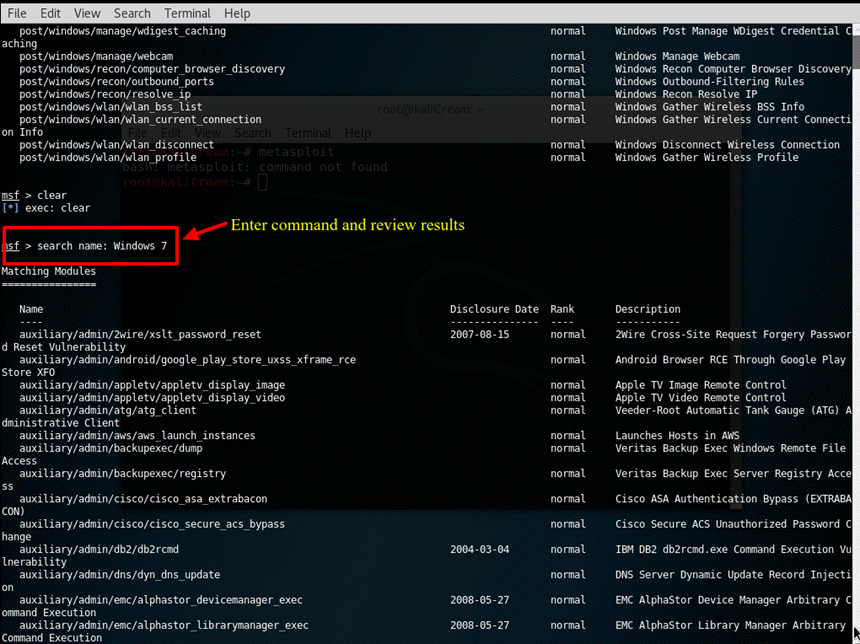
Step 3) Now narrow down the list with this command: search name: Windows 7. This searches for modules that specifically mention Windows 7, the operating system used in this example lab. Depending on your environment you will need to change the search parameters to match the machine type you are authorized to test, whether that is macOS or another Linux system.
Step 4) For the purposes of this tutorial we will use an Apple iTunes vulnerability discovered in the list. To load the module, enter the complete path shown in the search results: use exploit/windows/browse/apple_itunes_playlist

Step 5) When the module loads successfully the command prompt changes to display the module name followed by >, as shown in the screenshot above.
Step 6) Enter show options to review the settings available for that module. Each module has different options.

Everything above should be run only against machines you own or have written permission to test. Used that way, Nmap and Metasploit turn Kali Linux into a practical audit platform rather than a liability, and the questions below cover the points most beginners raise next.