How to Download & Install MongoDB on Windows and Cloud
⚡ Smart Summary
How to Download and Install MongoDB on Windows and Cloud is explained as a complete setup guide. This resource covers installing MongoDB Community Server on Windows, the JavaScript, Python, and Ruby drivers, MongoDB Compass, configuration with import and export, a config file, and deploying MongoDB Atlas on the cloud.

The installers for MongoDB are available in both the 32-bit and 64-bit format. The 32-bit installers are good for development and test environments. But for production environments you should use the 64-bit installers. Otherwise, you can be limited in the amount of data that can be stored within MongoDB. It is advisable to always use the stable release for production environments.
How to Download & Install MongoDB on Windows
The following steps can be used to download and install MongoDB on Windows 10:
Step 1) Download MongoDB Community Server
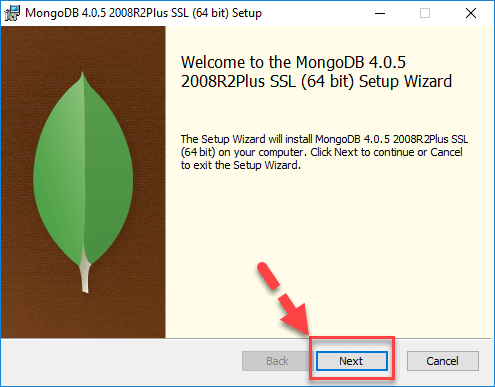
Go to the link and download MongoDB Community Server. We will install the 64-bit version for Windows.

Step 2) Click on Setup
Once the download is complete, open the msi file. Click Next in the start-up screen.
Step 3) Accept the End-User License Agreement
- Accept the End-User License Agreement.
- Click Next.

Step 4) Click on the “Complete” button
Click on the “Complete” button to install all of the components. The custom option can be used to install selective components or if you want to change the location of the installation.

Step 5) Service Configuration
- Select “Run service as Network Service user”. Make a note of the data directory; we will need this later.
- Click Next.

Step 6) Start installation process
Click on the Install button to start the installation.

Step 7) Click Next once completed
Installation begins. Click Next once completed.

Step 8) Click on the Finish button
Final step: once the installation is complete, click on the Finish button.

Hello World MongoDB: JavaScript Driver
Drivers in MongoDB are used for connectivity between client applications and the database. For example, if you had a Java program and required it to connect to MongoDB, then you would require to download and integrate the Java driver so that the program can work with the MongoDB database.
The driver for JavaScript comes out of the box. The MongoDB shell which is used to work with the MongoDB database is actually a JavaScript shell. To access it:
Step 1) Go to “C:\Program Files\MongoDB\Server\4.0\bin” and double click on mongo.exe. Alternatively, you can also click on the MongoDB desktop item.

Step 2) Enter the following program into the shell:
var myMessage='Hello World';
printjson(myMessage);
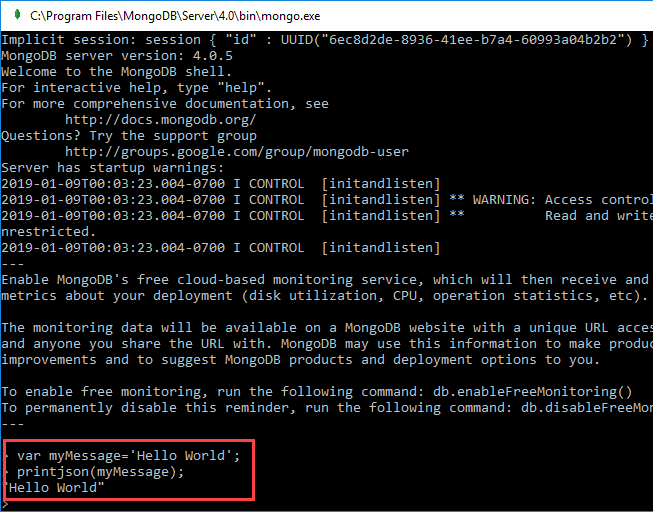
Code Explanation:
- We are just declaring a simple JavaScript variable to store a string called ‘Hello World’.
- We are using the printjson method to print the variable to the screen.
Install Python Driver
Step 1) Ensure Python is installed on the system.
Step 2) Install the mongo related drivers by issuing the below command:
pip install pymongo
Install Ruby Driver
Step 1) Ensure Ruby is installed on the system.
Step 2) Ensure gems is updated by issuing the command:
gem update --system
Step 3) Install the mongo related drivers by issuing the below command:
gem install mongo
Install MongoDB Compass – MongoDB Management Tool
There are tools in the market which are available for managing MongoDB. One such non-commercial tool is MongoDB Compass. Some of the features of Compass are given below:
- Full power of the Mongo shell
- Multiple shells
- Multiple results
Step 1) Go to the link and click download.

Step 2) Enter details in the popup and click submit.

Step 3) Double click on the downloaded file.

Step 4) Installation will auto-start.

Step 5) Compass will launch with a Welcome screen.

Step 6) Keep the privacy settings as default and click “Start Using Compass”.

Step 7) You will see the home screen with a list of current databases.

MongoDB Configuration, Import, and Export
Before starting the MongoDB server, the first key aspect is to configure the data directory where all the MongoDB data will be stored. This can be done in the following way:

The above command ‘md \data\db’ makes a directory called \data\db in your current location. MongoDB will automatically create the databases in this location, because this is the default location for MongoDB to store its information. We are just ensuring the directory is present, so that MongoDB can find it when it starts.
The import of data into MongoDB is done using the “mongoimport” command. The following example shows how this can be done.
Step 1) Create a CSV file called data.csv and put the following data in it:
Employeeid,EmployeeName
1,Guru99
2,Mohan
3,Smith
So in the above example, we are assuming we want to import 3 documents into a collection called data. The first row is called the header line, which will become the field names of the collection.
Step 2) Issue the mongoimport command.

Code Explanation:
- We are specifying the db option to say which database the data should be imported to.
- The type option is to specify that we are importing a csv file.
- Remember that the first row is called the header line, which will become the field names of the collection; that is why we specify the –headerline option. And then we specify our data.csv file.
Output

The output clearly shows that 3 documents were imported into MongoDB.
Exporting MongoDB is done by using the mongoexport command.

Code Explanation:
- We are specifying the db option to say which database the data should be exported from.
- We are specifying the collection option to say which collection to use.
- The third option is to specify that we want to export to a csv file.
- The fourth is to specify which fields of the collection should be exported.
- The –out option specifies the name of the csv file to export the data to.
Output

The output clearly shows that 3 records were exported from MongoDB.
Configuring MongoDB server with configuration file
One can configure the mongod server instance to start up with a configuration file. The configuration file contains settings that are equivalent to the mongod command-line options. For example, suppose you wanted MongoDB to store all its logging information to a custom location, then follow the below steps:
Step 1) Create a file called “mongod.conf” and store the below information in the file.

- The first line of the file specifies that we want to add configuration for the system log file, that is where the information about what the server is doing goes, in a custom log file.
- The second option is to mention that the location will be a file.
- This mentions the location of the log file.
- The logAppend: “true” means to ensure that the log information keeps on getting added to the log file. If you put the value as “false”, then the file would be deleted and created fresh whenever the server starts again.
Step 2) Start the mongod server process and specify the above created configuration file as a parameter. The screenshot of how this can be done is shown below.

Once the above command is executed, the server process will start using this configuration file, and if you go to the /etc directory on your system, you will see the mongod.log file created. The below snapshot shows an example of what a log file would look like.

How to Install MongoDB on Cloud (AWS, Google, Azure)
You do not need to install the MongoDB server and configure it. You can deploy a MongoDB Atlas server on the cloud on platforms like AWS, Google Cloud, and Azure, and connect to the instance using a client. Below are the detailed steps:
Step 1) Go to the link.
- Enter Personal Details
- Agree to terms
- Click the button “Get Started Free”

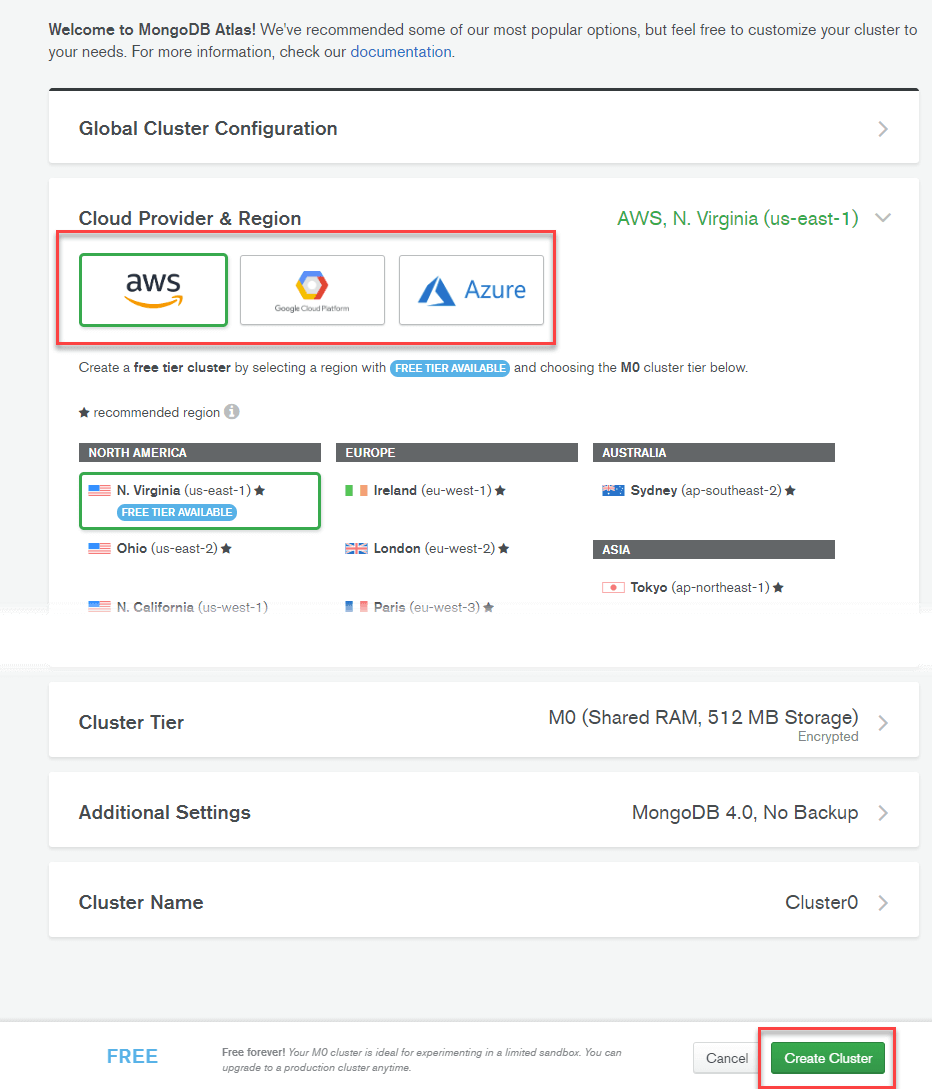
Step 2) Click “Build my first cluster”.

Step 3) You can select between AWS, Google Cloud, and Azure as your cloud provider. In this tutorial, we will use AWS, which is set by default. Make no other changes on the page and click “Create Cluster”.
Step 4) Cluster creation takes some time.

Step 5) After some time you will see the cluster ready.

Step 6) Click Security > Add new user.

Step 7) On the next screen:
- Enter user credentials
- Assign privileges
- Click the Add User button

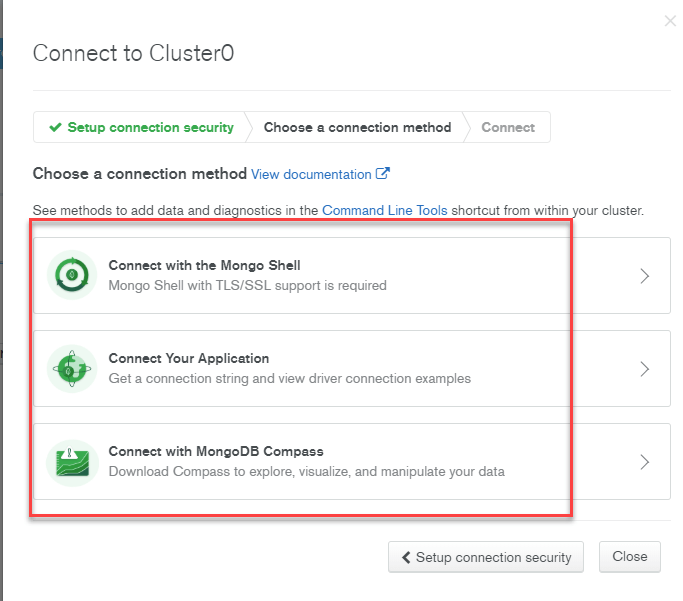
Step 8) In the dashboard, click the connect button.
- Whitelist your IP connection
- Choose the connection method

Step 9) Select the connection method of your choice to connect to the MongoDB server.