How to Download and Install SQL Server for Windows (FREE)
⚡ Smart Summary
Download and Install SQL Server for Windows is a straightforward setup process explained step by step. This walkthrough covers prerequisites, edition selection, installation modes, configuration choices, and verification, helping beginners successfully deploy Microsoft SQL Server on Windows without errors or guesswork.
What is SQL Server?
SQL Server is a relational database management system (RDBMS) developed by Microsoft. It supports ANSI SQL, the universally accepted Structured Query Language standard, while extending the language through its proprietary implementation called T-SQL (Transact-SQL). Microsoft built SQL Server to compete directly with leading database engines such as MySQL and Oracle, and it remains a top choice for enterprise data management, reporting, and analytics workloads.
Pre-Requisites for SQL Server Installation
Before starting the Microsoft SQL Server download for Windows 10 or Windows 11, your machine should meet the minimum environment requirements listed below to ensure a smooth installation experience.
- Operating System: Windows 10, Windows 11, or Windows Server (64-bit recommended).
- .NET Framework: Version 4.6 or later must be installed.
- Memory: Minimum 1 GB RAM (4 GB or higher recommended for better performance).
- File System: NTFS-formatted drive with at least 6 GB of free disk space.
- Processor: x64 processor running at 1.4 GHz or faster.
Once these prerequisites are confirmed, you can proceed to the download stage described next.
How to Download SQL Server Setup
Follow the steps below to download the Microsoft SQL Server installer on Windows 10 or Windows 11.
Step 1) Open your browser and go to the official Microsoft download page: https://www.microsoft.com/en-in/sql-server/sql-server-downloads.
Microsoft offers two free SQL Server editions intended for learning, evaluation, and small-scale deployments:
Developer vs Express Edition Comparison
| Feature | Developer Edition | Express Edition |
|---|---|---|
| License Cost | Free | Free |
| Usage | Development and testing only | Production allowed (limited) |
| Features | Full enterprise feature set | Limited core features |
| Business Intelligence | Included | Not included |
| Database Size Limit | Unlimited | 10 GB per database |
| Best For | Learning, prototypes, full evaluation | Lightweight apps and small projects |
For complete learning coverage, the Developer edition is recommended because it mirrors enterprise capabilities without licensing limitations.
Step 2) Click on “Download now” under the Developer edition tile.

The installer file named ‘SQLServer2017-SSEI-Dev.exe’ will save to your Downloads folder, ready to launch on your Windows environment.

How to Install Microsoft SQL Server
After the executable is downloaded, follow the steps below to install SQL Server on Windows 10 or Windows 11.
Step 1) Launch the installer.
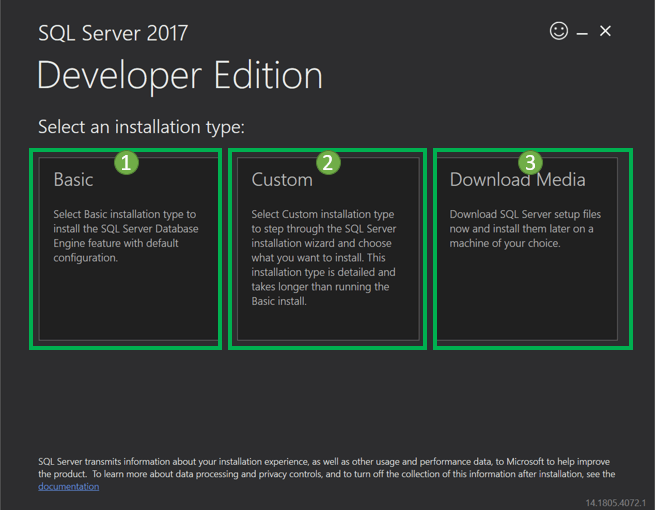
Double-click “SQLServer2017-SSEI-Dev.exe”. The setup screen appears with three installation options: Basic, Custom, and Download Media.
Step 2) Choose the installation type.
Click ‘Basic’ to install SQL Server with default configuration. This option is ideal for first-time learners and beginners exploring T-SQL.

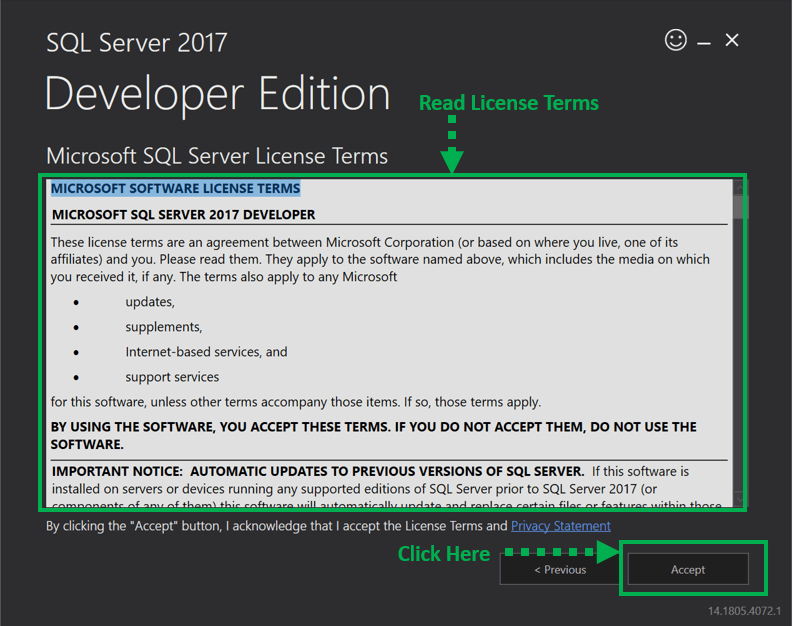
Step 3) Accept the License Terms.
The ‘Microsoft Server License Terms’ screen will appear. Review the agreement carefully and click ‘Accept’ to continue.
Step 4) Select the installation location.
The ‘SQL Server install location’ window will open. This step determines where program files are stored on your machine.
- The default location is C:\Program Files\Microsoft SQL Server.
- Optionally, you can change the location by clicking Browse.
- Once the path is selected, click ‘Install’ to begin the SQL installation on Windows 10.

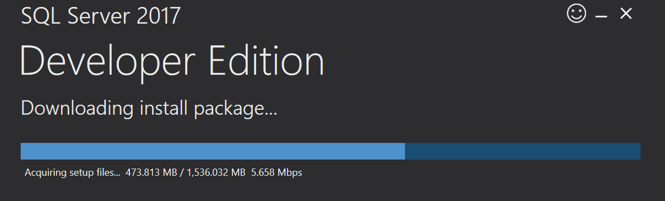
A ‘Downloading install package’ progress screen appears next. Wait until the SQL software download finishes before the setup continues automatically.
Once the download completes, the system automatically begins installing the Developer edition components.

The installation progress screen below confirms that core components are being deployed.

Step 5) Finish the installation.
When installation succeeds, the confirmation screen below appears.
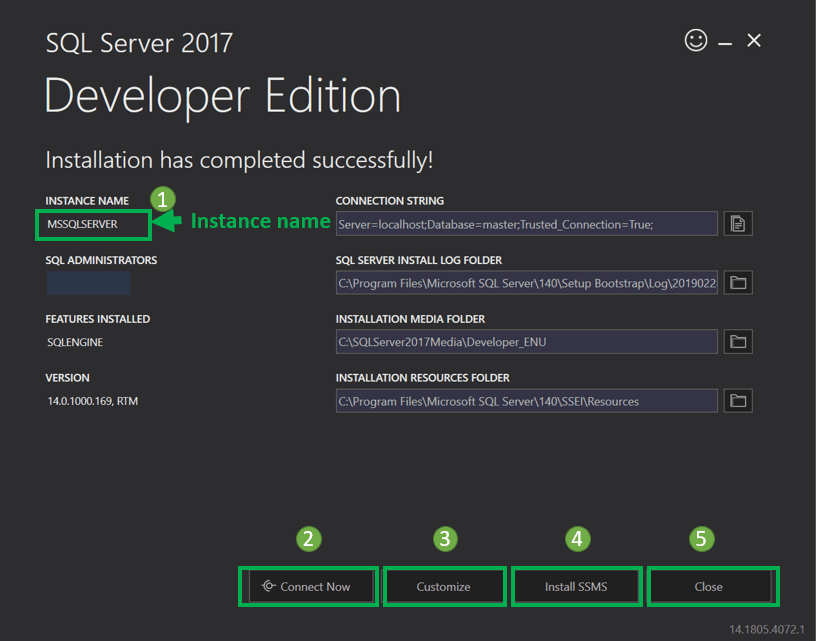
This setup is self-sufficient for continuing with SQL Server learning, and you may close this window. The key labels and buttons displayed are described below.
- Instance name: Labeled by default as MSSQLSERVER.
- Connect now: Opens a separate command-line window that runs ‘select @@Version’ automatically, confirming the new MSSQLSERVER instance is reachable.

- Customize: Launches the SQL Installation Center for adding optional features beyond the Basic installation.
- Install SSMS: Opens the Microsoft SSMS download link, the IDE used to manage SQL Server visually.
- Close: Closes the setup window. You are now ready to install SSMS and explore database creation.