
How to Create Customer Number Range in SAP with XDN1
 Editorial Team
⚡ Smart Summary
Customer number range creation in SAP, using transaction code XDN1, defines the interval of numbers assigned to customer master records. This resource explains creating intervals, choosing internal or external assignment, and linking ranges to customer account groups through transaction OBAR.
What Is a Customer Number Range in SAP?
A customer number range in SAP is the defined block of numbers that the system can assign to customer master records. Every customer account is identified by a unique number, and the number range controls which values are valid for a given group of customers. Ranges are created and maintained in transaction XDN1, where each interval is given a two-character key along with a lower and upper limit.
Number ranges keep customer numbering consistent and prevent duplicate identifiers across the system. They also decide whether numbers are issued by SAP or entered by the user, which is set through the internal or external option on each interval. Because customer masters in Sales and Distribution and in Financial Accounting share the same numbering, a well-planned range avoids conflicts between modules and supports clean reporting and reconciliation. The range itself does not belong to a single customer; instead, it is linked to one or more customer account groups, which then pass the numbering rule on to every customer created under them.
Internal vs External Customer Number Ranges
Each interval you create in XDN1 is defined as either internal or external, and the two types behave very differently. The choice controls who supplies the customer number, and it is important to select the right type before any customer records are created under that account group.
| Basis of comparison | Internal number range | External number range |
|---|---|---|
| Who assigns the number | SAP assigns it automatically | The user enters it manually |
| Interval marked “Ext” | No | Yes |
| Allowed characters | Numeric only | Numeric or alphanumeric |
| Best used for | New records created directly in SAP | Numbers migrated from a legacy system |
| Risk of gaps | Low, sequence is controlled | Higher, depends on manual entry |
Selecting the wrong type is a common cause of errors during customer creation, so confirm the interval type in XDN1 before the account group goes live. In short, choose an internal range when SAP should control numbering automatically, and choose an external range when numbers must match values that already exist outside the system.
How to Create Customer Number Range in SAP with TCode XDN1
Follow these steps to create the number range in transaction XDN1 and then assign it to a customer account group using transaction OBAR.
Step 1) Enter T-Code. Enter T-Code XDN1 in the command bar and press Enter.

Step 2) Create number ranges. We now create the customer number ranges. Click on the Intervals “Create” button.

Step 3) Check that intervals appear. A screen named “Maintain Number Range Intervals” appears. Click on the “+Interval” button.

Step 4) Click on the save button. The screen below appears. Enter the number range interval and click on the save button.
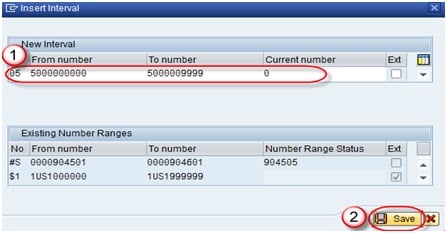
A message displays “The changes were saved”.

Step 5) Assign the number range. Now assign the number range to the customer account group. Enter T-Code OBAR in the command bar, then:
- Assign the number range to the customer account group.
- Save the screen.

A message displays “The changes were saved”.

Best Practices for Customer Number Range Assignment
A little planning before you create ranges keeps customer numbering clean and avoids errors during master data creation. Keep the following best practices in mind:
- Plan ranges before go-live: Decide the intervals for each account group early, because changing numbering after records exist is difficult.
- Avoid overlapping intervals: Ensure that intervals do not overlap, as overlaps cause conflicts and assignment errors.
- Match the type to the source: Use internal ranges for records created in SAP and external ranges for numbers imported from a legacy system.
- Reserve room for growth: Define intervals wide enough to cover future customers so you do not run out of numbers as the business expands.
- Assign every account group: Confirm in OBAR that each customer account group points to a valid number range before creating customers.
- Document the ranges: Record which interval belongs to each account group so future administrators can extend numbering without guesswork.
