
C# Class & Object Tutorial with Examples
 Editorial Team
⚡ Smart Summary
C# classes and objects bring object-oriented structure to applications by wrapping related data properties and methods inside a single blueprint. Each object is an instance of a class that stores its own values for those properties.
C# is based on the C++ programming language. Hence, the C# programming language has in-built support for classes and objects. A class is nothing but an encapsulation of properties and methods that are used to represent a real-time entity.
For example, if you want to work with employee’s data in a particular application.
The properties of the employee would be the ID and name of the employee. The methods would include the entry and modification of employee data.
All of these operations can be represented as a class in C#. In this chapter, we will look at how we can work with classes and objects in C# in more detail.
What is Class and Object?
Let’s first begin with classes.
As we discussed earlier classes are an encapsulation of data properties and data methods.
- The properties are used to describe the data the class will be holding.
- The methods tell what are the operations that can be performed on the data.
To get a better understanding of class and objects, let’s look at an example below of how a class would look like.
The name of the class is “Tutorial”. The class has the following properties
- Tutorial ID – This will be used to store a unique number which would represent the Tutorial.
- Tutorial Name – This will be used to store the name of the tutorial as a string.
A class also comprises of methods. Our class has the following methods,
- SetTutorial – This method would be used to set the ID and name of the Tutorial. So for example, if we wanted to create a tutorial for .Net, we might create an object for this. The object would have an ID of let’s say 1. Secondly, we would assign a name of “.Net” as the name of the Tutorial. The ID value of 1 and the name of “.Net” would be stored as a property of the object.
- GetTutorial – This method would be used to get the details of a specific tutorial. So if we wanted to get the name of the Tutorial, this method would return the string “.Net”.

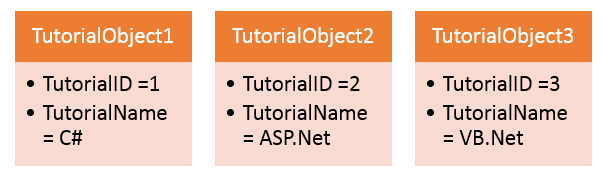
Below is a snapshot of how an object might look like for our Tutorial class. We have 3 objects, each with their own respective TutorialID and TutorialName.
How to Create a Class and Object
Let’s now dive into Visual Studio to create our class. We are going to build upon our existing console application which was created in our earlier chapter. We will create a class in Visual Studio for our current application.
Let’s follow the below-mentioned steps to get this example in place.
Step 1) The first step involves the creation of a new class within our existing application. This is done with the help of Visual Studio.

- The first step is to the right click on the solution, which in our case is ‘DemoApplication’. This will bring up a context menu with a list of options.
- From the context menu choose the option Add->Class. This will provide the option to add a class to the existing project.
Step 2) The next step is to provide a name for the class and add it to our solution.
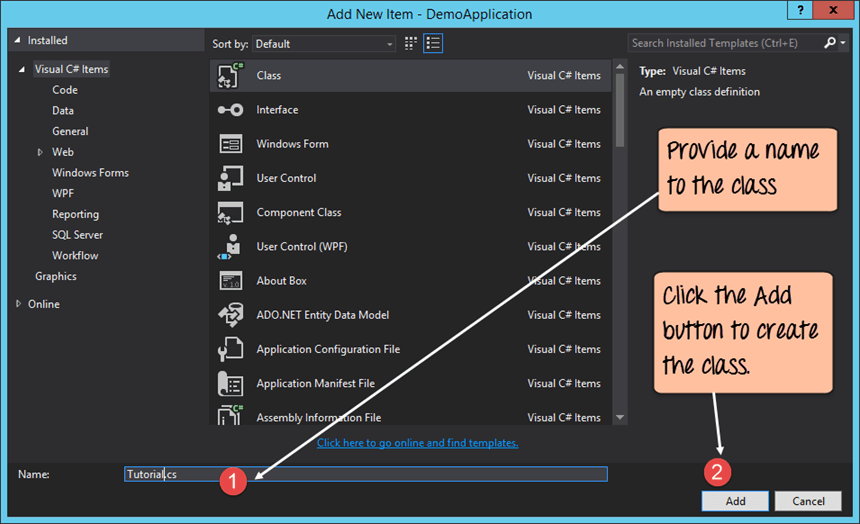
- In the project dialog box, we first need to provide a name for our class. Let’s provide a name of Tutorial.cs for our class. Note that the file name should end with .cs to ensure it is treated as a proper class file.
- When we click the Add button, the class will be added to our solution.
If the above steps are followed, you will get the below output in Visual Studio.
Output:-

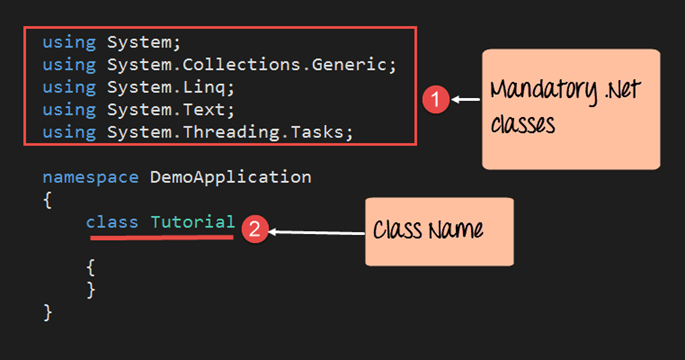
A class named Tutorial.cs will be added to the solution. If you open the file, you will find the below code added to the class file.
Code Explanation:-
- The first part contains the mandatory modules which Visual Studio adds to any .Net file. These modules are always required to ensure any .Net program runs in a Windows environment.
- The second part is the class which is added to the file. The class name is ‘Tutorial’ in our case. This is the name which was specified with the class was added to the solution.
For the moment, our class file does not do anything. In the following topics, we will look into more details on how to work with the class.
Fields and methods
We have already seen how fields and methods are defined in classes in the earlier topic.
For our Tutorial class, we can have the following properties.
- Tutorial ID – This will be used to store a unique number which would represent the Tutorial.
- Tutorial Name – This will be used to store the name of the tutorial as a string.
Our Tutorial class can also have the below-mentioned methods.
- SetTutorial – This method would be used to set the ID and name of the Tutorial.
- GetTutorial – This method would be used to get the details of a specific tutorial.
Let’s now see how we can incorporate fields and methods in our code.
Step 1) The first step is to ensure the Tutorial class has the right fields and methods defined. In this step, we add the below code to the Tutorial.cs file.

Code Explanation:-
- The first step is to add the fields of TutorialID and TutorialName to the class file. Since the TutorialID field will be a number, we define it as an Integer, while TutorialName will be defined as a string.
- Next, we define the SetTutorial method. This method accepts 2 parameters. So if Program.cs calls the SetTutorial method, it would need to provide the values to these parameters. These values will be used to set the fields of the Tutorial object.
- The value of pID would become 1
- The value of pName would be .Net.
- In the SetTutorial method, these values would then be passed to TutorialID and TutorialName.
- So now TutorialID would have a value of 1 and TutorialName would have a value of “.Net”.
- Here we set the fields of the Tutorial class to the parameters accordingly. So we set TutorialID to pID and TutorialName to Pname.
- We then define the GetTutorial method to return value of the type “String”. This method will be used to return the TutorialName to the calling program. Likewise, you can also get the tutorial id with method Int GetTutorial
- Here we return the value of the TutorialName field to the calling program.
Step 2) Now let’s add code to our Program.cs, which is our Console application. The Console application will be used to create an object of the “Tutorial class” and call the SetTutorial and GetTutorial methods accordingly.
(Note:- An object is an instance of a class at any given time. The difference between a class and an object is that the object contains values for the properties.)

using System;
using System.Collections.Generic;
using System.Linq;
using System.Text;
using System.Threading.Tasks;
namespace DemoApplication
{
 class Tutorial
 {
  int TutorialID;
  string TutorialName;

  public void SetTutorial(int pID,string pName)
  {
   TutorialID=pID;
   TutorialName=pName;
  }
  public String GetTutorial()
  {
   return TutorialName;
  }

  static void Main(string[] args)
  {
   Tutorial pTutor=new Tutorial();

   pTutor.SetTutorial(1,".Net");

   Console.WriteLine(pTutor.GetTutorial());

   Console.ReadKey();
  }
 }
}
Code Explanation:-
- The first step is to create an object for the Tutorial class. Mark here that this is done by using the keyword ‘new’. The ‘new’ keyword is used to create an object from a class in C#. The object is then assigned to the pTutor variable.
- The method SetTutorial is then called. The parameters of 1 and “.Net” are passed to the SetTutorial method. These will then be used to set the “TutorialID” and “TutorialName” fields of the class accordingly.
- We then use the GetTutorial method of the Tutorial class to get the TutorialName. This is then displayed to the console via the Console.WriteLine method.
If the above code is entered properly and the program is run the following output will be displayed.
Output:

From the output, you can clearly see that the string “.Net” was returned by the GetTutorial method.
