Assertions in SoapUI: Scripts, XQuery, XPath Types
 Thomas Hamilton
⚡ Smart Summary
Assertions in SoapUI are the checkpoints that decide whether a web service response is correct, turning a request that merely executes into a test that actually passes or fails on real, verifiable content.
What Is an Assertion?
Assertion means act of affirming or stating something. It can also be interpreted as check point or a validation point.
Once a request is sent to a web server a response is received. We need to validate if the response contains the data that we expect. In order to validate the response, we need to use assertions. Without an assertion a test step only proves that the service replied, not that it replied correctly, which is why every API test should carry at least one.
Types of Assertion
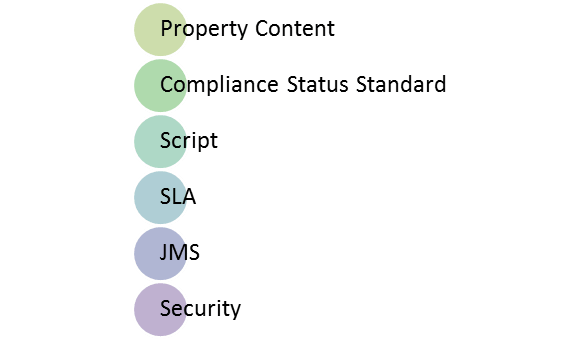
There are various ways of asserting a response; however, we will focus on the commonly used SoapUI assertion types while validating a response. Below are the categories that are available in the Open Source version of SoapUI.
- Property Content
- Compliance Status Standard
- Script
- SLA
- JMS
- Security
The dialog groups every assertion under those categories, as the screenshot below shows.
Apart from the ones that are listed above, the Pro version also has an inbuilt JDBC Assertion using which we can assert if the web service has updated the database correctly.
Version note: current SoapUI documentation also lists a JDBC category (JDBC Status and JDBC Timeout) alongside the categories above, and a Message Content assertion inside Property Content for richer XML comparison. The commercial edition referred to here as “Pro” is now sold as ReadyAPI by SmartBear, so menu labels in newer builds may read differently while the assertion behaviour stays the same.
Contains Assertion
Searches for the existence of the specified string. It also supports regular expression.
We will continue with the same example from the previous tutorial with WSDL request as http://www.dneonline.com/calculator.asmx. If you have not built that project yet, work through creating a project, test suite and test case first.
Step 1: By Default there are no assertions.
- The Number of Assertions are shown in the Assertions Tab.
- To add a new assertion, click on ‘Add New Assertion’ button.

Step 2: Now,
- Select the Assertion Category.
- Select the Assertion Type.
- Click ‘Add’

Step 3: Let us validate if the string ’46’ exist in the response. Click ‘OK’
Note: We can also ignore case and add regular expression.

Step 4: Upon adding it, immediately assertion is executed and shows if VALID or INVALID.

Step 5: Now Let us say we change the content of ‘Contains Assertion in SoapUI’ to ’47’ and see what happens.

Step 6: The Assertion is executed and the result is thrown to the user. Since we don’t have the string ’47’ within the response, the assertion has failed.

Not Contains Assertion
Its counterpart works the other way round. Searches for the Non-existence of the specified string. It also supports regular expression.
Step 1: Now after clicking on ‘add new assertions’ button,
- Select the Assertion Category.
- Select the Assertion Type – In this case ‘NOT Contains’
- Click ‘Add’

Step 2: Let us validate if the string ‘intA’ exist in the response. Enter the string ‘FromCurrency’ and Click ‘OK’

Step 3: As soon as an assertion is added, it executes and displays the result. So far we have added two assertions hence both the assertions are executed and displayed the result.

Step 4: Now let us change the contents of the ‘Not Contains Assertion’ and see what happens. We will check for the non-existence of the string “AddResult”.

Step 5: The string ‘AddResult’ is actually present in the response, hence the ‘NOT Contains’ assertion will fail as shown below.

XPath Match Assertion
String matching is blunt, so the next assertion targets a single node instead. Uses XPath expression to select the target node and its values. XPath, is an XML query language for selecting nodes from an XML document.
Step 1: Now after clicking on ‘Add New Assertions’ button,
- Select the Assertion Category.
- Select the Assertion Type – In this case ‘XPath Match’
- Click ‘Add’

Step 2: Add XPath Window opens.
Before adding a SoapUI XPath, we need to declare the namespace. An XML namespace is a collection of names, identified by a Uniform Resource Identifier (URI) reference, which are used in XML documents as element and attribute names. The same is used in the SoapUI XPath Assertion.
For declaring an XML namespace, we just need to click on ‘Declare’ button which would do the job for us else we can also manually declare a namespace ourselves.
After declaring the namespace we need to refer the XPath using the created namespace.
Upon clicking the ‘Declare’ button, two namespaces will pop up as we have two URI’s. One of them is the schema URL and the other one corresponds to the actual web service URL. We need to use the actual namespace where the web service is located and NOT the schema namespace while referencing XPath. The declared lines appear at the top of the XPath box as shown below.

declare namespace soap=’http://schemas.xmlsoap.org/soap/envelope/’;
declare namespace ns1=’http://tempuri.org/’;

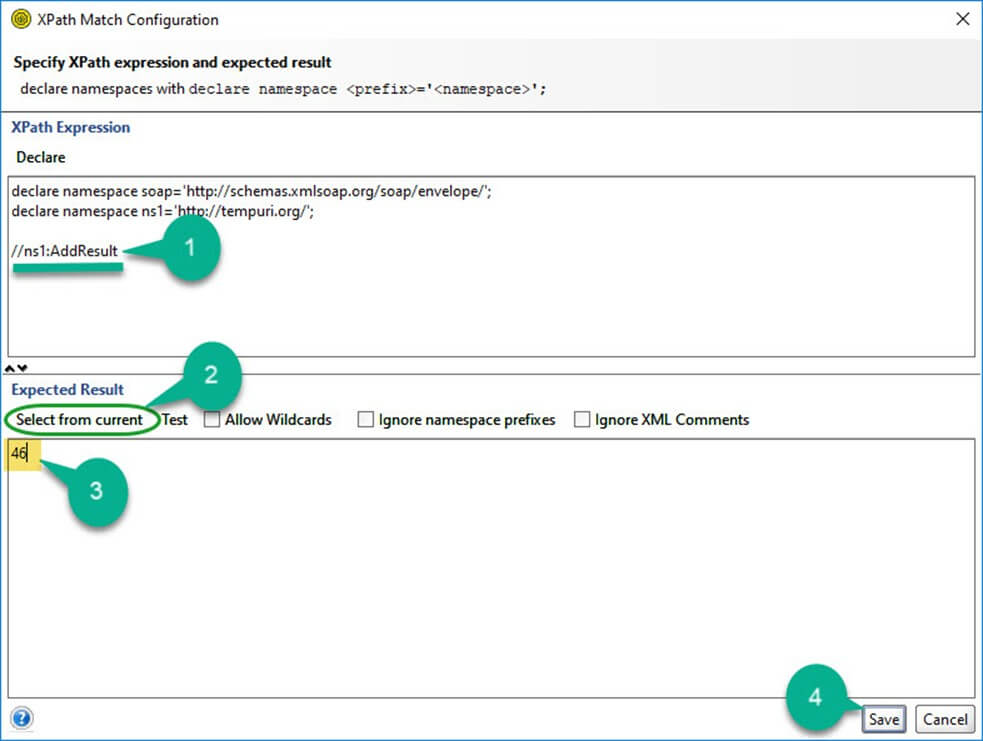
Step 3: Now we need to enter the XPath of the XML node that we need to validate.
//ns1:AddResult Gives us the Value of the node enclosed between <AddResult> & </AddResult> and ns1 corresponds to the declared namespace which is pointing to ‘http://tempuri.org/’
After entering the XML, we need to click on ‘Select from current’ so that value from the current response would be picked up for comparison going forward.

Step 4: So far,
- After declaring the namespaces, we have entered the XPath of XML node that we need to Validate.
- We Need to click ‘Select from Current’ to make the current value as the expected value.
- The current value is shown to the user which we can modify if required.
- Click ‘Save’.
Step 5: The added Assertion in SoapUI will be displayed as shown below.

Scripting Assertions
This Assertion technique is the most widely used one as it is extremely difficult to manage and maintain hundreds of assertions.
SoapUI uses either Groovy Scripting or JavaScript for scripting assertions. The scripting technique is adopted for developing a framework for testing SOAP. Scripting assertions are used under following circumstances.
- Scripting allows user to perform some operations before and after executing a test case using set up and tear down methods respectively. Set up is a procedure which is executed before executing a particular method (example – Object creation and Initialization) while tear down is a procedure which is executed after executing the method (eg: Destroying objects and clean up). This feature is not available in other Assertion types and can be done only through coding.
- It allows users to perform opening/closing a Project, in order to initialize or clean-up Project related settings and also to work with environmental variables which is very helpful during scripting.
- It helps us in asserting a dynamic Response content.
- Scripting assertions are used for creating user defined assertions that are NOT predefined by SoapUI.
For demonstrating a Script assertion in SoapUI, we will make use of calculator WSDL, the test case ‘Add’ that we had created earlier.
Step 1: Steps to add groovy script is same as that of other assertions except that the assertion is not a predefined one. Instead it is a user defined assertion which offers greater flexibilities than the inbuilt ones.
Select the Test step against which the assertion has to be added.
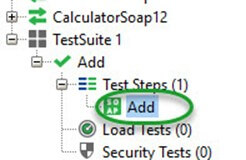
Click ‘Add Assertion’ Button as shown below.

Step 2: Now select the Assertion category.
- In this case it is Script.
- Select SoapUI Script Assertion and there no sub-types associated with it.
- Click ‘Add’.

Step 3: The Scripting Dialog opens where user will be able to write user defined script to validate the response XML.

Step 4: Now let us write a groovy script to validate the Conversion Rate. The Script is attached below with the comments embedded. It is recommended to have knowledge on Java Script or Groovy Script before attempting to write your own script.
//Define Groovy Utils and holder for validating the XML reponse content
def groovyUtils = new com.eviware.soapui.support.GroovyUtils(context)
def holder = groovyUtils.getXmlHolder(messageExchange.responseContent)

//Define the NameSpace
holder.namespaces["ns1"] = "http://tempuri.org/"

//Get the Value of the Node 'AddResult' and assign to a variable
def addResult = holder.getNodeValue("//ns1:AddResult")

//print the value of the result in the Output panel
log.info "The result value for integers is " + addResult

//Comparing the value to print 'Pass' or 'Fail'
if(addResult=="46")
{ log.info "Pass" }
else
{ log.info "fail"}
- Click ‘Execute’ Button to trigger the execution.
- The output of the Script is shown in the Output pane. It has printed both, Conversion Value as well as the end result (Pass or Fail)
- The Information is displayed that ‘Script Assertion Passed’. Click OK.
Note: The final Information pop up will always display with the message ‘Script Assertion Passed’ as long as the script is syntactically correct. It has got no correlation with your assertion within the script.

Click OK
Step 5: Now the assertion Tab displays all the assertions that we had added for this test suite with the Status against each one of those.

Step 6: Now
- Select the Test Suite from the Navigator tree
- Click ‘Run’ Button
- Results would be displayed for the entire test suite.

XQuery Match Assertion
It uses an XQuery expression to select content from the target property. We need a much bigger response XML in order to better understand the XQuery assertion in SoapUI. Let us import one other WSDL as shown below: http://www.webservicex.net/medicareSupplier.asmx?WSDL
Note: the public webservicex.net demo endpoints used in this walkthrough are no longer reliably reachable, so the request and response screenshots below are kept as the reference example. Any WSDL that returns a repeating node set will exercise the XQuery assertion in exactly the same way.
Step 1: Perform a Right click on the existing project and select ‘Add WSDL’.

Step 2: The Add WSDL dialog opens. Leave other options as default and Click ‘OK’ Button.

Step 3: All the operations are listed as shown below.

Step 4: Now let us add a Test Case within the same test suite that we had created for Testing the currency converter.

Step 5: Enter the name of the test case and Click ‘OK’ Button

Step 6: The test case is created as shown below.

Step 7: Add a new test step of Type ‘Soap Test Request’ as shown below.

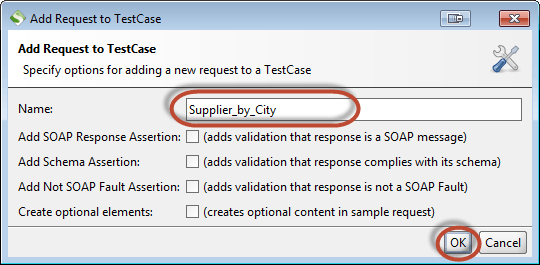
Step 8: Enter the name of the test step. Let us say – Supplier_by_City which would be more meaningful Click ‘OK’.

Step 9: Select the Operation that we would like to validate. In this case it is ‘MedicareSupplierSoap -> GetSupplierByCity’. Click ‘OK’.

Step 10: Enter the Name of the test case and click ‘OK’.
Step 11: The Request XML Outline would be displayed as shown below.
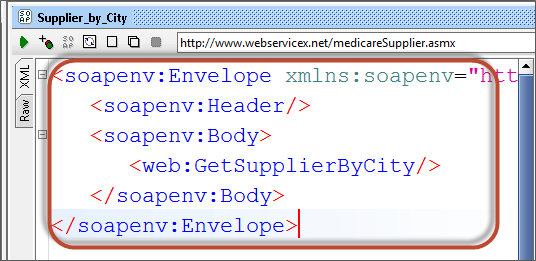
Step 12: Now let us find all supplier information for the ‘New York’ City.
To do so, add the following lines to your code.
<GetSupplierByCity xmlns="http://www.webservicex.net/">

<City>New York</City>

</GetSupplierByCity>
WSDL in the below URL – http://www.webservicex.net/medicareSupplier.asmx?op=GetSupplierByCity

Step 13: Upon executing the test, we receive the below response

Step 14: Let us say we need to Validate all the Supplier Number. We can’t use XPath Assertion as we need to have hundreds of XPath Assertion. Hence the usage of XQuery is inevitable in this case.
XQuery Assertion helps us to validate a group of XML response which are repetitive in nature.

Step 15: Now click on ‘Add an assertion’,
- Select the ‘Assertion Category’ – Property Content in this case.
- Select the Assertion Type as ‘XQuery Assertion’
- Click ‘Add’.

Step 16: Similar to XPath Assertion we need to declare the namespace.
- Click ‘Declare’ Button to automatically allow SoapUI to declare the namespace. Upon clicking on declare button a ‘POP up’ with the message ‘declare namespace from schema instead’ will be displayed to the user. Click ‘Yes’ to proceed as shown below.
- For retrieving all the Supplier Number, We need to write an XPath Query and we will place it within < SupplierNumber> and </ SupplierNumber> Tags.
- Click ‘Select from the Current’ which will execute from the current response.
- Upon Clicking ‘Select from the Current’, All the Supplier Number are listed.
- Click ‘Save’.

Note: Upon hitting ‘Declare button’ you might end up with different URL’s as namespace declaration, however, the actual web service location namespace is what would be considered for coding.
The finished XQuery expression, with its namespace declarations, looks like this.
// Namespace declaration declare namespace soap='http://schemas.xmlsoap.org/soap/envelope/'; declare namespace ns1='http://www.webservicex.net/'; declare namespace x = ''; // Placing the result in Myresult Tags{ // Iterating through all the supplier number for $x in //ns1:GetSupplierByCityResponse/ns1:SupplierDataLists/ns1:SupplierDatas/ns1:SupplierData //Return all the Supplier number within ‘SupplierNumber’ Tags. return {data($x/ns1:SupplierNumber)} }

Step 17: XQuery Assertion is executed and displays the final result in the ‘Assertion’ Panel as shown below. Now we have successfully added an XQuery assertion using which we have validated all the supplier Number information. The same would be compared against the actuals, every time the request is sent to the webserver.
Note: The actual values won’t be displayed. If all actual values are same as that of the expected values, then it displays VALID else it will display ‘Failed’.

When To Use Inbuilt Assertion?
With both the point-and-click and the scripted options covered, the practical question is which one to reach for.
- When a Response is short such that it can be validated using one of those inbuilt assertions.
- We can also use Inbuilt Assertion if the response sent from the web server is always static in nature. If it is dynamic, we will not be able to assert it using inbuilt assertions.
- When usage of inbuilt assertions such as Time out assertions and security assertions becomes inevitable.
- Inbuilt Assertions holds good pretty well for one-time usage where tests need not be repeated.
Assertions Options
The created assertions can be best controlled with the help of control panel that is highlighted below.

The created assertions allow testers to configure following things from the assertions toolbox.
| Option | Description |
 |
The selected Assertion moves up the order. |
 |
The selected Assertion moves down the order. |
 |
Removes the Selected Assertion |
 |
Re-configure/Edit the selected Assertion. |
Below are the features available exclusively in the Pro version of SoapUI, now shipped as ReadyAPI. The Pro version also helps us to Group assertions so that we can add one more layer of validation to the created assertions.
- AND: All assertions are evaluated as VALID assertion which will result in PASSED group condition.
- OR: At least one of the assertions within the group must be VALID in order to assert a group PASSED condition.
- Pro Version also allows Cloning of Assertions: This option lets testers to allow copying an assertion to a different test step in the same or a different project.
- Disable/Enable Assertions: This option allows any grouped or ungrouped assertion to be disabled or enabled. If an assertion is disabled, it is grayed out and when a test case is executed, disabled assertions won’t be executed.
- Ungroup Assertions: Any grouped assertions can be ungrouped if testers decide to do so.
Complete List of Methods available in various assertion types
The table below collects every assertion discussed above, grouped by the category it appears under in the Add Assertion dialog.
| Asserting Mechanism | Description |
| PROPERTY CONTENT | |
| Contains | Searches for the existence of the specified string. It also supports regular expression. |
| Not Contains | Searches for the Non-existence of the specified string. It also supports regular expression. |
| XPath Match | Uses XPath expression to select the target node and its values. |
| XQuery Match | Uses an XQuery expression to select content from the target property. |
| Compliance, Status, Standards | |
| HTTP Download all resource | Validates the HTML Document after downloading and it holds good to any property containing HTML. |
| Invalid HTTP Status Codes | Verifies if the HTML response contains a status code that is not in the list of defined codes. |
| Not SOAP Fault | Verifies if the last received message is not a SOAP Fault. It is very obvious that it is applicable only for SOAP Test Steps. |
| Schema Compliance | Verifies if the last received message is compliant with the WSDL or WADL standard schema definition. Holds good for SOAP and REST Test Steps. |
| SOAP Fault | Verifies if the last received message is a SOAP Fault. It is the inverse of ‘NOT SOAP’ Fault Assertions. |
| SOAP Response | Verifies if the last received response is a valid SOAP Response and holds good for SOAP Test Request Steps only. |
| Valid HTTP Status Codes | Verifies if the HTML response contains a status code that is in the list of defined codes. It is the inverse of ‘Invalid HTTP Status Codes’ Assertion. |
| WS-Addressing Request | Verifies if the last received request contains appropriate WS-Addressing Headers. |
| WS-Addressing Response | Verifies if the last received response contains appropriate WS-Addressing Headers. |
| WS-Security Status | Validates if the last received message contains valid WS-Security headers and holds good only for SOAP Requests. |
| Script | |
| Script Assertion | Allows users to execute a custom script to perform user defined validations. |
| SLA | |
| Response SLA | Validates if the response time of the last received response was within the defined limit. |
| JMS | |
| JMS Status | Verifies if the JMS request of the Test Step has executed successfully and holds good for Test Steps with a JMS endpoint. |
| JMS Timeout | Verifies if that the JMS response of a test step did not took longer than the specified duration. |
| Security | |
| Sensitive Information Exposure | Verifies if the response message does not expose sensitive information about the target system. We can use this assertion for REST, SOAP and HTTP Test Steps. |
DOWNLOAD THE SOAPUI PROJECT CONTAINING ABOVE ASSERTIONS
Common Errors and Trouble Shooting
Most assertion failures trace back to a small set of mistakes, so check these before rewriting an expression.
- Use the correct namespace. The namespace should be the URL where the web service is located.
- If an error thrown while developing a scripting assertion, use ‘log.info’ to print the contents of the variables.
- If you haven’t got the desired output, verify if a valid input is passed in the request.
For example, in currency converter, if you input the ‘intA’ as ‘x’ which is not integer, the output throws a fault code as ‘SOAP-Client’ which means that the issue is with the parameter that is being passed from the client side. The request carrying the invalid value is shown first.
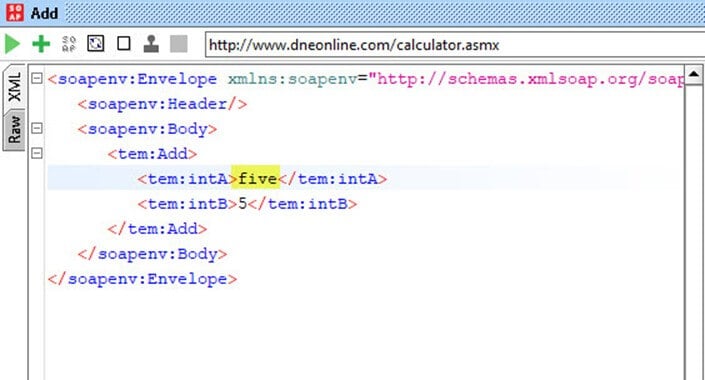
The response returns the fault code instead of a result, as shown below.

Ensure that you use the correct syntax while using XPath and XQuery assertion. You should NOT use dot(.) instead of colon(:) while using the above assertion. The Syntax is //namespace:Tagname and NOT //namespace.tagname. By doing so, you might end up having a message that ‘NO match in current response’ even though the tag name is correct.