
How to create Test Suite & Test Case in SoapUI
 Editorial Team
⚡ Smart Summary
Creating a SoapUI Project, Test Suite, and Test Case enables structured SOAP web service testing. This walkthrough explains SOAP protocol fundamentals, WSDL import, request execution, assertion setup, and response log analysis for reliable functional and regression testing.
Understanding the SOAP Protocol
Before creating a SoapUI Test Case, it helps to revisit the basics of the SOAP protocol. A clear grasp of how SOAP requests and responses move between systems makes it easier to use SoapUI for testing them effectively.
SOAP stands for Simple Object Access Protocol. Below are the core properties of the SOAP protocol:
- It is an XML-based protocol used to communicate between two different systems.
- It is platform and language independent. A system developed using Java can communicate with one developed in .NET.
- SOAP requests and responses are transported via HTTP.
Learn the SOAP Message Format
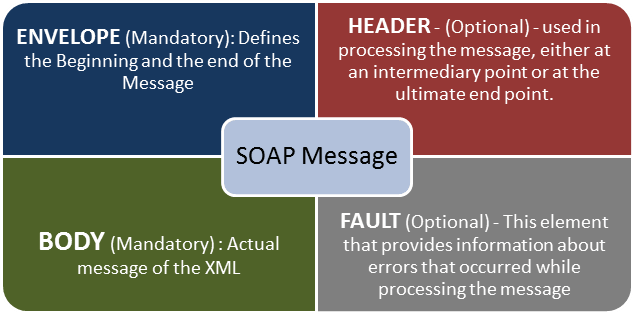
A SOAP message is an ordinary XML document containing the following elements. A message can be either a request or a response.
With the SOAP fundamentals in place, the next step is to build the SoapUI project structure, test suites, and test cases needed to validate a given web service. The walkthrough below uses a SoapUI project example to create a new SOAP project.
Creating a SOAP Project in SoapUI
The SOAP Project holds the imported WSDL definition along with all generated sample requests for each operation.
Step 1: Depending on the project type, import the SOAP or REST protocol. In this example, create a new SOAP Project.

Step 2: Use the following SOAP request URL: http://www.dneonline.com/calculator.asmx?wsdl
- Enter the Project Name.
- Enter the path of the WSDL request (in this case, http://www.dneonline.com/calculator.asmx?wsdl).
- Click OK.

Note:
- Create sample request for all operations: Generates a sample request for every operation in the WSDL. Enabled by default when the WSDL address is entered; may be unchecked if not required.
- Create a Test Suite for the imported WSDL: Adds a SoapUI Test Suite within the project for the imported WSDL.
- Relative Paths: Saves all files relative to the project file for easy portability.
Step 3: After creating the SOAP project with the above WSDL, two operations will be imported into the project.

Step 4: Expand the first request, right-click Add, then click New Request.

Then click OK. The SOAP request displays in XML format.

- Enter values for intA and intB.
- Click the Submit button.
- The response XML appears in the right-side pane.

Why Create Test Cases Instead of Direct Requests?
It is possible to send a request for one operation directly, but that approach quickly hits limits when multiple input combinations must be tested. For example, switching from 5+5 to 4+4 requires editing the request each time. A Test Suite with Test Cases makes it possible to keep every scenario reusable without altering the original operation.
How to Create a Test Suite in SoapUI
A Test Suite is a container that groups related Test Cases. Follow the steps below to create one.
Step 1) Right-click on the root of the project.
Within the project, create a Test Suite by right-clicking on the project root.

Step 2) Enter the Test Suite details.
Enter the Test Suite name and click OK.

Step 3) Verify the created Test Suite.
The new Test Suite appears in the navigator pane as shown below.

Step 4) Open the Test Suite.
The Test Suite window opens in the right pane. Because no Test Cases exist yet, all action options remain disabled.

How to Create a Test Case in SoapUI
Test Cases live inside a Test Suite and group the individual test steps that exercise a web service.
Step 1: Within a Test Suite, create multiple tests by right-clicking the Test Suite and choosing New TestCase.
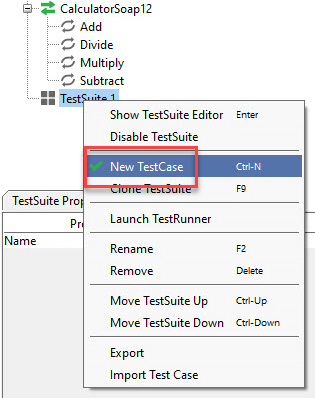
Step 2: Specify the name of the Test Case and click OK.

Step 3: The created Test Case has zero steps initially, as shown below.

Note: The Test Case is added with zero test steps for every test type. As steps are added, the numbers in the brackets update automatically.
Functional test steps belong in Test Steps, performance steps go into Load Test, and security checks live under Security Tests.
Step 4: Insert different test step types by right-clicking Test Steps and selecting the appropriate option. For a REST web service, select the REST Test Request instead of a SOAP request.

Adding a Test Step in SoapUI
Add a test step to validate the imported SOAP request inside the Test Case.
Step 1: Add a new step of type SOAP Request as shown below.
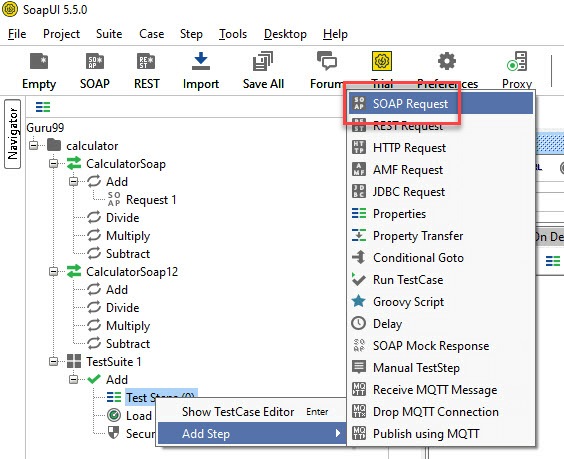
Step 2: Enter the step name and click OK.

Step 3: A dialog appears to select the operation to invoke. All available operations are listed for selection.
- Many operations appear here. The operations are identical apart from the SOAP version: CalculatorSoap uses SOAP version 1.1, while CalculatorSoap12 uses SOAP version 1.2.
- The version does not matter in this scenario, so either may be selected.

- After selecting the operation, click OK.


Step 4: While adding a Test Case, standard assertions can be applied. Assertions, also called checkpoints or validation points, are covered in the next tutorial.
The following checkpoints can be added while creating a Test Case. The example below creates a Test Case without any validation points enabled.
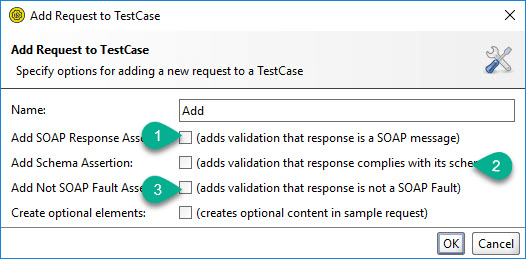
- Verifies whether the response message is SOAP after the test runs.
- Verifies whether the response schema is valid.
- Verifies whether the SOAP response contains a FAULT element.
Step 5: When the Test Case is created, the request XML appears as shown below. The structure of the XML is explained in the snapshot.

Step 6: The test step count is now incremented to one because one step has been added. Adding load and security test steps will increment their respective counters automatically.

Sending a Request Manually and Reading the Response in SoapUI
Step 1: The example below adds two integer numbers.
- intA — 5
- intB — 5
Next:
- Enter these inputs in place of the question marks in the request XML.
- After updating the corresponding XML tags, click Submit Request to check the response.

Step 2: After the request is submitted, the web service is processed by the web server and the response is returned, as shown below.
The response confirms 5 plus 5 equals 10.

Understanding the SOAP Response and Log Panels
As noted earlier, SOAP messages are transported via HTTP. Inspecting the RAW messages helps clarify how the SOAP request and response are carried over HTTP.
Step 1: Click the RAW tab in the SoapUI request window.
- The request is posted to the web server, so the HTTP POST method is used.
- The SOAP request travels in the body of the HTTP message.

Step 2: Now click the RAW tab in the SoapUI response window to understand how the response is delivered via HTTP.
- After the request is processed, the HTTP response code (200) is shown, indicating success.
- The SOAP response is returned to the client inside the body of the HTTP message.

The table below summarizes common HTTP response codes for quick debugging.
| HTTP Code | Description |
|---|---|
| 1xx | Informational: Request received, processing continues. |
| 2xx | Success: Action successfully received, understood, and accepted. |
| 3xx | Redirection: Further action is required to complete the request. |
| 4xx | Client Error: Request contains bad syntax or cannot be fulfilled. |
| 5xx | Server Error: Server failed to fulfil an apparently valid request. |
Step 3: The Test Case window also displays additional metadata for the request and response.

- Indicates NO header in the request being sent.
- Indicates NO attachments in the request being sent to the web server.
- Indicates 10 header items in the response, viewable on click.
- Indicates no attachments in the response message.
Logs Pane
The Logs Pane shows the complete information exchanged between the client and server. The most commonly used log tabs are described below.

SoapUI Log: Displays response information from the web server. The same data is stored in the soapui.log file inside the SoapUI bin directory.

HTTP Log: Displays all HTTP packet transfers. All information visible in the RAW view is also captured in the HTTP Log.

Error Log: Displays all errors encountered during the entire project session. The same information is stored in soapui-errors.log inside the SoapUI bin directory.
Memory Log: Monitors memory consumption and displays it as a chart. This is useful when running memory-intensive operations.

With a Test Suite, Test Case, and Test Step in place and a successful response received, the next step is validating the response. Assertion types are covered in the next tutorial.
