SOAPUI Download & Install on Windows
⚡ Smart Summary
SOAPUI Download, Install, and Configuration on Windows covers the open source release end to end. The walkthrough explains hardware prerequisites, installer options like Hermes JS and tutorials, workspace creation, and HTTP, WSDL, and UI preferences for reliable web service testing.
SOAPUI Download, Install, and Configuration Overview
This walkthrough demonstrates the steps to download, install, and configure SOAP UI (Open Source Version) on a Windows machine. The same procedure applies to other operating systems with minor changes to the installer.
The table-style overview image below summarizes the supported platforms and hardware requirements.

The following roadmap diagram summarizes the installation process at a glance.

Part A: Downloading SOAP UI
Start by downloading the appropriate installer for the target operating system from the official SoapUI website.
- Navigate to https://www.soapui.org/downloads/latest-release/.
- Scroll down and select the installer that matches the operating system. This tutorial installs SOAP UI on a 64-bit Microsoft Windows system.

- After clicking Download, the browser is forwarded to https://www.soapui.org/downloads/thank-you-for-downloading-soapui/ and the installer download begins automatically.

Part B: Installing SOAP UI on Windows
With the installer downloaded, run it as Administrator and follow the setup wizard.
Step 1: After downloading, run the file as Administrator as shown below.

Step 2: In the setup wizard, click Next to continue.

Step 3: Choose the installation directory or accept the default.

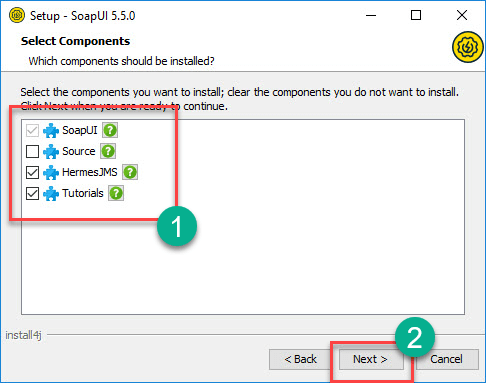
Step 4: Choose the components to install.
- SOAP UI: Checked by default and not user configurable.
- Source: Enable to access the SOAP UI source code. This walkthrough leaves it unchecked.
- Hermes JS: Enable when the application requires JMS testing.
- Tutorial: Enable to install SOAP UI tutorials after installation.
Step 5: Accept the license agreement and click Next.

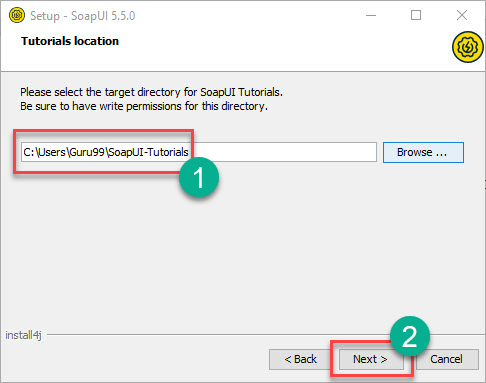
Step 6: Choose the folder location for tutorials or accept the default, then click Next.
Step 7: Choose the Start Menu folder or accept the default, then click Next.

Step 8: Tick Create a desktop icon and click Next.

Step 9: The installation starts. When complete, the wizard displays the status below. Click Finish.

Step 10: After clicking Finish, SOAP UI launches automatically.

The main interface includes:
- Menu Bar
- Quick Access Toolbar
- Project Navigation Area
- Workspace Properties
- Log Area
Part C: Configuring SOAP UI
With SOAP UI installed, the next stage is to create a workspace and become familiar with the project hierarchy.
The structure below is the basis for all testing work in SOAP UI:
- The first step in SOAP UI is to create a workspace. Several projects can belong to one workspace, and users can create more than one workspace. The Pro version supports switching environments to map to different endpoints.
- Each project can contain several Test Suites.
- Each Test Suite can contain several Test Cases.
- Each Test Case can contain several Test Steps.
Below is a visual representation of the workspace structure in SOAP UI.

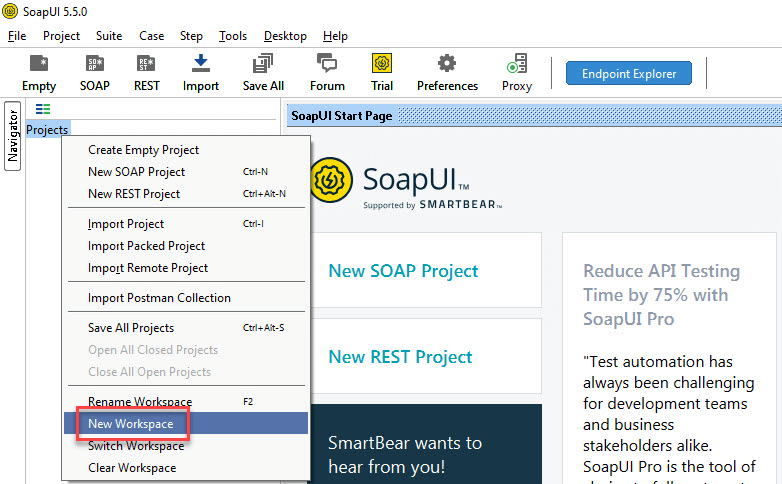
Step 1: Create a workspace as shown below. All artifacts created from this point belong to this workspace.
Step 2: Enter a name for the workspace and click OK.

Step 3: Select the path where the workspace XML file should be saved.
- Choose the directory for the workspace.
- Set the workspace XML file name. This file is opened later when reloading the workspace.
- Click Save.

Step 4: The workspace is created as shown below. Workspace properties can also be accessed under the Workspace Properties tab.

SOAP UI is now downloaded, installed, and configured, so testing work can begin.
Basic GUI Navigation in SOAP UI
Understanding the most frequently used menus inside SOAP UI is essential for navigating quickly on real projects. The sections below cover the File menu, Preferences, and Help menu.
File Menu

- New SOAP Project creates a project by importing a SOAP request.
- New REST Project creates a project by importing a REST request.
- Import Project loads an entire project by locating its XML file.
- Save All Projects saves all open projects in a single click.
- Close All Open Projects closes every project in the workspace.
- Rename Workspace renames the current workspace.
- Switch Workspace switches between workspaces.
- Preferences opens the SOAP UI customization dialog. Details follow below.
- Save Preferences saves customized settings so the next SOAP UI session loads them automatically.
File > Preferences > HTTP Settings
The HTTP Settings section controls how SOAP UI communicates over HTTP.

- Sets the HTTP version used for request and response.
- User-Agent Header can be predefined here. If left empty, the default HTTP client header is used.
- Specifies the compression method: gzip, deflate, or none.
- If checked, allows compressed responses from hosts.
- If checked, disables decompression of compressed responses.
- If checked, closes the HTTP connection after each SOAP request.
- If checked, allows authentication information to be specified for outgoing requests.
- Restricts the maximum number of bytes read from a response. Zero means unlimited.
File > Preferences > WSDL Settings
WSDL Settings control caching and example generation behavior.

- Cache WSDLs turns WSDL caching on or off.
- Generates example values inside requests.
- Always includes optional elements in generated requests.
- Prints response messages in the response editor.
- Specifies a directory containing schema (.xsd) files for WSDL request validation. Changes here require a SOAP UI restart.
- Sets the minimum message size to compress inside the SoapUI project file.
File > Preferences > UI Settings
UI Settings tune the SOAP UI startup behavior and visual experience.

- Closes all projects on launch to improve startup time and reduce memory usage.
- Displays descriptions whenever available.
- Automatically saves all projects when exiting SOAP UI.
- Creates a backup of the project before saving. If enabled, a backup folder path is required.
- Displays and expands the log tabs at startup.
- Displays the Start Up page dialog at launch.
- Disables tool tips when hovering over options.
Help Menu
The Help menu provides quick access to documentation, updates, and version information.

- Shows the home page of the online help at www.soapui.org.
- Allows registered users to post questions in the community forum.
- Checks for the latest updates and installs them if available.
- Opens the SOAP UI home page at www.soapui.org.
- Displays the build and version information of SOAP UI.
Upcoming tutorials cover how to create Test Suites, Test Cases, and Test Steps, plus how to send and validate SOAP requests.