
Database Testing Using Selenium and JDBC: How to Connect?
 Krishna Rungta
⚡ Smart Summary
Database testing using Selenium relies on JDBC, because WebDriver itself validates only the browser layer. These steps show how to open a MySQL connection, run SQL, read a ResultSet, and verify stored data.
Database Connection in Selenium
Selenium Webdriver is limited to Testing your applications using Browser. To use Selenium Webdriver for Database Verification you need to use the JDBC (“Java Database Connectivity”).
JDBC (Java Database Connectivity) is a SQL level API that allows you to execute SQL statements. It is responsible for the connectivity between the Java Programming language and a wide range of databases. The JDBC API provides the following classes and interfaces
- Driver Manager
- Driver
- Connection
- Statement
- ResultSet
- SQLException
How to Connect Database in Selenium
In order to test your Database using Selenium, you need to observe the following 3 steps

Step 1) Make a connection to the Database
In order to make a connection to the database the syntax is
DriverManager.getConnection(URL, "userid", "password" )
Here,
- Userid is the username configured in the database
- Password of the configured user
- URL is of format jdbc:< dbtype>://ipaddress:portnumber/db_name”
- <dbtype>- The driver for the database you are trying to connect. To connect to oracle database this value will be “oracle”. For connecting to database with name “emp” in MYSQL URL will be jdbc:mysql://localhost:3036/emp
And the code to create connection looks like
Connection con = DriverManager.getConnection(dbUrl,username,password);
You also need to load the JDBC Driver using the code
Class.forName("com.mysql.jdbc.Driver");
Step 2) Send Queries to the Database
Once connection is made, you need to execute queries.
You can use the Statement Object to send queries.
Statement stmt = con.createStatement();
Once the statement object is created use the executeQuery method to execute the SQL queries
stmt.executeQuery(select * from employee;);
Step 3) Process the results
Results from the executed query are stored in the ResultSet Object.
Java provides loads of advance methods to process the results. Few of the methods are listed below

Example of Database Testing with Selenium
Step 1) Install MySQL Server and MySQL Workbench
Check out the complete guide to Mysql & Mysql Workbench here
While installing MySQL Server, please note the database
- Username
- Password
- Port Number
It will be required in further steps.
MySQL Workbench makes it easy to administer the database without the need to code SQL. Though, you can also use the MySQL Terminal to interact with the database.
Step 2) In MySQL WorkBench, connect to your MySQL Server

In the next screen,
- Select Local Instance of MySQL
- Enter Port Number
- Enter Username
- Enter Password
- Click OK

Step 3) To Create Database,
- Click create Schema Button
- Enter Name of Schema/Database
- Click Apply

Step 4) In the navigator menu,
- Click on Tables, beneath the emp database
- Enter Table name as employee
- Enter Fields as Name and Age
- Click Apply
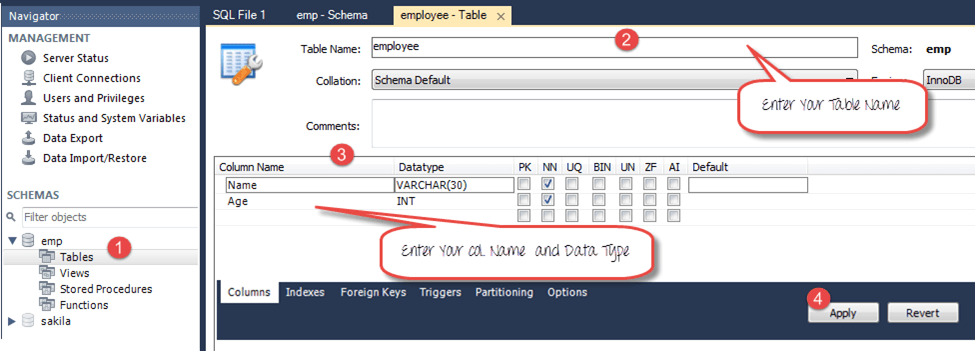
You will see the following pop-up. Click Apply

Step 5) We will create following data
| Name | Age |
|---|---|
| Top | 25 |
| Nick | 36 |
| Bill | 47 |
To create data into the Table
- In navigator, select the employee table
- In right pane, click Form Editor
- Enter Name and Age
- Click Apply

Repeat the process until all data is created

Step 6) Download the MySQL JDBC connector here
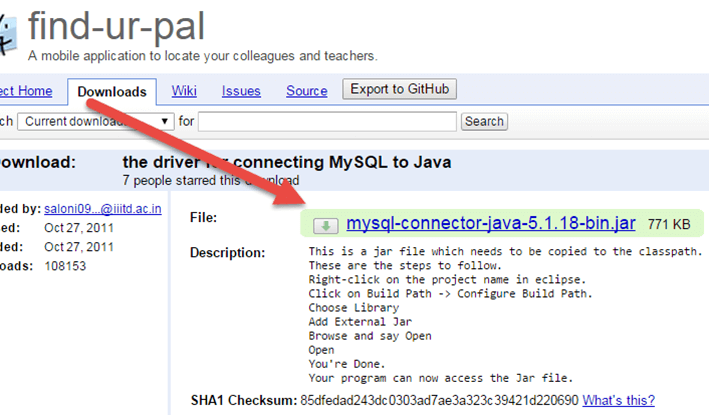
Step 7) Add the downloaded Jar to your Project
- Right click on your Java File. Then click on Build Path à Configure build path
- Select the libraries
- Click on add external JARs
- You can see MySQL connector java in your library
- Click on open to add it to the project

Step 8) Copy the following code into the editor
Package  htmldriver;
import  java.sql.Connection;
import  java.sql.Statement;
import  java.sql.ResultSet;
import  java.sql.DriverManager;
import  java.sql.SQLException;
public class  SQLConnector {
    	public static void  main(String[] args) throws  ClassNotFoundException, SQLException {
				//Connection URL Syntax: "jdbc:mysql://ipaddress:portnumber/db_name"
                String dbUrl = "jdbc:mysql://localhost:3036/emp";

				//Database Username
				String username = "root";

				//Database Password
				String password = "guru99";

				//Query to Execute
				String query = "select *  from employee;";

         	    //Load mysql jdbc driver
           	    Class.forName("com.mysql.jdbc.Driver");

           		//Create Connection to DB
            	Connection con = DriverManager.getConnection(dbUrl,username,password);

          		//Create Statement Object
        	   Statement stmt = con.createStatement();

       			// Execute the SQL Query. Store results in ResultSet
         		ResultSet rs= stmt.executeQuery(query);

         		// While Loop to iterate through all data and print results
				while (rs.next()){
			        		String myName = rs.getString(1);
                            String myAge = rs.getString(2);
                            System. out.println(myName+"  "+myAge);
                    }
      			 // closing DB Connection
      			con.close();
		}
}
Step 9) Execute the code, and check the output

The same steps apply to any relational engine.
JDBC Drivers and Connection Strings for Popular Databases
MySQL is only one option. The JDBC pattern stays identical across engines: the imports, the Statement call, and the ResultSet loop do not change. Only the driver artifact and the URL differ, so use the table below when the application under test runs on another database.
| Database | Driver class | Sample connection URL | Default port |
|---|---|---|---|
| MySQL | com.mysql.cj.jdbc.Driver | jdbc:mysql://localhost:3306/emp | 3306 |
| PostgreSQL | org.postgresql.Driver | jdbc:postgresql://localhost:5432/emp | 5432 |
| Oracle | oracle.jdbc.OracleDriver | jdbc:oracle:thin:@localhost:1521:orcl | 1521 |
| SQL Server | com.microsoft.sqlserver.jdbc.SQLServerDriver | jdbc:sqlserver://localhost:1433;databaseName=emp | 1433 |
Port numbers cause most first-time failures. A connection refused error almost always means the port in the URL does not match the port the server actually listens on. Check your server configuration before assuming the default.
Each driver ships as a single JAR that you add to the build path exactly as shown in Step 7. Every engine listed above registers itself automatically, so no Class.forName line is required. That means a single helper method can serve every environment your suite targets.
