
VB.Net TEXTBOX Control Tutorial: Properties with Example
 Editorial Team
⚡ Smart Summary
TextBox controls in VB.Net accept user input on a Windows Form and expose properties like Multiline, PasswordChar, MaxLength, and ReadOnly to shape how text is entered, hidden, limited, or locked at runtime.

What is TextBox Control?
The TextBox Control allows you to enter text on your form during runtime. The default setting is that it will accept only one line of text, but you can modify it to accept multiple lines. You can even include scroll bars into your TextBox Control.
TextBox Properties
The following are the most common properties of the Visual Basic TextBox control:
- TextAlign– for setting text alignment
- ScrollBars– for adding scrollbars, both vertical and horizontal
- Multiline– to set the TextBox Control to allow multiple lines
- MaxLength– for specifying the maximum character number the TextBox Control will accept
- Index– for specifying the index of control array
- Enabled– for enabling the textbox control
- Readonly– if set to true, you will be able to use the TextBox Control, if set to false, you will not be able to use the TextBox Control.
- SelectionStart– for setting or getting the starting point for the TextBox Control.
- SelectionLength– for setting or getting the number of characters that have been selected in the TextBox Control.
- SelectedText– returns the TextBox Control that is currently selected.
TextBox Events
The purpose of events is to make the TextBox Control respond to user actions such as a click, a double click or change in text alignment. Here are the common events for the TextBox Control:
- AutoSizeChanged– Triggered by a change in the AutoSize property.
- ReadOnlyChanged– Triggered by a change of the ReadOnly property value.
- Click– Triggered by a click on the TextBox Control.
How to Create a TextBox
Follow these steps to add your first TextBox control to a Windows Form and display a greeting message at runtime.
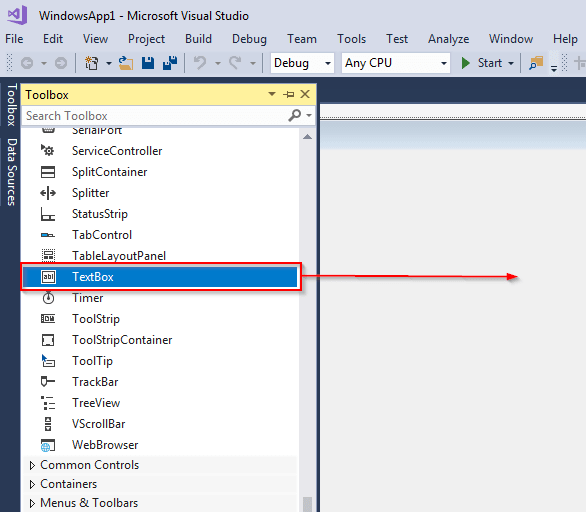
Step 1) To create a TextBox, drag the TextBox control from the toolbox into the Windows Form:
Step 2)
- Click the TextBox Control that you have added to the form.
- Move to the Properties section located on the bottom left of the screen. Change the name of the text box from TextBox1 to HelloTextBox:

Step 3) Add the following code to add text to the control:
Private Sub Form1_Load(sender As Object, e As EventArgs) Handles MyBase.Load
        'Add text to the control
         HelloTextBox.Text = "Hello. Welcome to Guru99!"
  End Sub
Step 4) You can now run the code by clicking the Start button located at the top bar:

Step 5) You should get the following form:

Here is a screenshot of the complete code for the above:

Explanation of code:
- Creating a public class named Form1.
- Creating a sub procedure named Form1_Load. It will be called when the form is loaded.
- A comment. The VB.Net compiler will skip this.
- End the sub-procedure.
- End the class.
PasswordChar Property
Sometimes, you want a text box to be used for typing a password. This means that whatever is typed into that text box must remain confidential. This is possible with VB.Net. It can be done using the PasswordChar property which allows us to use any character that you want. Let us demonstrate this using an example:
Begin by creating a new project. Drag two TextBox Controls, two Labels, and one Button into the form. Change the texts on the two labels and the button to the following:

Click the text box next to Username label, move to the Properties section located at the bottom left of the window. Give it the name UsernameField.

Do the same for the TextBox Control next to Password label, giving it the name PasswordField.

You should now make the PasswordField TextBox Control show * for each character typed in it. Add the following code:
Private Sub PasswordField_TextChanged(sender As Object, e As EventArgs) Handles PasswordField.TextChanged
       PasswordField.PasswordChar = "*"
End Sub
Now, run the code by clicking the Start button. A form will popup.
Type the username and the password and observe what happens. You should see the following:
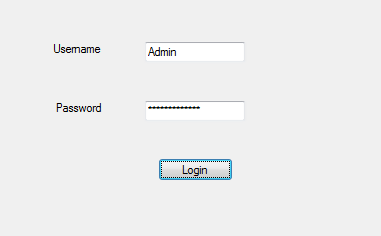
The username is shown, but the password has been hidden. Here is the code for the above:

Explanation of code:
- Creating a class named Form1.
- Creating a sub-procedure named PasswordField_TextChanged(). It will be called when the form is loaded.
- Using the PasswordChar property to show * as a user types the password.
- Ending the sub-procedure.
- Ending the class.
Newline in TextBox
By default, you can only create one line of text in a text box. There are two ways through which we can achieve this. Let us discuss them.
Drag and drop a TextBox Control to your form. Give the control the name GuruWelcome.

Click the text box control again and move the mouse cursor to the Properties section. Change the value of Multiline property to True.

Alternatively, you can set the Multiline property to true in your code as follows:
GuruWelcome.Multiline = True
Add the following code:
 Private Sub Form1_Load(sender As Object, e As EventArgs) Handles MyBase.Load

        GuruWelcome.Multiline = True

        GuruWelcome.Text = "Line 1"

        GuruWelcome.Text = GuruWelcome.Text & ControlChars.NewLine & "Line 2"

    End Sub
Upon execution, the two lines of text will be separated.

Explanation of Code:
- Creating a class named Form1.
- Creating a sub-routine named Form1_Load().
- Setting the Multiline property to True. The textbox will be able to take more than one line.
- Adding the first line of text to the text box.
- Adding the second line of text to the text box. The ControlChars.NewLine property helps us split the two lines.
- Ending the sub-routine.
- Ending the class.
Retrieving Integer Values
VB.Net treats everything as a string. This means that you read an integer from the text box as a string, then you convert it into an integer. This is normally done using the Integer.Parse() method.
To demonstrate this, create a new text box control plus a button. Give the text box the name age. Give the button the name Button1. You should have the following interface:

Add the following code:
Private Sub Button1_Click(sender As Object, e As EventArgs) Handles Button1.Click
        Dim x As Integer
        x = Integer.Parse(age.Text)
        MessageBox.Show(x)
Run the code, and enter your age into the text box. Click the Show Age button. You should see the following:

The value you enter is returned in a MessageBox.

Explanation of Code:
- Creating a class named Form1.
- Creating a sub-procedure named Button1_Click. It will be called when the button is clicked.
- Defining an integer variable named x.
- Converting the value read from the textbox named age into an integer.
- Displaying the value converted in the above step in a MessageBox.
- Ending the sub-procedure.
ReadOnly TextBox
You can make a textbox readonly. This means that the user will not be able to modify the value displayed within the textbox. To do this, you set the ReadOnly property to True. To demonstrate this, create a new textbox and give it the name guru99. Add the following code:
Private Sub guru99_TextChanged(sender As Object, e As EventArgs) Handles guru99.TextChanged

        guru99.Text = "welcome to Guru99"

        guru99.ReadOnly = True

    End Sub
The code should return the following:

Here is the code:

Explanation of Code:
- Creating a class named Form1.
- Creating a subroutine named guru99_TextChanged.
- Adding text to the textbox named guru99.
- Setting the ReadOnly property of the textbox to True. This makes the text on the textbox unmodifiable.
- Ending the sub-procedure.
- Ending the class.
MaxLength Property
The MaxLength property can help you set the maximum number of words or characters that the textbox will allow. To demonstrate this, create a TextBox control and give it the name fullName. Add the following code:
Private Sub fullName_TextChanged(sender As Object, e As EventArgs) Handles fullName.TextChanged

        fullName.MaxLength = 8

    End Sub
Run the code and try to type your full name. You will not be able to type more than 8 characters, with whitespace included:

The code:

Code Explanation:
- Creating a class named Form1.
- Creating a sub-procedure named fullName_TextChanged.
- Making the fullName textbox accept a maximum of only 8 characters.
- Ending the sub-procedure.
- Ending the class.
