VB.Net Arrays: String, Dynamic with EXAMPLES
⚡ Smart Summary
VB.Net arrays store multiple values of the same data type under one variable name, using an index that begins at zero. Both fixed-size and dynamic arrays are supported, and the Split and Join functions convert between strings and arrays.
What is an Array?
An array is a data structure used to store elements of the same data type. The elements are ordered sequentially with the first element being at index 0 and the last element at index n-1, where n is the total number of elements in the array.
How to Declare and Initialize an Array
In VB.Net, arrays are declared using the Dim statement. For example:
Dim myData() As Integer
In the above example, we have defined an array named myData, and it should hold elements of the integer data type. The following example demonstrates how we can declare an array to hold string elements:
Dim myData(10) As String
We have defined an array named myData to hold 10 strings.
We can initialize arrays at the time of their declaration. For example:
Dim myData() As Integer = {11, 12, 22, 7, 47, 32}
We have declared the array myData and added 6 integer elements to it. This can also be done for the case of strings:
Dim students() As String = {"John", "Alice", "Antony", "Gloria", "jayden"}
We have created an array named students and added 5 names to it.
Arrays in VB.Net fall into two groups depending on whether their size can change after declaration. The first group is the fixed-size array.
Fixed-Size Arrays
A fixed-size array holds a fixed number of elements. This means that you must define the number of elements that it will hold during its definition. Suppose you need an array to hold only 3 student names. You can define and initialize the array as follows:
Dim students(0 to 2) As String

students(0) = "John"
students (1) = "Alice"
students (2) = "Antony"
We began by declaring a string array named students. The 0 to 2 declares that the array will store elements from its index 0 to index 2, meaning we will have 3 elements in total.
To add elements to the array, we have used the array name and specified the index at which the element will be stored. For example, the name John will be stored at index 0 of the array, meaning that it will form the first element of the array. Antony will be the last element of the array.
When the number of elements is not known in advance, a dynamic array becomes the better choice.
Dynamic Arrays
This is an array that can hold any number of elements. The array size can grow at any time. This means that you can add new elements to the array any time we want. To demonstrate this, let us first define an array of integers:
Dim nums() As Integer
We have defined an integer array named nums. You now need to add two elements to the array, while giving room for resizing it. You need to use the ReDim statement as follows:
ReDim nums(1)
nums(0) = 12
nums(1) = 23
Our array now has two elements in indexes 0 and 1. We need to add a third element to it at index 3 while preserving the two element it already has. We can do it as follows:
ReDim Preserve nums(2)
nums(2) = 35
The array now has three elements.
After an array has been populated, the next task is reading back the values it holds.
Retrieving the Contents of an Array
Retrieving means accessing the array elements. To access an array element, we use its index. Let us demonstrate this using an example.
Step 1) Begin by creating a new console application.
Step 2) Add the following code to the application:
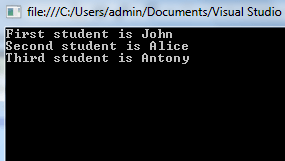
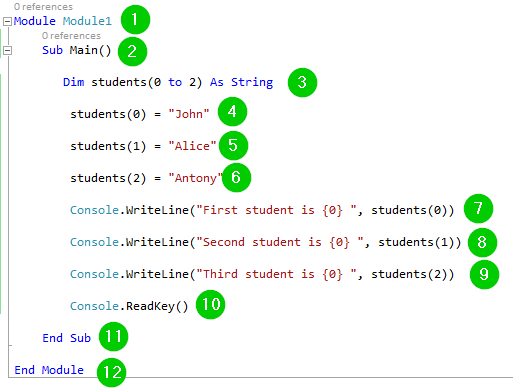
Module Module1
    Sub Main()

       Dim students(0 to 2) As String

        students(0) = "John"

        students(1) = "Alice"

        students(2) = "Antony"

        Console.WriteLine("First student is {0} ", students(0))

        Console.WriteLine("Second student is {0} ", students(1))

        Console.WriteLine("Third student is {0} ", students(2))


        Console.ReadKey()

    End Sub

End Module
Step 3) Run the code by clicking the Start button from the toolbar. You will get the following window:
We have used the following code:
Explanation of Code:
- Creating a module named Module1.
- Creating the main sub-procedure.
- Creating an array named students to store string elements. The array will store elements from index 0 to index 2, which means it will have a total of 3 elements.
- Adding the name John as the first element of the array, that is, John stored at index 0.
- Adding the name Alice as the second element of the array, that is, Alice stored at index 1.
- Adding the name Antony as the third element of the array, that is, Antony stored at index 2.
- Printing some text and the element stored at index 0 of the array students on the console. The students(0) helps us access the element at index 0 of the array named students.
- Printing some text and the element stored at index 1 of the array students on the console. The students(1) helps us access the element at index 1 of the array named students.
- Printing some text and the element stored at index 2 of the array students on the console. The students(2) helps us access the element at index 2 of the array named students.
- Pausing the console window waiting for the user to take action to close it.
- End of the sub-procedure.
- End of the module.
Adding New Elements to an Array
This will only happen if you have a dynamic array. If you had declared a fixed-size dimensional array and it is full of array elements, you cannot add new elements to it. The following example demonstrates how to add new elements to a dynamic array:
Step 1) Begin by creating a new console application.
Step 2) Add the following code to the application:
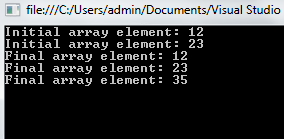
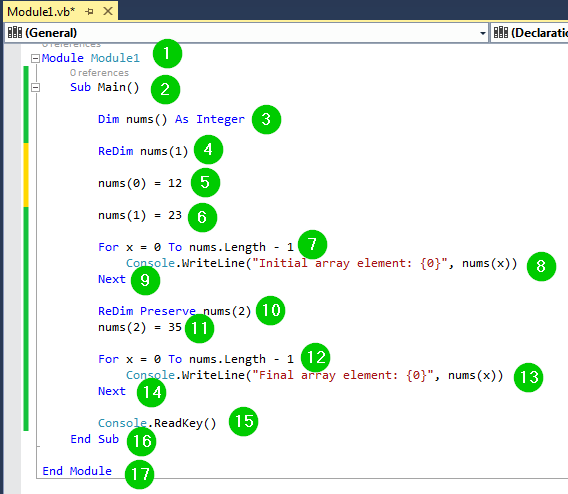
Module Module1
    Sub Main()

        Dim nums() As Integer

        ReDim nums(1)
        nums(0) = 12
        nums(1) = 23

        For x = 0 To nums.Length - 1
            Console.WriteLine("Initial array element: {0}", nums(x))
        Next

        ReDim Preserve nums(2)
        nums(2) = 35

        For x = 0 To nums.Length - 1
            Console.WriteLine("Final array element: {0}", nums(x))
        Next

        Console.ReadKey()
    End Sub

End Module
Step 3) Click the Start button from the toolbar to run the code. You should get the following window:
We have used the following code:
Explanation of Code:
- Creating a module named Module1.
- Creating the main sub-procedure.
- Creating an array named nums to hold integer values.
- Specifying that the above array will store two elements, that is, at index 0 and 1 while allowing room for resizing.
- Adding the element 12 to the index 0 of array nums.
- Adding the element 23 to the index 1 of array nums.
- Using a for loop to create a variable x to help us iterate from the first to the last elements of the array nums. Note that the array now has two elements, 12 and 23.
- Printing some text and the elements of the array on the console.
- Ending the for loop and jumping to the next part of the code.
- Resize the array nums to allow elements at indexes 0 to 2. It will now be able to store 3 elements rather than 2. The Preserve keyword helps us maintain the current elements of the array, that is, 12 and 23.
- Adding the element 35 to index 2 of the array. The array now has three elements, 12, 23 and 35.
- Using a for loop to create a variable x to help us iterate from the first to the last elements of the array nums. Note that the array now has three elements, 12, 23 and 35.
- Printing some text and the elements of the array on the console.
- Ending the for loop and jumping to the next part of the code.
- Pause the console window waiting for the user to take action to close it.
- End of the sub-procedure.
- End of the module.
Deleting an Array
It is recommended that you erase your array after you are done with it, mostly when you are dealing with a dynamic array. This will help you free up some memory space.
To delete an array, you just have to call the Erase statement followed by the name of the array. For example:
Dim nums(1) As Integer
        nums(0) = 12
        nums(1) = 23
Erase nums
We have declared an array of integers named nums and added two elements to it. The Erase nums statement will erase the array.
Beyond storing values, VB.Net provides built-in functions that convert between strings and arrays. The first of these is the Split function.
The Split Function
The split function provided by Visual Basic .NET helps us split a string into parts and keep them in an array. The following example demonstrates how to use this function:
Step 1) Create a new console application.
Step 2) Add the following code to the application:
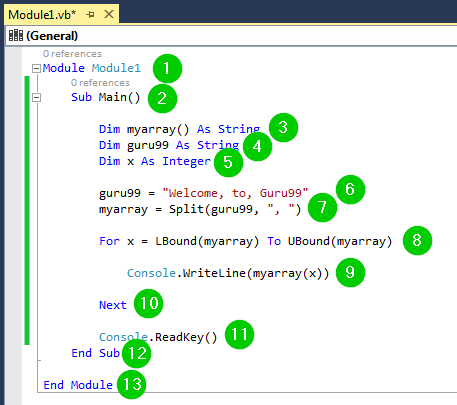
Module Module1
    Sub Main()

        Dim myarray() As String
        Dim guru99 As String
        Dim x As Integer

        guru99 = "Welcome, to, Guru99"
        myarray = Split(guru99, ", ")

        For x = LBound(myarray) To UBound(myarray)

            Console.WriteLine(myarray(x))

        Next

        Console.ReadKey()
    End Sub

End Module
Step 3) Run the code by clicking the Start button from the toolbar. You should get the following window:

We have used the following code:
Explanation of Code:
- Creating a module named Module1.
- Starting the main sub-procedure.
- Creating an array named myarray to hold string values.
- Creating a string variable named guru99.
- Creating an integer variable named x.
- Assigning a string to the variable guru99.
- Splitting the String above into parts and placing them in the array named myarray. The “,” (comma) is the delimiter, hence the split function will use it to mark the end of the various parts of the String.
- Using the variable x to iterate through the array named myarray. The LBound and UBound specify the lower bounds and the upper bounds of the array, respectively.
- Printing the values of the array named myarray on the console.
- Ending the for loop.
The Join Function
The join function helps us join multiple arrays into a single string. The following example demonstrates this:
Step 1) Begin by creating a new console application.
Step 2) Add the following code to the application:
Module Module1
    Sub Main()

        Dim students(0 To 2) As String

        students(0) = "John"

        students(1) = "Alice"

        students(2) = "Antony"

        Dim classmates As String


        classmates = Join(students, ", ")

        Console.WriteLine(classmates)

        Console.ReadKey()
    End Sub

End Module
Step 3) Run the code by clicking the Start button on the toolbar:

We have used the following code:

Explanation of Code:
- Creating a module named Module1.
- Creating the main sub-procedure.
- Creating an array named students to hold 3 string values.
- Adding the name John to the index 0 of the array.
- Adding the name Alice to the index 1 of the array.
- Adding the name Antony to the index 2 of the array.
- Defining a variable named classmates of string data type.
- Joining all the elements of the array students and separating them using a , (comma). The result of this operation will be assigned to the variable classmates.
- Printing the contents of the classmates variable on the console.
- Pausing the console window waiting for the user to take action to close it.
- Ending the main sub-procedure.
- Ending the module.