
How to Print Output Values in QTP/UFT & Exporting Test Results
 Editorial Team
⚡ Smart Summary
Output values in QTP/UFT capture object property data at runtime, store it in the Test Results datasheet, and let testers export or print those results outside Micro Focus UFT for reporting and analysis.
What is the Output Value?
An output value step is a step in which an object property value is captured at a specific point in your test and stored at the desired location. The stored values can be used as input at different points in a test script. Unlike a Checkpoint, this step never validates the captured value; it only stores it, which makes it useful whenever a tester needs reference data instead of a pass or fail result.
For example, an output value step could capture a flight confirmation number generated after booking a ticket in a sample Flight Reservation application, then store that number so a later test step can search for the same booking.
Tip: Use output values whenever reference data is needed for later steps, and reserve checkpoints for real verification that must produce a Pass or Fail result.
Output Value vs Checkpoint in UFT/QTP
Testers often confuse output values with checkpoints because both steps read a property from an object while a test runs. The real difference is what happens to that captured value afterward. A Checkpoint compares the value against an expected value and reports a Pass or Fail status in the Test Results. An output value simply stores the captured value, in the DataTable, a variable, or the results themselves, without judging it in any way. Both step types appear in the Keyword View and generate a corresponding VBScript statement in the Editor, so the choice comes down to whether the test needs verification or simply data capture.
| Aspect | Output Value | Checkpoint |
| Purpose | Capture and store a property value | Verify a property value against an expectation |
| Result | No Pass/Fail status | Pass or Fail status |
| Typical use | Data-driven input, dynamic or unpredictable values | Functional verification of known values |
| Generated statement | Output method | Check method |
This distinction matters most in data-driven testing, where a value captured in one iteration of the test becomes the input for the next, or when capturing dynamic data such as order numbers and timestamps that have no fixed expected value to check against.
Types of Output Values in Micro Focus UFT
Micro Focus UFT groups output values into four categories, each suited to a different kind of object or data source:
- Standard output value
- Text /Text Area output value
- Database output value
- XML output value (from application/resources)
Creating an Output Value is very similar to creating a Checkpoint. A Standard output value can be used on any object to output any of its properties. You can select one or many properties from the same object as output. Choosing among the four types depends on the object under test: Standard output values fit ordinary UI controls, while the other three types fit text regions, databases, and XML sources respectively.
During run time, HP QTP stores the output value in the run-time DataTable, which is cleared automatically as soon as the test run ends.
How to Create a Standard Output Value in UFT
Follow these steps to insert a Standard output value while recording a test in Micro Focus UFT. The process works on almost any recognized object on screen, since UFT relies on its object identification mechanism to locate the target object before capturing any property from it, whether the application is Windows-based, web-based, or a supported add-in technology.
- Start recording the test in Micro Focus UFT, then pause exactly at the point in the flow where the property should be captured.
- From the Design menu, choose Insert > Output Value > Standard Output Value, or click the matching icon on the toolbar.
- Click the object whose property you want to capture; UFT highlights it on screen and opens the Output Value Properties dialog box.
- Select one or more properties from the object, and optionally rename the DataTable column that will store each captured value.
- Click OK to close the Output Value Properties dialog box, then click OK again to confirm and insert the step.
- Stop recording. UFT automatically inserts a matching Output statement into the VBScript Editor, which testers can edit directly if required.
- Run the test, then open the Test Results window to confirm the captured values appear correctly inside the run-time DataTable.
Tip: Name DataTable columns clearly, for example AgentName or FlightNumber, so captured values remain easy to reference from later steps or reports.
The video below demonstrates these steps end to end, from launching the Flight Reservation sample application to reviewing the captured output value in the DataTable.
Click here if the video is not accessible
Code Example:
The VBScript below shows a typical flow: launching the Flight Reservation sample application, entering login credentials, and capturing an output checkpoint on the resulting dialog box.
SystemUtil.Run "C:\Program Files\HP\samples\flight\app\flight.exe"
Dialog("Login").WinEdit("Agent Name:").SetDataTable("AgentName",dtGlobalsheet)
Dialog("Login").WinEdit("Password:").SetDataTable("Password",dtGlobalsheet)
Dialog("Login").WinButton("OK").Click
Dialog("Login").Dialog("FlightReservations").Static("Please enter agent name").OutputCheckPoint("ErrorMessage")
Dialog("Login").Dialog("FlightReservations").WinEdit("OK").Click
Dialog("Login").WinEdit("Cancel").Click
Text, Database, and XML Output Values Explained
Beyond the Standard output value, Micro Focus UFT supports three more output value types for data that does not fit a simple list of object properties.
| Type | Captures | Typical source |
| Text / Text Area | A text string shown on a page or inside a defined screen region | Web pages, Windows applications |
| Database | Result-set values returned by a SQL query | ODBC or OLE DB data sources |
| XML | Element and attribute values inside an XML document | Web application XML responses or resource files |
A Text output value lets testers capture part of a displayed string, along with optional text that appears immediately before or after it. A Database output value runs a SQL statement against a connected data source and stores selected result cells, similar to a Database Checkpoint. An XML output value reads the hierarchical tree of an XML document and stores the values of chosen elements or attributes. Like Standard output values, all three types can be inserted while recording, and each one adds its own Output statement to the underlying VBScript.
Note: XML output values are not supported in Internet Explorer 9 or later running in standard mode, in Google Chrome, or in Mozilla Firefox, because the WebXML test object is unavailable in those browsers.
Understand Test Results in QTP/UFT with Print/Export Example
Once an output value step runs, its captured data appears inside the UFT Test Results window alongside every other test step, making it easy to review what was captured and where. Let’s understand the Test Results generated by Micro Focus UFT.
In HP QTP, Right Hand Side shows Test Results Summary.
Left Hand Side is Test Results Tree – an icon-based view of the test steps that were performed while the test was running. Similar to the test tree in Keyword View.

If you select a step in the tree, the right panel gives it complete details, including the object, the operation performed, and any property values that were output or checked during that step.
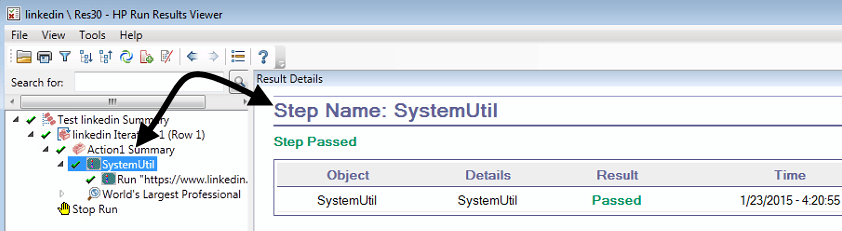
You can capture Movie / Screenshots of the entire test run using Tools > Options > GUI Testing, which is useful evidence when a defect needs to be reported.

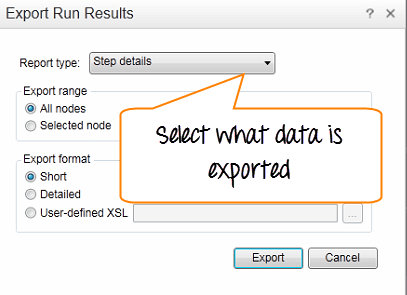
You can print or export the results directly from the Test Results window for offline review or for sharing with the rest of the team.
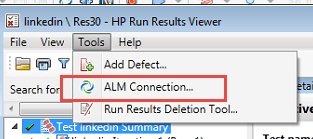
You can also export the results and defects to Quality Center, keeping automated test evidence linked to the same tool used for manual test management.
Together, the Test Results Tree, the Summary panel, and the export options give testers a complete audit trail of what ran, what was captured, and what evidence exists for every checkpoint or output value in the test.
Click here if the video is not accessible
