
Groups in Tableau: Create Groups, Hierarchy, Sets
 Editorial Team
⚡ Smart Summary
Tableau sort data controls the order marks appear in a view, while groups, hierarchies, and sets reshape the dimensions behind them. This page covers every sorting method and each of the three field-shaping features, with the exact dialog steps.

Sort Data in Tableau
Data present in the visualization and worksheet can be sort based on the requirement. It can sort the data based on data source order, ascending, descending or depend on any measured value.
The procedure for sorting is given as follows.
Step 1) Go to a Worksheet and drag a dimension and measure as given in the image.
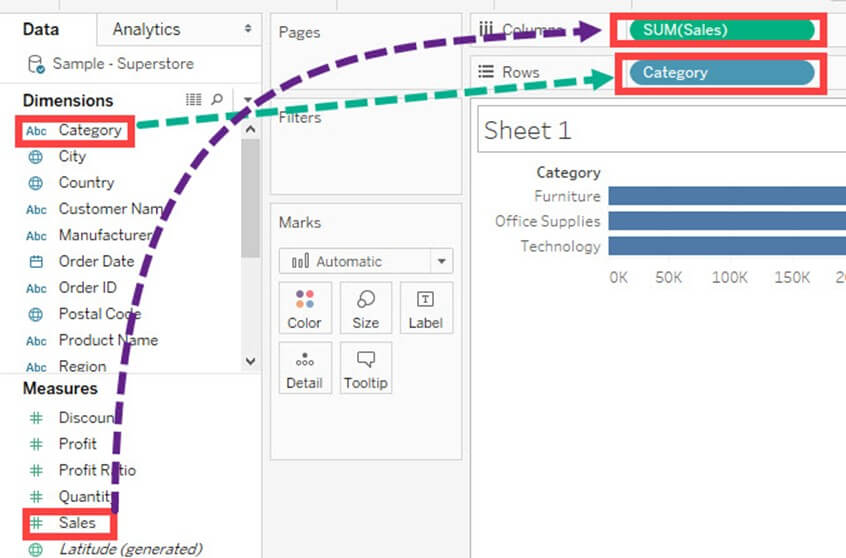
It creates a bar chart by default. Category Present in the visual is sorted based on data source order by default. We can change the sort order by following the below procedure.
Step 2)
- Right click on Category.
- Select ‘Sort’ option.
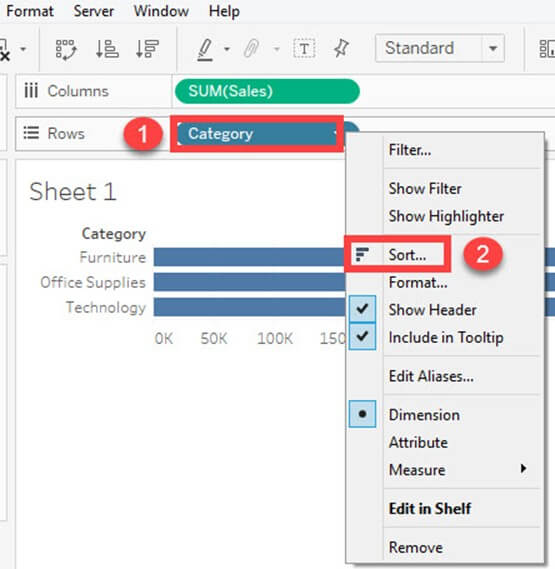
It opens the Sort window. The options present inside the sort window is explained as follows.

Sort Order:
- Ascending: It sorts the order of selected dimension in ascending order.
- Descending: It sorts the order of selected dimension in descending order.
Sort by:
The field can be sorted by different types of methods. It is explained as follows.
| Data Source order | It sorts the field based on data source order. |
| Alphabetic | It sorts the field based on the alphabetic order. |
| Field | It sorts the field based on other dimension or measure values. |
| Manual | The user can manually sort the data using this option. |
In this example, the category is sorted based on another field namely ‘Sales.’
Step 3: In this window,
- Click on ‘Field’ radio button.
- Select the field on which the category is to be sorted.
- Select the aggregation type.
- Click on OK.

The above example sorts the category field based on the sum of sales in ascending order.
It sorts the data as shown in the figure.

Types of Sorting in Tableau
The dialog above is only one of several ways to order a view, and the method chosen decides whether the order survives a filter change or a new data refresh. Four approaches are available.
- Quick sort: The small ascending and descending icons on the toolbar, or the icon that appears when hovering over an axis. One click sorts by the measure already in the view. This is the fastest option and is stored as a computed sort.
- Computed sort: The Sort dialog shown above, driven by a field and an aggregation. Because the order is recalculated each time, it stays correct when filters change or new members arrive.
- Manual sort: Dragging headers into position, or using the arrow buttons in the Sort dialog. The order is stored member by member, so a new member added later will not be placed automatically.
- Nested sort: Applied when two dimensions sit on the same shelf. A normal sort orders members across the whole view, while a nested sort orders them independently inside each pane, which is usually what a reader expects from a grouped bar chart.
One rule prevents most confusion: use a computed sort whenever the data will change, and reserve manual sorting for a fixed list such as a set of five regions that never grows.
Sorting changes the order of members. The remaining features on this page change the members themselves, starting with groups.
What is Tableau Group?
A Tableau Group is a set of multiple members combined in a single dimension to create a higher category of the dimension. Tableau allows the grouping of single-dimensional members and automatically creates a new dimension adding the group at the end of the name. Tableau does not do anything with the original dimension of the members.
Create Groups
Group is used to combine members present in a field. For example, aggregated values of ‘Furniture’ and ‘Office Supplies’ can be obtained by using group. Once the grouping data in Tableau is done, aggregated value of ‘Furniture’ and ‘Office Supplies’ can be shown in the visuals. The procedure to Group Data in Tableau is given as follows.
Step 1)
- Right-click on the dimension ‘Category’.
- Click on ‘Create’ option.
- Select ‘Group’ option.

Step 2) It opens the ‘Create group’ window.
- Type the name of the group data in Tableau.
- Select the members to be grouped.
- Click on ‘Group’ button.

Step 3) In Edit Group Window,
1. It creates groups in Tableau of ‘Furniture’ and ‘Office supplies’.
2. Click on Ok to create the group.

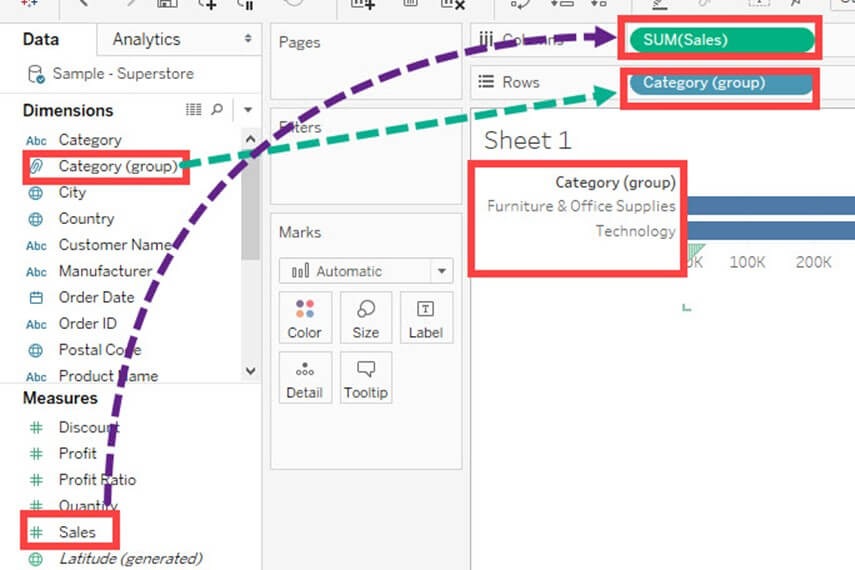
It created a group in Tableau with the name of Category (Group) and added in the dimension list. This can be used for visualizing the group by in Tableau method for members present in a field.
The following image explains the functionality of Tableau create group. The sum of sales is visualized for both furniture and office supplies for grouping in Tableau.
An “Other” bucket can also be added from the same Edit Group window, which collects every member left ungrouped. That is useful when only the top few members matter and the remainder should be summarised into one bar.
Create Hierarchy
Hierarchies can be built in Tableau to visualize the data in granular level. Tableau hierarchies can be created by following the given steps.
Step 1) Go to a worksheet.
- Select a dimension to create a hierarchy. Right-click on the dimension.
- Select ‘Hierarchy’ option.
- Click on ‘Create hierarchy’ option.

Step 2) It opens the ‘Create Hierarchy’ Window.
- Enter a name for hierarchy.
- Click on OK.

It creates a Hierarchy as shown in the image.
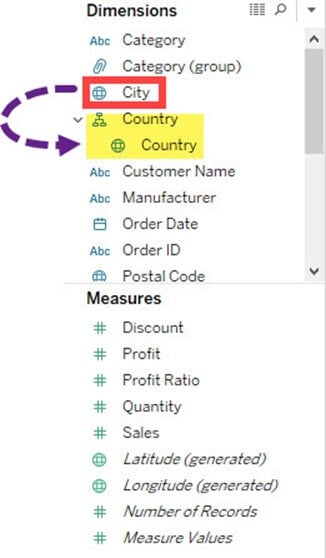
You can add another field to the box and create the hierarchy. In this example, the city is added into a country hierarchy.

Once the hierarchy is placed on a shelf, a plus sign appears on the field. Clicking it drills the view down to the next level, and the minus sign rolls it back up, so a single worksheet can serve both a country overview and a city detail view.
Build Sets
Sets create a set of members out of the field present in a data set. It acts as a separated field or dimension. The procedure to build sets is given as follows.
Step 1) Go to a Worksheet.
- Right-click on a dimension.
- Select ‘Create’ option.
- Click on ‘Set’ option.

Step 2) It opens ‘Create Set’ Window.
- Name the set to be created.
- Select the members needs to be added in the set.
- Click on OK.

This creates a set of the given name. Dragging the set onto a shelf splits the view into In and Out, so members inside the set can be compared directly against everything else.
Groups vs Hierarchies vs Sets
All three features create a new field in the Data pane, which is why they are easy to confuse. The table below shows what each one actually does.
| Feature | What it produces | Use it when |
|---|---|---|
| Group | A new dimension where several members share one label, suffixed with (group) | Members need combining or renaming, for example merging spelling variants of one city |
| Hierarchy | A nested folder of existing dimensions with drill-down controls | Fields have a natural parent and child relationship, such as country, state, and city |
| Set | A two-value In/Out field marking membership | A subset must be isolated or compared against the remainder, such as the top ten customers |
Sets have one capability the other two lack: a dynamic set defined by a condition, such as the top ten customers by sales, refreshes automatically as the data changes. Groups and hierarchies are always fixed by their definition. Once fields are shaped this way, the results are usually presented through the chart types covered in the Tableau charts and graphs tutorial.
