How to Change Instance Type & Security Group of EC2 in AWS
⚡ Smart Summary
Modifying an Amazon EC2 instance lets you change its instance type, security groups, tags, user data, and network settings from the AWS Management Console after launch, adapting the server to new performance, security, and scaling requirements without rebuilding it.
EC2 stands for Elastic Compute Cloud. It is the compute service offering from the IaaS (Infrastructure as a Service) area of AWS.
Once an EC2 instance is provisioned, it is very handy to update or modify many of the instance configuration parameters using the AWS Management Console.
Let us take a look at each of them.
Login and access to AWS services
Step 1) In this step, you will do the following:
- Login to your AWS account and go to the AWS Services tab at the top left corner.
Here, you will see all of the AWS Services categorized as per their area viz. Compute, Storage, Database, etc. For creating an EC2 instance, we have to choose Compute → EC2 as in the next step.
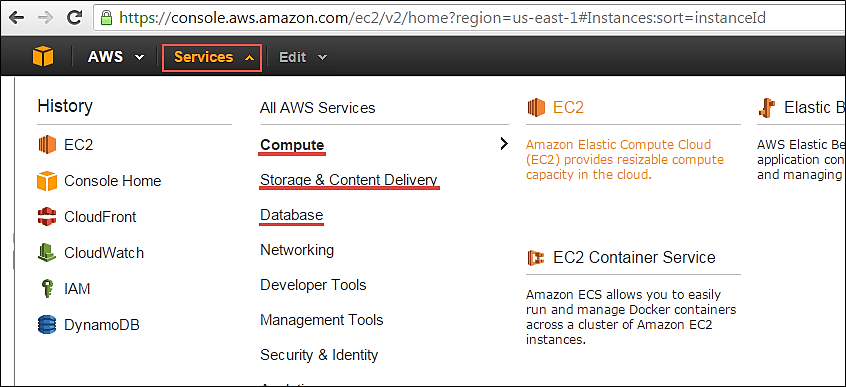
Open all the services and click on EC2 under Compute services. This will launch the dashboard of EC2.
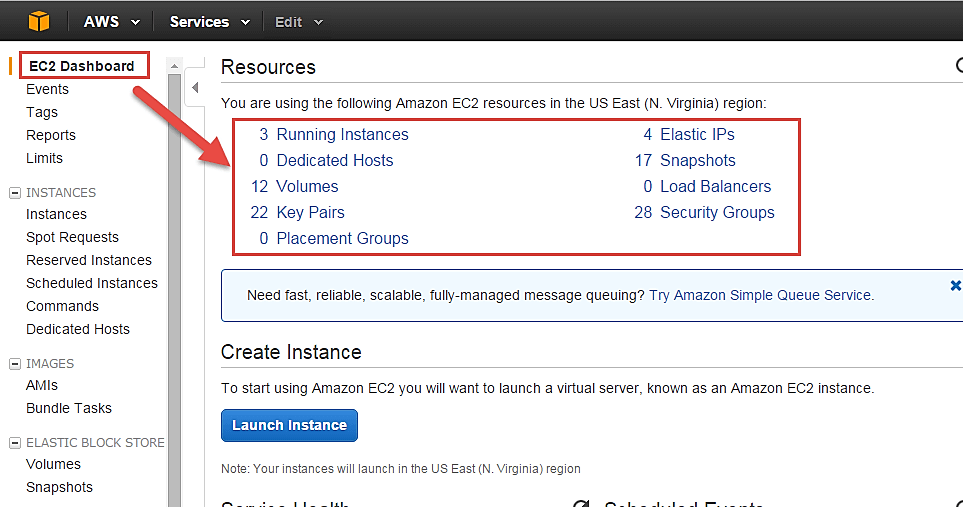
Here is the EC2 dashboard. Here you will get all the information in gist about the AWS EC2 resources running.
Step 2) On the top right corner of the EC2 dashboard, choose the AWS Region in which you want to provision the EC2 server.
Here we are selecting N. Virginia. AWS provides multiple Regions all over the globe.

Step 3) Once your desired Region is selected, come back to the EC2 Dashboard.
Check the modification parameters
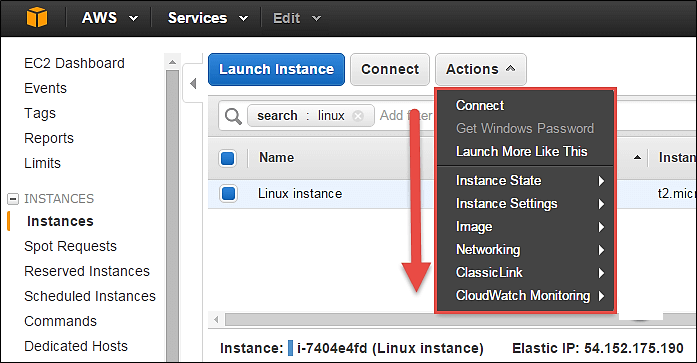
Step 1) On the EC2 Dashboard, select the instance whose configuration parameters you want to modify and click on the “Actions” button as shown below.

Step 2) As you click the button, the drop-down will show us all the areas where we can modify the instance characteristics.
View the connection details
The Connect option below will show us ways in which we can connect to an EC2 instance.
Step 1) Click on option ‘Connect.’

You may choose to connect with a standalone SSH client or a Java client. You will get a step-by-step procedure on how you can connect to your instance.
For this tutorial, we can see the connection methods for a Linux instance.

Launch multiple instances with the similar configuration
If you have a single EC2 instance running with a particular configuration, and you wish to quickly launch another instance in a one-click deployment, then the ‘Launch More Like This’ option helps us do that.
Step 1) Click on ‘Launch More Like This.’

You will be straightaway directed to the review instance details page of the launch instance wizard. Here we can verify all the details once more.
Step 2) On the review instance details page, click on button ‘Launch.’

Step 3) In this window,
- Select an existing key pair
- Click on “Launch Instance.”

Instance launch progress can be seen as below.

You can see below that a new instance is in a pending state before creation.

You can see that the new instance has the same tag as well.

Change the instance state
You can change the instance state on the fly from the Management Console on a single click.
Step 1) In this step, click on ‘Instance State’ under actions.
- Stop – you can stop the running instance
- Reboot – you can reboot the instance
- Terminate – you can delete the instance permanently

Change instance settings
Here you can change a lot of instance settings like security groups, termination protection, etc.
Let us see each one in detail.
Create tags
Add/Edit Tags – You can add or edit the tags assigned to the instance. Tagging makes it easier for the business owner of the AWS account to keep track of the instances especially if there are multiple environments.
AWS admins should assign each instance a tag based on the segregation e.g.: tagging all the instances in the production environment as ‘Prod’ or tagging the instances belonging to a department with the department initials etc. Tagging is a very effective method to track the costing of the instances as well.
Let us see how to change tags.
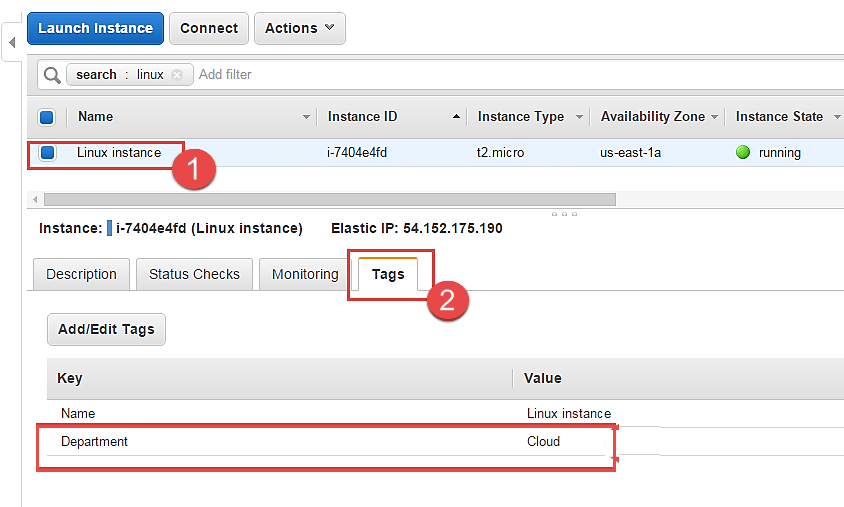
Step 1) In this step,
- Click on instance setting
- Click on ‘Add/Edit Tags.’

Step 2) A tag is just a key-value pair.
- So we have assigned a new tag as Department and added its value as Cloud.
- Click on Save

Step 3) Come back to the EC2 Dashboard and
- Select your instance again
- Select the tab of ‘Tags’
Note that the new tag as “Department” with value as Cloud has appeared under Tags.
Attach to Auto Scaling Group
An EC2 instance can be attached to an Auto Scaling Group on the fly.
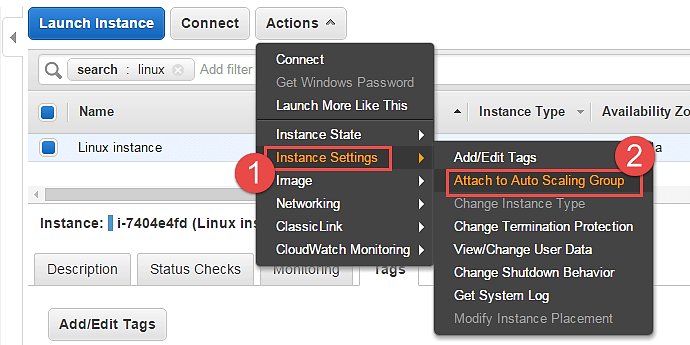
Step 1) In this step, we do the following things:
- Click on ‘Instance Settings’
- Click on ‘Attach to Auto Scaling Group.’
Step 2) In this step,
- Attach an instance to an existing AS group. You can also create a new AS group in this step.
- Select one AS group from the list of already existing groups.
- Click on ‘Attach’.
This action will attach your instance to an auto-scaling group in your environment.

How to Change instance type in AWS
You can change the instance-type of your instance if you desire a higher configuration instance as per your application requirement. This can be done to vertically scale your instance and provide you with more compute/memory capacity.
Let us see how to do this.
You cannot change an instance type if it is a running server. You have to stop it before doing so.
Step 1) Go to ‘Instance State’.
Click on ‘Stop’. This will stop the instance.

Note that the instance state is now in “stopping” mode on the EC2 Dashboard. You can change an instance type now.

Step 2) Go to ‘Instance Settings’. Click on ‘Change Instance Type’

Step 3) Check Popup. A Change Instance Type pop-up will appear.
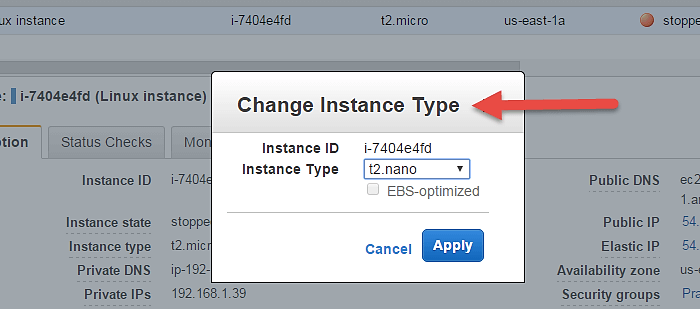
Step 4) Select Instance Type. You can select from a range of EC2 available instance types. For this tutorial, we are changing it to t2.nano just for the sake of demonstration.

Step 5) Select t2.nano. Select t2.nano, and click on ‘Apply’.

Step 6) Open EC2 Dashboard. Notice on the EC2 Dashboard, your instance type has been changed to the said type automatically.

You can now start your instance and continue with the operations on that. There will be no change in other configuration parameters and also your existing installations on the server will remain intact.
Enable termination protection
An instance should always have termination protection enabled especially on production servers. This will ensure that your EC2 instance is not getting accidentally terminated.
AWS will add an additional level of security in case you happen to accidentally hit the instance terminate option.
Let us see how to enable termination protection.
Step 1) In this step,
- Go to ‘Instance Settings.’
- Click on ‘Change Termination Protection.’

Step 2) Notice that the current setting on our instance is disabled. Click on “Yes, Enable”.

This has enabled Termination protection on our instance. We will check to see if our instance gets deleted when we hit Terminate.
Step 3) In this step,
- Select option ‘Instance State’ and then
- Click on ‘Terminate.’

AWS will immediately notify you that the EC2 instance has “termination protection enabled” and you will not be able to delete it. The ‘Terminate’ button below is disabled.

Change User Data
When you launch a new EC2 instance, you have the option to pass user data to an instance to run tasks at boot time automatically e.g. common configuration tasks, init scripts, etc.
You can pass the user data in the form of shell scripts or cloud-init directives. This can be either plain text, as a file or as base64 encoded text for API calls.
Here we will see how we can edit these scripts.
You will have to stop the instance first, you will not be able to edit the instance user data if it is running. On a stopped instance, perform the below steps.
Step 1) In this step, do the following things:
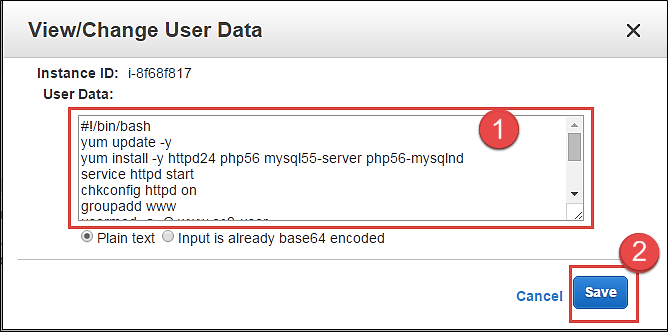
- Go to ‘Instance Settings’.
- Click on ‘View/Change User Data’.

Here for the purpose of demonstration, we have a shell script which installs a LAMP stack on the server.
Step 2) In this step,
- View/modify your user data field.
- Click on “Save” tab.
Change the shutdown behavior
If ever you have accidentally shutdown the instance via the OS console, you do not want AWS EC2 to actually terminate the instance.
For that, we can set up the shutdown behavior as ‘Stop’ instead of ‘Terminate’. We can also do vice versa if the application requirement is as such.
Let us see how to achieve this.
Step 1) In this step,
- Go to ‘Instance Settings’.
- Click on ‘Change Shutdown Behavior.’

Step 2) In this step, click on ‘Stop’ and then hit apply. The setting will be applied to the instance accordingly.

Step 3) Now when “stop” shutdown is initiated in the instance console via putty, it will not get terminated. It will simply shutdown normally.

View System Log
You can see the system log for any EC2 instance for troubleshooting purposes etc.
Step 1) In this step,
- Go to ‘Instance Settings’.
- Click on ‘Get System Log’.
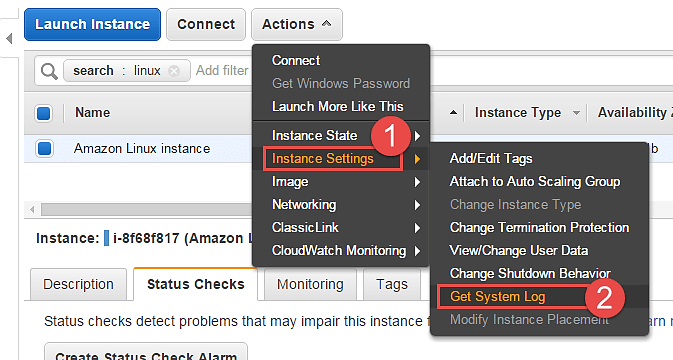
You can see a separate window depicting the instance log details. Here we can see a snap of log when the instance was restarted.

Create an instance AMI
You can create an AMI of your EC2 instance for backup.
Step 1) In this step,
- Go to ‘Image’.
- Click on ‘Create Image’.

An image creation wizard will open.

Step 2) In this step,
- Add the image name
- Give some friendly description for the AMI
- Check the volumes and then hit ‘Create Image’ button.
AWS will receive your create image request and will send a notification immediately.

You can check the status of the request on the EC2 dashboard as ‘pending’ just like what is shown below.

After a while the status is “available” and you will have your AMI ready as a backup.

You can also de-register it from the dashboard once the backup is old.
Change the instance network settings
Networking parameters such as security groups, network interfaces, Elastic IP addresses, and private IP addresses can also be adjusted after launch. The sections below walk through each network change one at a time.
How to Change the Security Group
You can change the SG (Security Group) of an instance anytime. If you have another security group with different firewall rules, you can easily do so using the console.
Let us see how.
Step 1) In this step,
- Go to ‘Networking’.
- Click on ‘Change Security Groups’.

Step 2) In the change security groups wizard, it will show the already existing SG on the instance along with a list of all the security groups in the region.

Step 3) In this step,
- Tick the box against your desired SG
- Click on ‘Assign Security Groups’ button.

Step 4) On the EC2 Dashboard, you can see that the SG of the instance has been changed. The instance will now send/receive traffic based on the new SG settings.
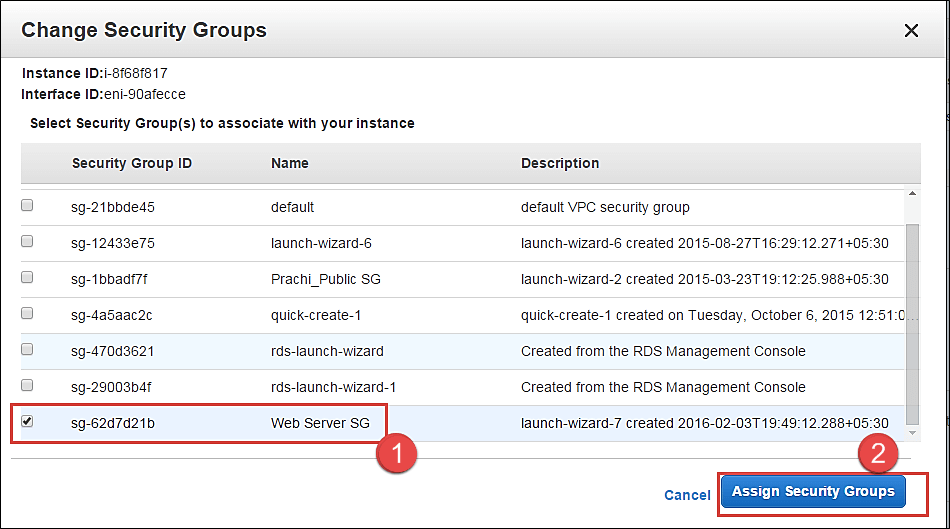
You can also add multiple security groups.
Add a Network Interface
A network interface is like another NIC card to an instance. It will have another set of IPs additional to the already existing primary Network Interface.
Step 1) In this step,
- Go to ‘Networking’.
- Click on ‘Attach Network Interface’.

You will get an error prompt if you do not have a Network Interface already created.
Let us see how to create a Network Interface quickly.

Step 2) In this step,
- Go to EC2 Dashboard, and click on ‘Network Interfaces’ on the left pane.
- Click on ‘Create Network Interface’ button.

Step 3) In this step,
- Add a description for your network interface
- Select the subnet where you want to create your network interface. Keep the auto assign the private IP option default
- Security groups are applied to a network interface of an instance, so here you will get an option for the same. Select your desired SG
- Once you are done entering the details, click on ‘Create.’

Now you can come back to the EC2 Dashboard and check that your network interface is getting created.

Now come back on Step 2) and go ahead with selecting your available interface which we just created and attach it to the instance.
Now as you can see the network interface which we just created is enlisted below automatically.

Your network interface will be attached to the instance immediately.
We can come back to the EC2 Dashboard and check our instance now. Note that the instance has 2 private IPs belonging to 2 network interfaces.

Dissociating EIP
An Elastic IP is a static Public IP.
You can dissociate an EIP directly from the instance dashboard.
Step 1) In this step,
- Click on ‘Networking.’
- Click on ‘Dissociate Elastic IP Address.’

Step 2) Click on the button of dissociate, once we have verified the instance id and the EIP.

Check below that the instance dashboard now shows the EIP field blank.

Change Source/Destination check
The Source/Destination Check attribute controls whether source/destination checking is enabled on the instance. Disabling this attribute enables an instance to handle network traffic that is not specifically destined for the instance. For example, instances running services such as network address translation, routing, or a firewall should set this value to disabled.
Step 1) In this step,
- Click on ‘Networking.’
- Click on ‘Change Source/Dest. Check’

Step 2) Click on ‘Disable’. If it is disabled already, you can enable it in this step.

Manage private IP addresses
You can assign multiple private IP addresses to a single instance if that is your application architecture’s design. The maximum number of IPs you can assign of course depends on the EC2 instance type.
Step 1) In this step,
- Click on ‘Networking.’
- Click on ‘Manage Private IP addresses.’

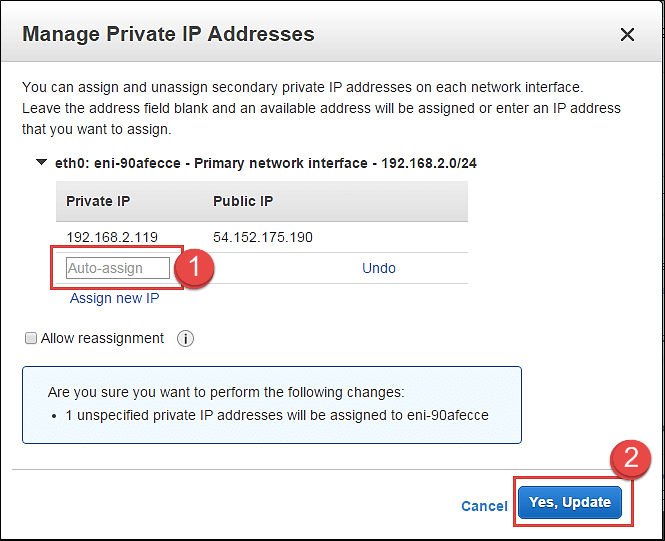
You will be redirected to a new window to assign a secondary IP address to your instance.
Step 2) In this step,
- Here we are leaving the field blank. This will enable AWS to auto-assign any available private IP to our instance.
- Click on ‘Update.’

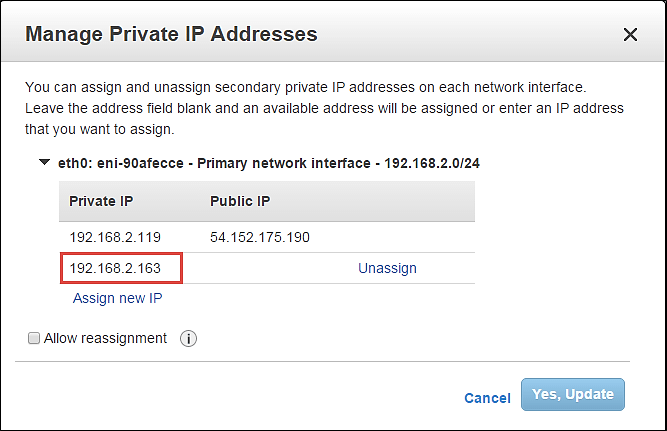
Note that an IP has been automatically assigned here.
Also, come back to the EC2 dashboard and notice the 2 private IPs assigned. These are 2 IPs on a single network interface.
Enable/disable ClassicLink to a VPC
If your instance is provisioned in EC2 – Classic, which is a deployment mode in AWS where resources are provisioned out of a VPC; then you can link your instance to a VPC environment as shown below.
The options below are disabled for us as our instance is already in a VPC.

Enable detailed CloudWatch monitoring
AWS will by default have basic CloudWatch monitoring enabled on all its resources. However, if our instances are production instances, we may wish to enable detailed monitoring on them with additional costs of course.
Step 1) In this step,
- Click on ‘CloudWatch Monitoring’
- Click on ‘Enable Detailed Monitoring’

You can also add/edit alarms to alert you for attributes in your CloudWatch monitoring metrics.

Also Check:- AWS (Amazon Web Services) Tutorial: Basics for Beginners