
Joiner Transformation in Informatica with EXAMPLE
 Editorial Team
⚡ Smart Summary
Joiner transformation in Informatica is the active, connected object that joins two heterogeneous sources on a matching condition, caching the master pipeline in memory while the detail pipeline streams through it.
What is Joiner Transformation?
Joiner transformation is an active and connected transformation that provides you the option to create joins in Informatica. The joins created using Joiner transformation are similar to the joins in databases. The advantage of Joiner transformation is that joins can be created for heterogeneous systems (different databases).
In Joiner transformation, there are two sources which we are going to use for joins. These two sources are called
- Master Source
- Detail Source
In the properties of Joiner transformation, you can select which data source can be master and which source can be the detail source.
During execution, the master source is cached into the memory for joining purpose. So it is recommended to select the source with fewer records as the master source. The master pipeline is held in two caches: an index cache for the values used in the join condition and a data cache for the rest of the row data.
Types of Joins in Joiner Transformation
The Join Type property on the Properties tab decides what happens to rows that find no match. The following joins can be created using Joiner transformation.
- Master outer join – In a master outer join, all records from the detail source are returned by the join and only matching rows from the master source are returned.
- Detail outer join – In a detail outer join, only matching rows are returned from the detail source, and all rows from the master source are returned.
- Full outer join – In a full outer join, all records from both the sources are returned.
- Normal join – In a normal join, only matching rows are returned from both the sources.
Master outer and detail outer joins are equivalent to left outer joins in SQL: each one keeps every row of one source and only the matches from the other. The table below lines the four types up against their SQL equivalents.
| Join type | Rows kept from master | Rows kept from detail | SQL equivalent |
|---|---|---|---|
| Normal join | Matching only | Matching only | Inner join |
| Master outer join | Matching only | All rows | Left outer join on the detail source |
| Detail outer join | All rows | Matching only | Left outer join on the master source |
| Full outer join | All rows | All rows | Full outer join |
The join type is a property, not a structural choice, so it can be changed later without rebuilding the mapping or relinking any ports.
How to Use Joiner Transformation in Informatica
In this example, we will join the emp and dept tables using Joiner transformation. Work through the eight steps below in the Mapping Designer.
Step 1) Create a new target table EMP_DEPTNAME in the database using the script below and import the table in Informatica targets.
Download the above emp_deptname.sql File
Step 2) Create a new mapping and import source tables “EMP” and “DEPT” and the target table which we created in the previous step. All three definitions now sit on the canvas, as shown below.

Step 3) From the Transformation menu, select the Create option. Then in the Create Transformation window shown below,
- Select joiner transformation
- Enter transformation name “jnr_emp_dept”
- Select create option

Step 4) Drag and drop all the columns from both the Source Qualifiers to the Joiner transformation. Both pipelines are now linked into jnr_emp_dept, as the screenshot shows.

Step 5) Double click on the Joiner transformation, then in the Edit Transformations window
- Select condition tab
- Click on add new condition icon
- Select deptno in master and detail columns list
The Condition tab now holds the single join condition on deptno.

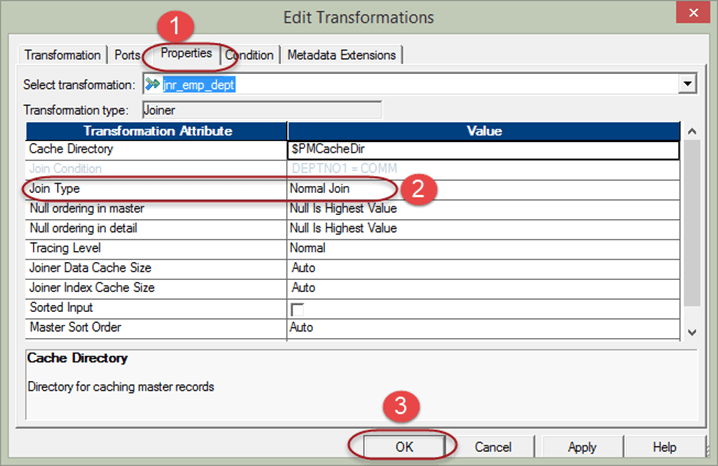
Step 6) Then in the same window
- Select properties tab
- Select Normal Join as join type
- Select the OK button
The Properties tab with the join type set is shown next.
For performance optimization, we assign the master source to the source table pipeline which is having fewer records. To perform this task:
Step 7) Double click on the Joiner transformation to open the Edit Transformations window, and then
- Select ports tab
- Select any column of a particular source which you want to make a master
- Select OK
The Ports tab marks the chosen pipeline as the master, as shown below.

Step 8) Link the relevant columns from Joiner transformation to the target table. The mapping now runs from both sources through the join into EMP_DEPTNAME.
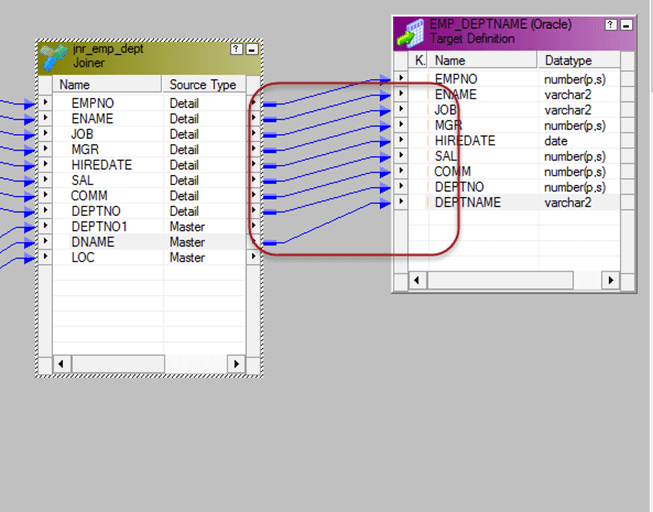
Now save the mapping and execute it after creating a session and workflow for it. The join will be created using the Informatica Joiner, and relevant details will be fetched from both the tables.
Joiner Transformation Properties
The Properties tab carries more than the join type. The settings below control how much memory the join uses and where the cache files are written.
| Setting | What it controls |
|---|---|
| Join Type | Normal, Master Outer, Detail Outer or Full Outer. Decides which unmatched rows are kept. |
| Join Condition | The list of master-to-detail port pairs compared with the equals operator. Several conditions are combined with AND. |
| Sorted Input | Declares that both pipelines already arrive sorted by the condition ports, which lets the Integration Service minimise disk input and output. |
| Master Sort Order | The sort order of the master source data, used together with sorted input. |
| Cache Directory | Directory in which the index and data cache files are created. The default is the $PMCacheDir process variable. |
| Joiner Data Cache Size | Size of the data cache holding the master row data. The default is Auto, which lets the Integration Service size it. |
| Joiner Index Cache Size | Size of the index cache holding the master condition values. The default is Auto. |
| Transformation Scope | Applies the join to each transaction, to all incoming data, or to a row-level scope. |
Sorted input is the setting worth reaching for first. When both pipelines arrive ordered by the condition ports, the Integration Service does not have to hold the whole master source before matching begins, which is the same principle applied during performance tuning of other cached transformations.
Joiner Transformation Rules and Limitations
Some restrictions only surface when the mapping is validated, so it is cheaper to know them before the ports are linked.
- Equality only. A join condition compares ports with the equals operator. Comparison operators such as greater than, less than or not equal to are not accepted in the condition.
- Matching datatypes. Both ports in a condition must have the same datatype. The Designer validates this, so mismatched columns have to be converted first, usually in an Expression transformation.
- No Update Strategy upstream. A Joiner transformation cannot be used when either input pipeline contains an Update Strategy transformation.
- No Sequence Generator directly before it. Connecting a Sequence Generator transformation immediately upstream of the Joiner is not supported.
- Caching cannot be switched off. The master pipeline is always cached, which is why the smaller source belongs on the master side and why cache sizing matters on large joins.
Joining three sources needs two Joiner transformations chained together, because each one accepts exactly one master and one detail pipeline. Where the second source is a small reference table read row by row instead, a Lookup transformation is often the simpler design.
