Java Swing Tutorial: How to Create a GUI Application in Java
What is Swing in Java?
Swing in Java is a Graphical User Interface (GUI) toolkit that includes the GUI components. Swing provides a rich set of widgets and packages to make sophisticated GUI components for Java applications. Swing is a part of Java Foundation Classes(JFC), which is an API for Java GUI programing that provide GUI.
The Java Swing library is built on top of the Java Abstract Widget Toolkit (AWT), an older, platform dependent GUI toolkit. You can use the Java simple GUI programming components like button, textbox, etc., from the library and do not have to create the components from scratch.
In this Java Swing tutorial, you will learn Java GUI basics like-
Java Swing class Hierarchy Diagram
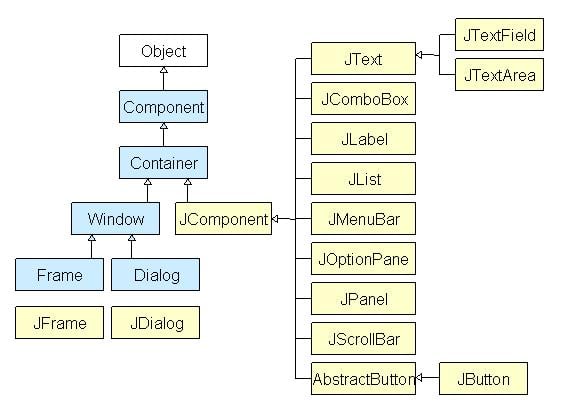
All components in Java Swing are JComponent which can be added to container classes.
What is a Container Class?
Container classes are classes that can have other components on it. So for creating a Java Swing GUI, we need at least one container object. There are 3 types of Java Swing containers.
- Panel: It is a pure container and is not a window in itself. The sole purpose of a Panel is to organize the components on to a window.
- Frame: It is a fully functioning window with its title and icons.
- Dialog: It can be thought of like a pop-up window that pops out when a message has to be displayed. It is not a fully functioning window like the Frame.
What is GUI in Java?
GUI (Graphical User Interface) in Java is an easy-to-use visual experience builder for Java applications. It is mainly made of graphical components like buttons, labels, windows, etc. through which the user can interact with an application. GUI plays an important role to build easy interfaces for Java applications.
How to Make a GUI in Java with Example
Now in this Java GUI Tutorial, let’s understand how to create a GUI in Java with Swings in Java examples.
Step 1) Copy code into an editor
In first step Copy the following code into an editor.
import javax.swing.*;
class gui{
public static void main(String args[]){
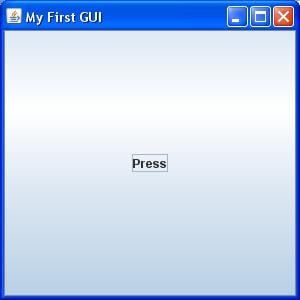
JFrame frame = new JFrame("My First GUI");
frame.setDefaultCloseOperation(JFrame.EXIT_ON_CLOSE);
frame.setSize(300,300);
JButton button = new JButton("Press");
frame.getContentPane().add(button); // Adds Button to content pane of frame
frame.setVisible(true);
}
}
Step 2) Run the code
Next step, Save, Compile, and Run the code
Step 3) Copy following code into an editor
Now let’s Add a Button to our frame. Copy following code into an editor from given Java UI Example
import javax.swing.*;
   class gui{
      public static void main(String args[]){
        JFrame frame = new JFrame("My First GUI");
        frame.setDefaultCloseOperation(JFrame.EXIT_ON_CLOSE);
        frame.setSize(300,300);
       JButton button1 = new JButton("Press");
       frame.getContentPane().add(button1);
       frame.setVisible(true);
     }
}
Step 4) Execute the code
Next, Execute the code. You will get a big button.
Step 5) Add two buttons
How about adding two buttons? Copy the following code into an editor.
import javax.swing.*;
class gui{
      public static void main(String args[]){
           JFrame frame = new JFrame("My First GUI");
           frame.setDefaultCloseOperation(JFrame.EXIT_ON_CLOSE);
           frame.setSize(300,300);
          JButton button1 = new JButton("Button 1");
          JButton button2 = new JButton("Button 2");
          frame.getContentPane().add(button1);
          frame.getContentPane().add(button2);
          frame.setVisible(true);
     }
}
Step 6) Save & Run the program
Next, Save, Compile, and Run the program.
Step 7) Check output
Unexpected output =? Buttons are getting overlapped.
Java Layout Manager
The Layout manager is used to layout (or arrange) the GUI Java components inside a container. There are many layout managers, but the most frequently used are-
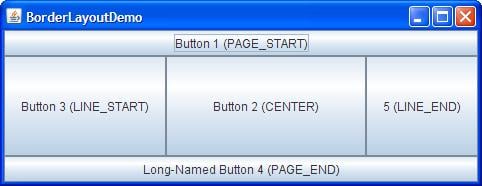
Java BorderLayout
A BorderLayout places components in up to five areas: top, bottom, left, right, and center. It is the default layout manager for every java JFrame
Java FlowLayout
FlowLayout is the default layout manager for every JPanel. It simply lays out components in a single row one after the other.

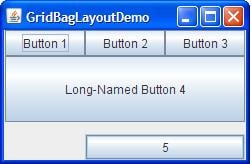
Java GridBagLayout
It is the more sophisticated of all layouts. It aligns components by placing them within a grid of cells, allowing components to span more than one cell.
Step 8) Create chat frame
How about creating a chat frame like below?

Try to code yourself before looking at the program below.
//Usually you will require both swing and awt packages
// even if you are working with just swings.
import javax.swing.*;
import java.awt.*;
class gui {
    public static void main(String args[]) {

        //Creating the Frame
        JFrame frame = new JFrame("Chat Frame");
        frame.setDefaultCloseOperation(JFrame.EXIT_ON_CLOSE);
        frame.setSize(400, 400);

        //Creating the MenuBar and adding components
        JMenuBar mb = new JMenuBar();
        JMenu m1 = new JMenu("FILE");
        JMenu m2 = new JMenu("Help");
        mb.add(m1);
        mb.add(m2);
        JMenuItem m11 = new JMenuItem("Open");
        JMenuItem m22 = new JMenuItem("Save as");
        m1.add(m11);
        m1.add(m22);

        //Creating the panel at bottom and adding components
        JPanel panel = new JPanel(); // the panel is not visible in output
        JLabel label = new JLabel("Enter Text");
        JTextField tf = new JTextField(10); // accepts upto 10 characters
        JButton send = new JButton("Send");
        JButton reset = new JButton("Reset");
        panel.add(label); // Components Added using Flow Layout
        panel.add(tf);
        panel.add(send);
        panel.add(reset);

        // Text Area at the Center
        JTextArea ta = new JTextArea();

        //Adding Components to the frame.
        frame.getContentPane().add(BorderLayout.SOUTH, panel);
        frame.getContentPane().add(BorderLayout.NORTH, mb);
        frame.getContentPane().add(BorderLayout.CENTER, ta);
        frame.setVisible(true);
    }
}