How to Download & install SAP IDES for Practice (FREE Access)
⚡ Smart Summary
Install SAP IDES for Practice covers the end-to-end download and setup of the SAP IDES demonstration system on a local Windows server, including media, prerequisites, database, and central instance steps that learners need for hands-on ABAP and functional training.
What is SAP IDES?
SAP IDES is a demo SAP system developed by SAP AG that is used for learning and training. IDES stands for Internet Demonstration and Evaluation System, and it ships with end-to-end business processes so end users and consultants can get acquainted with SAP ERP quickly.
This tutorial walks through the process to download free SAP software for practice and install the IDES server for learning. There are several prerequisites before you download the free IDES EHP6 version and start installation. The required installation media are listed below:
- j2sdk-1_4_2_17-windows-amd64.exe
- IDES EHP6 Installation Master
- IDES EHP6 Installation Export
- NW703 Kernel 720_Ext
- SL Controller 720
- MS SQL RDBMS
- SAPCRYPTOGRAPHIC Library
- JCE (Java Cryptography Extension) Policy
The media above is available on the SAP Service Marketplace for licensed SAP IDES access. Download SAP ERP IDES and store the files on your local hard disk. With the software requirement covered, next focus on hardware. For the installation you need a server with:
- RAM of 4 GB and above
- HDD of 600 GB
- Intel i3 64-bit processor or higher
- Windows Server 2008 R2 (or later) operating system
Note: You can also install SAP on Linux , AIX, and Sun Solaris. Below we map the road map and each step for SAP IDES installation.
Many learners need a video of the installation steps or do not have access to the SAP Service Marketplace to download the required files.
For such students we recommend you follow
this course for a step-by-step process to install SAP on your laptop.

How to Download & Install SAP IDES
- The hostname of the server where you want to install IDES must not exceed 13 characters; otherwise the installer throws an error.
- Increase the virtual memory to three times the physical memory of the server, or set it to around 20 GB as a safe baseline.
- Install Java (j2sdk-1_4_2_17-windows-amd64.exe) and set the JAVA_HOME environment variable. Windows Server 2008 R2 already includes a Java component in the operating system package.
- Before starting SAP IDES installation, decide the System Identifier (SID) and Instance Number. In this guide we use SID = IDS and instance number = 00.
-
Open the installation master media and follow the path:
SAPCD(F:)/INST_MAST/IM_WINDOWS_X86_64/sapinst, then double-click “sapinst” as shown in figures 1 and 2.


- After double-clicking “sapinst”, the SAP installation GUI opens as shown in figure 3.
- Follow the path shown in figure 3, select Prerequisite Check, then click Next.

- The prerequisite check flags any missing requirements during this phase. After Next, the screen in figure 4 appears. The installation master DVD contains a data file used to validate the prerequisites; the next screen auto-detects the .xml file, or you can browse the installation master DVD for “PREREQUISITE_CHECK_DATA.XML”, then click Next.

- Because we are installing the ABAP stack, check the option shown in figure 5 and click Next.

- On the next screen (figure 6), the installer asks for the database. We are installing SAP on MS SQL, so MS SQL server is selected. To use a different database, pick it from the drop-down highlighted in figure 6.

- On the next screen, enter the JAVA_HOME path where Java is installed. Because we are installing Unicode, check all options and click Next.

- On the next screen (figure 8), review the options selected. Choose Revise to change them; otherwise click Next and the prerequisite check executes.

- If any prerequisites are missing, they appear on the next screen; otherwise execution completes successfully as in figure 9.

- Repeat step 5 to execute “sapinst” from the installation master, choose “Operating System Users and Groups” from the drop-down (figure 10), and click Next.

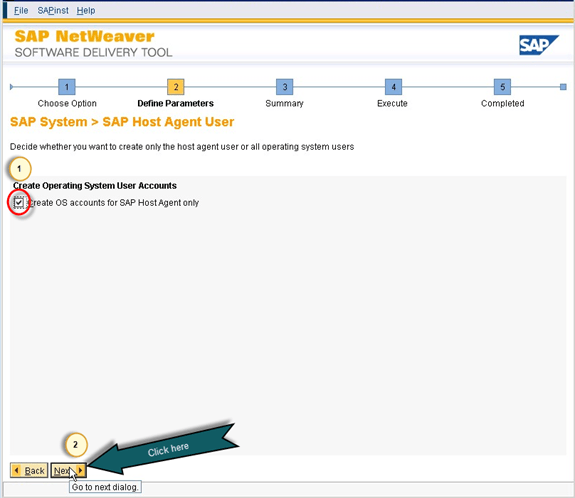
- The next screen asks whether you want to create OS accounts for the SAP host agent only or for the SAP administrative user as well. Pick the option and click Next (figure 11).
- The next screen sets the SAP system identifier “IDS”. Select local domain installation or supply the domain of your host server (figure 12), then click Next.

- Set the password on the next screen. It must comply with the operating system password policy. Enter the password and click Next.

- The next screen (figure 14) lets you revise the options you selected; otherwise continue with the choices and click Next.

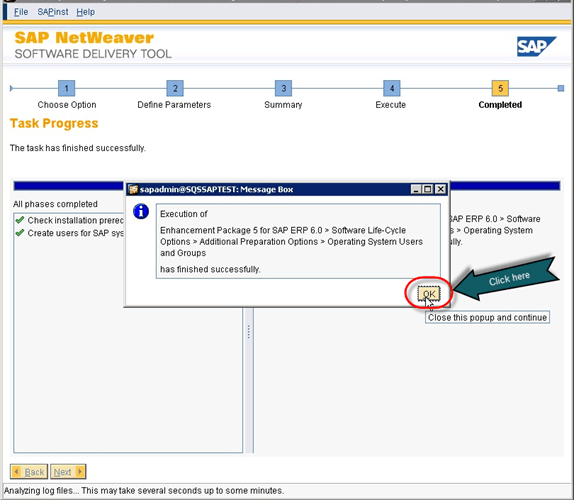
- After successful execution, the following message is shown.
- Once prerequisites and user creation are complete, install the database before starting the central instance of the IDES server. To start the DB installation, go to the RDBMS DVD (figure 16). Here we use MS SQL, and SAP provides the script “SQL4SAP”; double-click that script. For an Oracle database, it gets installed in between the SAP installation.

- After double-clicking the script, a window opens and asks for the database instance SID. For SAP installation, always keep it as default so the DB SID matches the SAP SID. Details are shown in figure 17.

- After OK, a confirmation appears; click OK as shown in figure 18.

- Once confirmed, MS SQL installs in the background on the “C:/” drive.

- When the installation completes, a confirmation message appears (figure 20).

- Repeat step 5 to start “sapinst”, select “Central Instance”, click Next, and start the installation as shown in figure 21.

- The next screen asks for the installation mode. “Typical” lets sapinst pick default settings and skips DB configuration and SAPDATA file selection. “Custom” prompts you for those expert settings. See figure 22.

- The next screen (figure 23) prompts for the SAP system ID (SID) and the installation drive where “\usr\sap” will reside.

- The screen in figure 24 asks for the server’s Fully Qualified Domain Name (FQDN). For a local server installation, uncheck the FQDN option; otherwise check it and provide your server’s FQDN. We are doing a local installation, so the option is unchecked.

- Enter the master password for your SAP system. This password is used for all SAP accounts and users during installation, and you can use it to log into the SAP system with DDIC and SAP* users.

- As mentioned earlier, we are running a local installation. So on the next screen (figure 26), select Local Installation and click Next.

- The next screen (figure 27) asks for the password for “<SID>adm” and SAPservice<SID>. Since you already provided the master password, you can skip this step or set a different password for each user. For an Oracle database, the users are “<SID>adm” and “ORA<SID>”.

- The installer now asks for the database instance. Since MS SQL was already installed, the default instance appears; select it and click Next.

- An information message shows that DBSID and SAPSID match. That is fine, click Next.

- The next screen asks for the media path of the Unicode Kernel NW 7.20. Provide it via Browse and click Next.

- Next, the installer shows the installation drive where “\usr\sap\PRFCLOG” will be created.

- The installer asks for domain details for the SAP host agent. Because we are installing locally, select Local Domain and click Next.
- Provide the password for the sapadm user; otherwise the master password is used by default.

- Provide the path of the installation export media and click Next.

- The installer asks for the password of the database ABAP schema. By default, the master password is used.

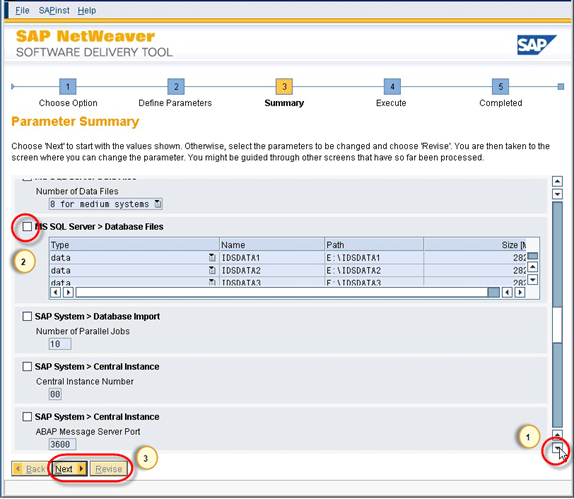
- The installer asks how many datafiles to create for the database. As a rule of thumb, 4 datafiles for a small system, 8 for medium, and 16 for large. We selected 8 datafiles.

- The next screen asks for the path where the datafiles will be stored. Also specify the initial size of the datafiles.

- The installer asks for the location and size of the tempdev and templog file. By default, these sit on the database installation drive. Provide the required details and click Next.

- Provide the number of parallel jobs for the ABAP import phase. Default is 3, but increasing it based on server resources is recommended. We increased the jobs from 3 to 10. Keep the SAP code page at the default.

- The installer asks for the central instance number; any number between 00 and 99 works. We chose 00, the default.

- Provide the details of the ABAP message server and internal ABAP port. Defaults are 3600 and 3900, respectively. Also provide a host for the transport directory; by default it is the same host where the server is being installed. Change the host if a common transport directory is shared across a single landscape.

- The next screen asks for the media path of SAPCRYPTO. Provide the path; to skip installation, uncheck the option and click Next.

- This step unpacks the components of the SAPCRYPTO library. Select each package to unpack and click Next.

- Next, the installer asks for the SID of the diagnostic agent system. The default is DAA, but you can supply your own and change the destination drive.

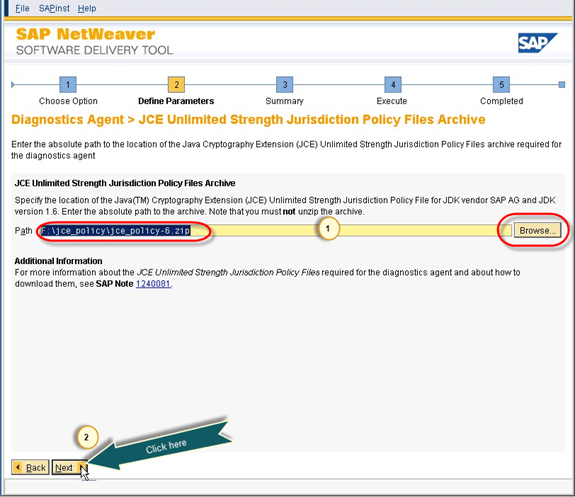
- Provide the media path of the JAVA JCE policy.
- The next screen asks for the diagnostic agent system domain details. To install as a domain, supply the domain name and pick “Domain of the current user” or “different domain”; otherwise select Local Installation, which we picked here.

- This screen asks for the password for the diagnostic agent system. The default is the master password you supplied earlier.

- Next, the installer asks for the instance number of the diagnostic agent system.

- The next screen asks whether to register the system in an existing SLD. SLD is the host where all server details are stored. Registering opens a screen for the host details. We selected “No SLD destination”. Details in figures 49 and 50.


- The installer asks you to unpack the archive for the diagnostic agent system. Check all and click Next.

- This screen lists every parameter selected during the “Define Parameters” phase. Revise the input parameters if needed; once done, click Next.

- This screen asks for the Solution Manager key. You need a unique key for your installation, which you must generate from SAP Solution Manager. After supplying it, click Next.

- Once the Solution Manager key is provided, the remaining installation phases start. The longest is “Import ABAP”. The bottom of the screen shows installation status.


- Once every phase completes successfully, a new window pops up with a message confirming successful installation.

- After installation, log into the system with DDIC and SAP* using SAP GUI and the master password. The SAP IDES server includes clients 000, 001, 066, and 800 by default.
Common SAP IDES Installation Errors and Fixes
Even seasoned SAP Basis administrators hit a few recurring blockers when installing IDES on a local box. Treat the list below as a quick triage checklist before you re-run sapinst.
- Hostname too long: sapinst aborts when the hostname exceeds 13 characters. Rename the server, reboot, and restart the installer.
- Virtual memory exhausted: ABAP import fails with “out of memory” if pagefile is too small. Set virtual memory to three times the physical RAM, or roughly 20 GB.
- JAVA_HOME not set: the installer cannot start the GUI. Confirm JAVA_HOME points at the JDK root and that “java -version” works from cmd.
- MS SQL service stopped: the script “SQL4SAP” fails if the SQL service is not running. Start the MSSQLSERVER service from services.msc.
- Solution Manager key missing: the Central Instance step blocks without a valid key. Generate it in SAP Solution Manager before reaching that screen.
SAP IDES Alternatives for Learners in 2026
SAP IDES EHP6 remains a popular practice system, but in 2026 SAP encourages learners to move to newer, lighter-weight options that do not require a 600 GB local server. The choices below cover most beginner-to-intermediate training goals.
- SAP Cloud Appliance Library (CAL): pay-per-hour images of S/4HANA, BW/4HANA, and IDES-style systems on AWS, Azure, or GCP. No local install needed.
- SAP S/4HANA Fully-Activated Appliance: ready-to-use S/4HANA training instance with sample data, ideal for current functional and Fiori practice.
- SAP Learning Hub: subscription that bundles training plus hands-on system access through the Live Access program.
- ABAP Platform Trial (Docker): a free Docker image of the AS ABAP developer edition for quick ABAP and SAPUI5 practice.
How AI Is Changing SAP IDES Practice
AI tools now sit alongside SAP IDES practice systems for both Basis and functional learners. SAP Joule, the in-product copilot, answers transaction-level questions inside S/4HANA, while external assistants help with ABAP debugging, customization, and exam prep. Used carefully, they shorten the learning curve without replacing hands-on practice.
- SAP Joule: generative AI assistant embedded in SAP Cloud apps, helpful for explaining tcodes and Fiori tiles during practice.
- ABAP code helpers: AI assistants can refactor legacy ABAP, suggest CDS view structures, and explain dumps from ST22.
- Installation troubleshooting: general AI chat models summarize sapinst log errors and point to OSS notes faster than manual searches.
- Practice planning: AI can build a personalized study path mapping IDES modules to your target SAP certification.