
How to Install Java in Ubuntu (Linux)
 Editorial Team
⚡ Smart Summary
Installing Java on Ubuntu takes two clean paths, the apt package manager for OpenJDK or a manual tarball for Oracle JDK, plus a small set of environment variables and update-alternatives commands that make Ubuntu recognise the runtime.
This step-by-step guide explains how to install Java on Ubuntu Linux using two proven routes. The apt package manager delivers OpenJDK in one command, while a manual tarball install lets you pin any Oracle JDK build. The same commands work across recent Ubuntu LTS releases.
How to Install Oracle Java on Ubuntu Linux
The manual Oracle JDK install gives you full control over the exact release and location. The nine steps below wipe any previous OpenJDK build, extract the Oracle tarball, register the binaries with update-alternatives, and verify the runtime version.
Step 1) Before you set up Java, remove the existing OpenJDK or JRE from the system. Run the following command:
sudo apt-get purge openjdk-\*
You will be asked for a confirmation. Enter Y and wait for the uninstall to complete.

Step 2) Check whether the Ubuntu operating system architecture is 32-bit or 64-bit. Run:
file /sbin/init

Step 3) Download the latest Java archive (for example jdk-8-linux-x64.tar.gz) from the Oracle site:
https://www.oracle.com/java/technologies/downloads/
Accept the license agreement and choose the correct build:
- Select x86 for a 32-bit system.
- Select x64 for a 64-bit system.
- Select the tar.gz archive for Ubuntu.
- Select rpm for a Red Hat based system.
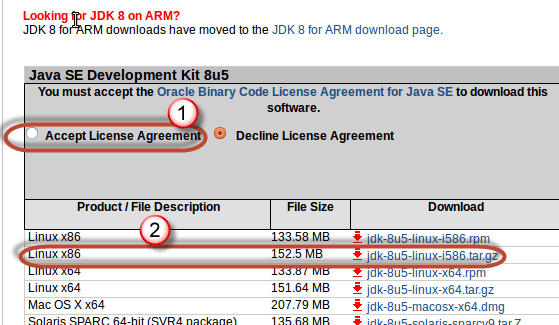
Step 4) Open a terminal and navigate to the folder that holds the downloaded archive. In this tutorial the file lives in ~/Downloads. Extract the archive with:
sudo tar -xvf jdk-8u5-linux-i586.tar.gz
Enter your password if prompted. Once extraction finishes you should see a new jdk1.8.0_05 folder in the current directory.
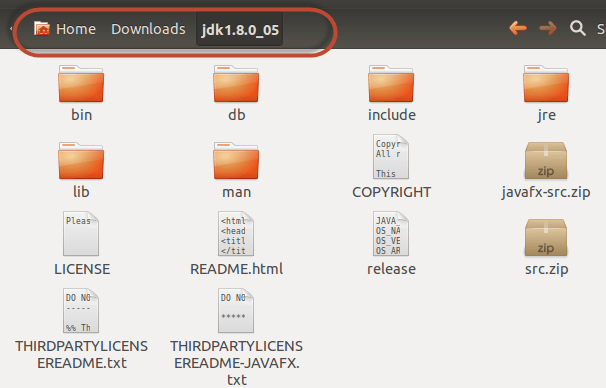
Step 5) Add the following system variables to the end of the /etc/profile file so every login shell picks up the new JDK:
JAVA_HOME=<Directory where JAVA has been extracted>/jdk1.8.0
PATH=$PATH:$HOME/bin:$JAVA_HOME/bin
export JAVA_HOME
export PATH
Open the file with:
sudo nano /etc/profile
Enter the system variables shown above, press Ctrl+X to exit, and press Y to save the changes.
Step 6) Reload the shell environment so the new variables take effect immediately:
. /etc/profile
Step 7) Register the new JDK binaries with Ubuntu’s update-alternatives system so java, javac, and javaws resolve to the Oracle build. Paste the following into the terminal:
sudo update-alternatives --install "/usr/bin/java" "java" "<Directory where JAVA has been extracted>/bin/java" 1
sudo update-alternatives --install "/usr/bin/javac" "javac" "<Directory where JAVA has been extracted>/bin/javac" 1
sudo update-alternatives --install "/usr/bin/javaws" "javaws" "<Directory where JAVA has been extracted>/bin/javaws" 1
Step 8) Tell Ubuntu that the Oracle JDK you just extracted (for example jdk1.8.0_05) is the default Java runtime:
sudo update-alternatives --set java <Directory where JAVA has been extracted>/bin/java
sudo update-alternatives --set javac <Directory where JAVA has been extracted>/bin/javac
sudo update-alternatives --set javaws <Directory where JAVA has been extracted>/bin/javaws
Step 9) Test the installation:
java -version
A successful install prints the version, runtime, and 64-bit HotSpot server VM lines, confirming that the Oracle JDK is now the active Java on your system.
How to Install OpenJDK on Ubuntu Using the apt Package Manager
Most Ubuntu users install OpenJDK instead of Oracle JDK because it ships in the Ubuntu archive, receives security updates through apt, and does not require an Oracle account. OpenJDK is the reference implementation of the Java SE specification and is fully compatible with build tools like Maven, Gradle, and Tomcat.
Step 1) Refresh the package list so apt sees the latest available JDK versions:
sudo apt update
Step 2) Install the default JDK, which is the version currently recommended by Ubuntu:
sudo apt install default-jdk
To install only the runtime (no compiler), use sudo apt install default-jre instead. Both commands automatically pull the latest OpenJDK version supported by your Ubuntu release.
Step 3) To pick a specific OpenJDK version, install it directly by number. Recent Ubuntu LTS releases carry OpenJDK 11, 17, and 21:
sudo apt install openjdk-17-jdk       # LTS release, common default
sudo apt install openjdk-21-jdk       # newest LTS in the archive
sudo apt install openjdk-11-jdk       # older LTS for legacy applications
Step 4) Confirm the installation and check the compiler:
java -version
javac -version
Both commands should print matching version strings such as openjdk version "17.0.11". If several JDK versions are installed, use sudo update-alternatives --config java to interactively pick the default runtime. The same command with javac switches the compiler.
OpenJDK installed via apt lands in /usr/lib/jvm/. That path is what you point JAVA_HOME to when configuring build tools, application servers, or IDEs like IntelliJ IDEA and Eclipse.
How to Set the JAVA_HOME Environment Variable on Ubuntu
Build tools such as Maven, Gradle, Ant, Tomcat, and Jenkins read the JAVA_HOME environment variable to locate the JDK. If JAVA_HOME is missing or points at the wrong version, these tools fail to compile, package, or start. Ubuntu does not set it automatically, so you set it once per user or system wide.
Step 1) Find the actual JDK path. The readlink trick returns the real folder that java resolves to:
readlink -f $(which java)
# example output: /usr/lib/jvm/java-17-openjdk-amd64/bin/java
The JDK home is the folder above the bin directory. In the example that is /usr/lib/jvm/java-17-openjdk-amd64.
Step 2) Set JAVA_HOME for your user only by editing ~/.bashrc:
echo 'export JAVA_HOME=/usr/lib/jvm/java-17-openjdk-amd64' >> ~/.bashrc
echo 'export PATH=$JAVA_HOME/bin:$PATH' >> ~/.bashrc
source ~/.bashrc
Step 3) Set JAVA_HOME system wide (all users) by editing /etc/environment:
sudo nano /etc/environment
# add the following line, save, and exit
JAVA_HOME="/usr/lib/jvm/java-17-openjdk-amd64"
Reload the environment with source /etc/environment or start a new shell for the change to take effect.
Step 4) Verify that the variable is set correctly:
echo $JAVA_HOME
$JAVA_HOME/bin/java -version
The first command echoes the JDK path, and the second command runs the exact java binary that JAVA_HOME points to, confirming both settings agree.
How to Verify, Switch, and Uninstall Java on Ubuntu
Once Java is installed you often need to check the version, switch between multiple JDKs, or remove an older runtime. All three tasks use standard Ubuntu tooling and take only a few seconds each.
Verify the Installed Java Version
Three commands give a complete picture of the current runtime, compiler, and default alternative:
java -version                        # runtime version
javac -version                       # compiler version
sudo update-alternatives --display java   # every registered JDK
If java -version works but javac -version reports “command not found”, only the JRE is installed. Install the JDK with sudo apt install default-jdk to add the compiler.
Switch Between Multiple JDK Versions
If you installed more than one JDK, pick the default interactively with:
sudo update-alternatives --config java
sudo update-alternatives --config javac
Ubuntu prints a numbered list of every registered JDK. Type the number that matches the version you want and press Enter. Repeat the command for javac to switch the compiler alongside the runtime.
Uninstall Java from Ubuntu
To remove an OpenJDK installed via apt, purge the package and clean up unused dependencies:
sudo apt remove --purge openjdk-17-jdk
sudo apt autoremove
To remove an Oracle JDK you extracted manually, delete the folder and unregister the alternative:
sudo rm -rf /opt/jdk1.8.0_05
sudo update-alternatives --remove "java" "/opt/jdk1.8.0_05/bin/java"
After uninstalling, run java -version once more to confirm the removal is complete. The output should either show a different registered JDK or “command not found” if no Java remains on the system.
