
How to Download and Install JUnit in Eclipse
 Thomas Hamilton
⚡ Smart Summary
JUnit installation in Eclipse takes six ordered parts: verify the JDK, download the jars, set environment variables, add the jars to the build path, confirm the libraries, and run a first passing test.
Installing JUnit is a six-part process, explained in detail below — from the Java Development Kit on your machine to a first test that turns the Eclipse bar green.
PART 1) Install Java
JUnit is a testing framework used to test Java based applications. So before installing JUnit, you need to configure or verify the Java Development Kit (JDK) on your machine.
Click this tutorial to download and install Java. Any currently supported JDK release works for the steps that follow; the screenshots on this page were captured on JDK 1.7 and JDK 1.8.
PART 2) Download JUnit
Step 1) Visit junit.org/junit4 and click Download and Install. The link sits in the Welcome column of the JUnit home page, as the arrow below shows.

Step 2) Click junit.jar. The Download and Install link opens the junit4 wiki page on GitHub, and the Plain-old JAR section lists the two jars you need.

Step 3) In the central repository you are shown all versions of JUnit that can be downloaded. Usually, you will select the latest version. Click on the jar link to download JUnit version 4.12 as shown below.

Step 4) Visit the junit4 Download and Install wiki page again. Click hamcrest-core.jar, the second entry in the same list.

Step 5) Download the jar. The hamcrest-core entry opens in the repository, where the jar link starts the download.

For JUnit installation, you need the JUnit jars, and you can download the desired version of the JUnit jar file from the JUnit official website junit.org.
Here is the jars list:
- junit.jar
- hamcrest-core.jar
Version note: the screenshots show JUnit 4.12. JUnit 4 is now in maintenance mode with 4.13.2 as its final release, so the wiki today points junit.jar at 4.13.2 and hamcrest-core.jar at 1.3. New projects use the Jupiter artifact org.junit.jupiter:junit-jupiter instead, which needs no hamcrest jar. Only the file name changes; the steps below do not. See the JUnit test framework tutorial.
PART 3) JUnit Environment Setup
Step 1) You need to set the JUNIT_HOME environment variable to point to the base location where you have placed the JUnit jars.
For example, if you have created a JUnit folder on the C: drive and placed the jars there, then for environment settings you need to open Control Panel -> Advanced -> Environment Variables, and click the New button under System variables.

When you click the New button in Environment Variables, it opens another window.
Step 2) A “New System Variable” window will open:
- Provide the variable name as “JUNIT_HOME”.
- Provide the JUnit value as the JUnit path where you have copied the JUnit jar files.
- Click on OK.
In the capture below the value is the folder C:\Junit4, which is where this walkthrough saved the jars.

When you click OK, it will create a new system variable with the given name and value, which you can verify in the Environment Variables window shown in Step 1.
Step 3) After creating JUNIT_HOME, create another variable with the name CLASSPATH. Again go to Environment Variables and click the “New” button, which opens the same New System Variable window.

Step 4) In this step, point CLASSPATH at the jar placed in the JUnit folder as given below:
- Variable Name: CLASSPATH
- Variable Value: %CLASSPATH%;%JUNIT_HOME%\junit-4.10.jar;.;
- Click on the OK button.
Substitute the exact file name you downloaded: the build path in Part 4 shows this machine using junit-4.10.jar.

Step 5) Once you click the ‘OK’ button, you can verify that a new environment variable named “CLASSPATH” can be seen under System variables. See below.

Note: these two variables only matter when you compile and run tests from the command line. Eclipse ignores the system CLASSPATH and resolves jars from the project build path, which Part 4 configures. Maven and Gradle projects need neither, because the build tool assembles the test classpath for you.
PART 4) Install the JUnit Jar File in Eclipse
Step 1) Right click on the project:
- Click on “Build Path” and then
- Click on “Configure Build Path”.
The Build Path submenu is where every classpath change on a project begins.

Step 2) In this step,
- Go to the Java Build Path window as shown in the figure below
- Now click on the “Add External JARs” button to add your downloaded JUnit.jar file to Eclipse.
After adding the JUnit jar file, click the ‘OK’ button to close the Java Build Path window.

Shortcut: the Add Library… button in the same panel attaches the JUnit library bundled with Eclipse, so a project can reach JUnit 4 or JUnit 5 without any manual download. The manual route still matters when you need a specific version or work offline. Next, write tests with JUnit annotations.
PART 5) Verify the JUnit Jar File in Your Build Path
In order to verify the JUnit jar file in Eclipse, you need to follow the steps mentioned below:
- Right click on the project -> Build Path
- Click on “Configure Build Path”.
This is the same menu used in Part 4, reached from the editor this time.

Step 2) The Java Build Path window will appear as shown below.
In that window, go to the Libraries tab to see all jar files. In the jar file tree view, you need to look for the jar file name that starts with JUnit.
Once you expand the JUnit library, you can see the Java libraries as shown below:

Now you are ready to use JUnit with Eclipse. If this tree shows no JUnit entry, the jar was never attached and every org.junit import in your test classes will fail to resolve.
PART 6) Verify the JUnit Setup
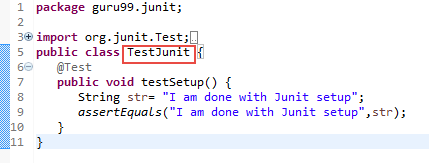
You can create a simple JUnit test to verify the JUnit setup. See the test class below.
Step 1) Create a Java class named TestJunit.java and provide a simple assert statement.
package guru99.junit;

import org.junit.Test;
import static org.junit.Assert.assertEquals;
public class TestJunit {
   @Test
   public void testSetup() {
      String str= "I am done with Junit setup";
      assertEquals("I am done with Junit setup",str);
   }
}
Step 2) Create a Test Runner class to execute the test above.

package guru99.junit;

import org.junit.runner.JUnitCore;
import org.junit.runner.Result;
import org.junit.runner.notification.Failure;

public class TestRunner {
   public static void main(String[] args) {
      Result result = JUnitCore.runClasses(TestJunit.class);
      for (Failure failure : result.getFailures()) {
         System.out.println(failure.toString());
      }
      System.out.println("Result=="+result.wasSuccessful());
   }
}
Step 3) To execute the test, follow the steps below:
- Right click on TestJunit.java and click on “Run As” as shown below
- Another window will open once you click on “Run As”; click on “1 JUnit Test” as shown below:

Step 4) Here is the output or result for your test. If it executes successfully, a green check mark appears in front of it.
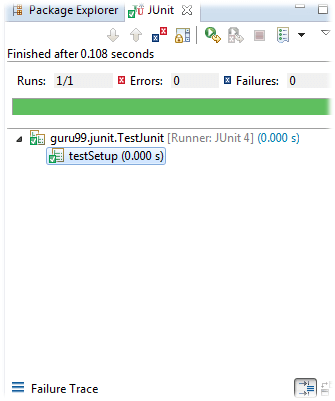
The view reports Runs: 1/1, Errors: 0, Failures: 0 with the runner marked JUnit 4, confirming that the jars, the build path and the test class are wired correctly. A red bar here usually means the jars are missing from the build path. See the JUnit assert reference, and how to create a JUnit test suite.
